The Author – Bart Busschots
Creative Commons
Unless otherwise stated, the content on this site is licensed under Creative Commons Attribution, Noncommercial, No Derivative Works 3.0 License


Nov
8
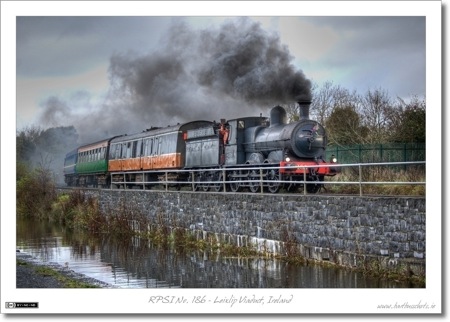
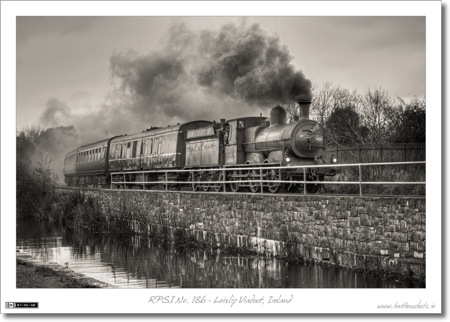
Photo of the Week 89 & 90 – Steam Loco No. 186
Filed Under Photography on November 8, 2009 | 4 Comments
Since I was ill last weekend I’m doing a double-post this weekend. In this case, it’s actually the same shot post-processed in two different ways.
Both shots are of the steam locomotive No. 186 which started it’s life as a mainline locomotive for Ireland’s Great Southern & Western Railway (GS&WR or just GSWR). No. 186 is now lovingly maintained by the Railway Preservation Society of Ireland (RPSI), and gets to stretch it’s legs on various Irish Rail mainlines on steam specials. This shot was taken when No. 186 was pulling the Ghost Train steam special from Dublin Connolly to Mullingar and back to Dublin Connolly. Here we see No. 186 crossing the Leixlip Viaduct on her way out to Mullingar in the morning. You can read more about No. 186 on the RPSI’s Website.
Normally when I tone-map shots I like to keep them looking natural, but in this case I really liked the result of pushing things a little further. The result is still quite natural, but yet also somewhat hyper-real.
The second version uses the first as the base for the conversion to monochrome. Because black and white shots tend to pick up a lot of texture anyway, the hyper-real look of the first version is completely lost in the second. We’re used to Sepia tone shots having this level of texture and detail in them.
You can see all my photos from this steam special in this Flickr Set.
- Camera: Nikon D40
- Lens: Nikon DX AFS 55-200mm
- Exposure: 1/320 sec
- Focal Length: 55mm
- Focal Ratio: f/4.5
- ISO: 400
- Camera Mode: Aperture Priority
- Processing (Version 1): Started by tonemapping a single RAW image in Photomatix Pro, then selectively tweaked the exposure, contrast, and saturation using the Dodge & Burn plugin in Aperture.
- Processing (Version 2): Took the veresion described above as the starting point, then converted to monochrome using the Channel Mixer brick in Apeture, then added a subtle Sepia Tone using the Colour Monochrome brick.
Aug
24
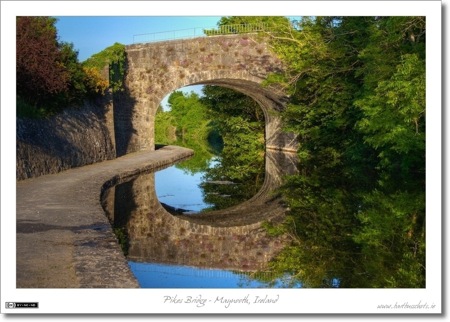
Photo of the Week 79 – Pike Bridge Re-Visited
Filed Under Photography on August 24, 2009 | 1 Comment
If this week’s instalment reminds you a lot of last week’s, that’s no coincidence, this week’s shot is also of Pike’s Brige, and also shot at the same time of day, the so-called golden hour around sunset. There are some marked differences though, last week’s shot was taken into the sun, this week’s is taken with the sun directly behind the camera – meaning this is the opposite side of the bridge. Although the conditions look identical, the shots were actually taken two days apart.
- Camera: Nikon D40
- Lens: Nikon DX AFS 18-55mm (D40 kit lens)
- Exposure: 1/500 sec
- Focal Length: 42mm
- Focal Ratio: f/8
- ISO: 400
- Camera Mode: Aperture Priority
- Exposure Bias: -0.3EV
- Processing: Generated by tonemapping a single RAW file in Photomatix Pro
Aug
16
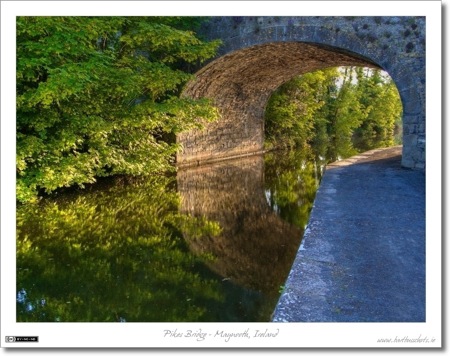
Photo of the Week 78 – Evening at Pike Bridge
Filed Under Photography on August 16, 2009 | 3 Comments
Photography is all about light, and you get some of the nicest light each day in the hours around sunrise and sunset, or the so-called ‘golden hours’. I’m not a fan of early mornings, so, for me, there is only one golden hour each day, but some of my very favourite pictures are taken during that hour, including this one.
I got this photo on an evening when I wasn’t really planning to shoot, I was out getting some much-needed exercise, and brought the camera along ‘just in case’. I’m certainly glad I did. The light was superb, and it’s very rare that the water is this still under the bridge. The dynamic range was very large in this shot so I tonemapped the RAW file in Photomatix Pro to recover both the shadows and the highlights. I have also edited this image for use as a desktop wallpaper on either a standard (4:3) or widescreen (16:10) monitor.
This is Pike Bridge between Maynooth and Leixlip in Co. Kildare, Ireland. It has two arches, one crossing the Dublin to Sligo railway line, and this one crossing the Royal Canal.
- Camera: Nikon D40
- Lens: Nikon DX AFS 18-55mm (D40 kit lens)
- Exposure: 1/80 sec
- Focal Length: 20mm
- Focal Ratio: f/8
- ISO: 400
- Camera Mode: Aperture Priority
- Exposure Bias: -1.0EV
- Processing: Generated by tonemapping a single RAW file in Photomatix Pro
Aug
12
Photo of the Week 77 – Ennis Friary
Filed Under Photography on August 12, 2009 | 1 Comment
This is my 67th Photo of the Week, yet it is only the second monochrome image to make it into the series. I think this is because I absolutely adore colour, and feel rather out of my depth when colour gets extracted from the equation. It took me hours to process this shot the first time, then I got some feed back from people on a few flickr groups, and then it took me another hour or so to have another go and come up with something I not just liked, but liked a lot. Most of the time I only revert to monochrome as a fall-back, but I’m going to try change that, and spend more time experimenting with monochrome precisely because I’m not comfortable with it.
Returning to this image, I reverted to monochrome here because I didn’t have a choice. I had once chance to get a short visit to the priory, so I had to make do with what ever I got – which was mostly rain! At the very end I got a few shots in good sun, but I didn’t have the opportunity to re-shoot this shot in sun because of time pressures. So, what I got was an image with a blown out sky, a flat looking stone building, and almost no colours to speak of. I was either going to bin it, or go monochrome. Determined not to waste the shot, I went for the monochrome option – deciding texture was going to be what I needed to concentrate on – in particular, I wanted to recover details in the sky, and enhance the details in the stonework of the building.
Since I’d shot in RAW I started by tone-mapping the image to recover detail in the sky, and also to enhance details in walls. Then I converted to monochrome using the monochrome mixer in Aperture, before using Aperture’s dodge & burn plug-in to correct some side effects of the tone-mapping and to pick out the spire of the church a little better. After seeking and getting some opinions from others I also used some pretty dramatic levels adjustments to really push up the contrast and really make those textures jump out.
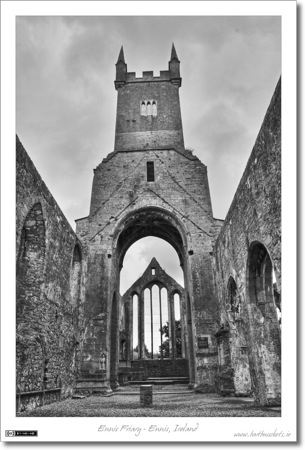
- Camera: Nikon D40
- Lens: Nikon DX AFS 18-55mm (D40 kit lens)
- Exposure: 1/400 sec
- Focal Length: 18mm
- Focal Ratio: f/8
- ISO: 400
- Camera Mode: Aperture Priority
- Processing: Generated by tonemapping a single RAW file in Photomatix Pro, then converting to monochrome in Aperture, dodging & burning in Aperture, as well as applying some other tweaks in Aperture.
Jul
25
What’s the Story with Tonemapping?
Filed Under Photography on July 25, 2009 | Leave a Comment
I’ve become very fond of tonemapping as a photographic technique, and have mentioned it quite a few times in the descriptions of the photos I pick for my Photo of the Week blog posts. The more people see my tonemapped photos, and the more I mention tonemapping on Flickr, the more questions I get about it, so, instead of repeating myself over and over again, I figured I may was well just write an article about it that I can then link people to.
Lets start with some background, particularly with the concept of the dynamic range of a scene. You hear the term a lot, but I get a feeling a lot of people are not sure what it means. The simplest way I can describe it is as the difference between the brightest objects in the scene, and the darkest objects in the scene. Our eyes have quite a large dynamic range, at mid-day on a sunny day we can see both the things illuminated by the sun, and the things in shadow at the same time. Try that with a camera, and you’ll soon find that cameras have a much smaller dynamic range than our eyes. You’ll either end up with no detail in the shaded bits, or no detail in the bright bits, but try as you might, you won’t capture both! This is not a new problem, although it has gotten worse. Film has a bigger dynamic range than the JPEG images that come out of our digital cameras, but even film has a signifficatly smaller dynamic range than our eyes.
Nov
29
Photomatix Pro – First Impressions
Filed Under Photography, Computers & Tech on November 29, 2008 | 4 Comments
 Anyone who’s been following this blog for a while will know that I’ve been experimenting with HDR for most of this year. I started off with the cheapest solution I could find so that I could be sure I really wanted to go down this road before spending a lot of money on more professional software. It can’t be denied that I got some good results with the process I’ve been using until now, but I was never completely happy with the results. In particular the level of haloing was really starting to annoy me. Today I bit the bullet and spent $99 (about €80) on the stand-alone version of Photomatix Pro from HDR Soft. The reason I went for the standalone version is that I don’t have photoshop and am not planning to buy it any time soon (probably never as long as it costs extortionate amounts of money). I haven’t had much time to play with it yet but I though I’d share some of my initial thoughts and results.
Nov
2
Photo of the Week 37 – Laraghbryan Church
Filed Under Photography on November 2, 2008 | 1 Comment
The ruins of Laraghbryan Church are set amidst an old graveyard and next to a modern grave yard. The whole lot is surrounded by high trees so although the church is only a few hundred yards from the road, many people drive by every day without ever realising the wonders hidden behind those trees. Because of the trees though it’s very hard to get a good shot of these ruins so I’ve had to resort to HDR to even have a chance. I’ve taken a lot of shots of these ruins and I’ve settled on this one as my favourite because of the nice shadows being cast across the church.
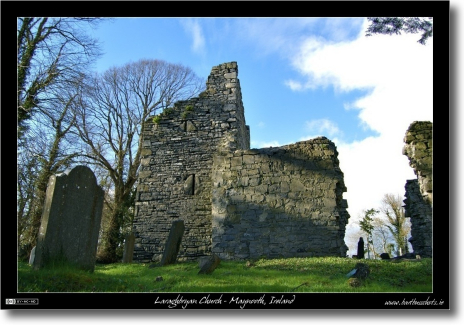
For those of you interested in such things, here are the technical details of this shot:
- Camera: Nikon D40
- Lens: Nikon DX AFS 18-55mm (D40 kit lens)
- Focal Length: 18mm
- Focal Ratio: F5.0
- ISO: 400
- Camera Mode: Aperture Priority
- Three Brackets:
- Exposure Bias: 0.0 (Exposure: 1/800 sec)
- Exposure Bias: -1.0 (Exposure: 1/1600 sec)
- Exposure Bias: 1.0 (Exposure: 1/400 sec)
Apr
10
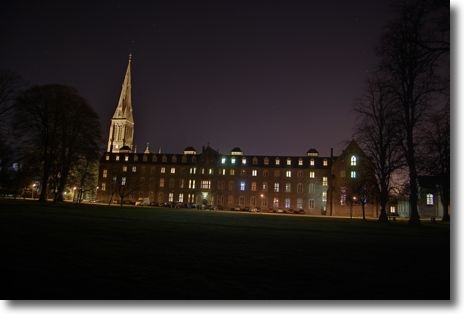
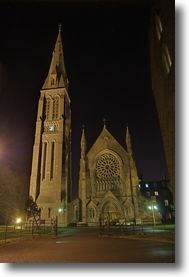
HDR at Night
Filed Under Photography on April 10, 2008 | 5 Comments
Continuing my experimentation with HDR photography I had a go shooting night-scenes in HDR. Since buildings at night tend to have a very high dynamic range I figured I should get better results with HDR than without. I certainly wasn’t wrong. What you do have to bear in mind is that exposures will be long and you’ll need a lot of them. I actually pushed the camera as far as it would go in both directions of exposure compensation to get some of these shots. The sample below is composed of 7 exposures, the longest being 10 seconds, but for a few of the shots some component exposures went as high as 30 seconds.
What I do really need to learn though is to check that my tripod is level before shooting! What should have been my favourite image from the night was spoiled a little by a sloping horizon. I’ve included it below regardless because it still shows the potential pretty well.
You can see all my shots from Tuesday night in my gallery (not all are HDRs but all HDRs are tagged and labelled as such).
[tags]HDR photography, nigth-time photography[/tags]
Apr
8
HDR Revisited
Filed Under Photography on April 8, 2008 | 5 Comments
 Since I wrote my article on HDR a few weeks ago myself and Allison also discussed it on our Chit-Chat Across The Pond segment on the NosillaCast. When just talking about it left quite a few listeners a little confused Allison asked me to screen cast my workflow for creating an HDR image. I made it clear in my original article and on the NosillaCast that I was just describing my way of doing HDR, and that I wasn’t claiming it was the best way, or the right way. I also included quite a few examples of images produced with my workflow in my original article so people could clearly see the kind of results my workflow can generate. Since writing that original article two new and interesting pieces of information have come my way so I thought I’d re-vist the topic to expand on it a little.
[tags]HDR, Photography[/tags]
Mar
18
HDR with a Nikon D40, Bracketeer & iPhoto
Filed Under Photography, Computers & Tech on March 18, 2008 | 23 Comments
 I’m no expert on HDR but since I spent most of my weekend playing with it now seems like a good time to write about it, while it’s all nice and fresh in my mind and all that. One of the first things I noticed when I started shooting DSLR is that the dynamic range of the camera was a lot narrower than the dynamic range of my eyes. I didn’t know it was called dynamic range back then but that’s not really the point. When a scene has a big range in brightness between the brightest parts and the darkest parts then it’s said to have a high dynamic range. Our eyes are quite good in those situations, DSLRs on the other hand are terrible at capturing them. On a sunny evening when the sun is low in the sky casting shadows all over the place you can still see just fine but a DSLR gets into all sorts of trouble.
[tags]HDR, Nikon, Bracketeer, iPhoto[/tags]