The Author – Bart Busschots
Creative Commons
Unless otherwise stated, the content on this site is licensed under Creative Commons Attribution, Noncommercial, No Derivative Works 3.0 License


Mar
18
HDR with a Nikon D40, Bracketeer & iPhoto
Filed Under Computers & Tech, Photography on March 18, 2008 at 1:09 am
 I’m no expert on HDR but since I spent most of my weekend playing with it now seems like a good time to write about it, while it’s all nice and fresh in my mind and all that. One of the first things I noticed when I started shooting DSLR is that the dynamic range of the camera was a lot narrower than the dynamic range of my eyes. I didn’t know it was called dynamic range back then but that’s not really the point. When a scene has a big range in brightness between the brightest parts and the darkest parts then it’s said to have a high dynamic range. Our eyes are quite good in those situations, DSLRs on the other hand are terrible at capturing them. On a sunny evening when the sun is low in the sky casting shadows all over the place you can still see just fine but a DSLR gets into all sorts of trouble.
[tags]HDR, Nikon, Bracketeer, iPhoto[/tags]
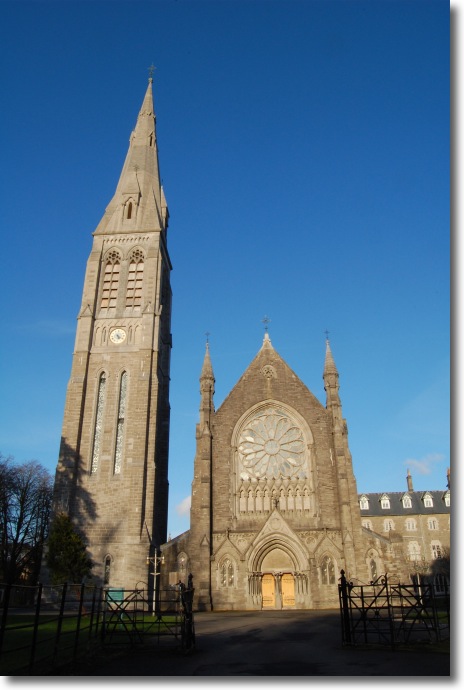
When you try to shoot a scene with a high dynamic range with a DSLR you have to choose whether to over-expose the bright bits or under-expose the shadows. If you go with the former option then all the detail will be lost in the bright bits, if you go with the latter all the detail will be lost in the dark bits. Your best bet is often to half the damage and blow out the brightest of highlights and drown out the darkest of shadows leaving most of the scene properly exposed, well, hopefully enough of it for the shot to look passable anyway. The photo below illustrates the problem well. Push up the exposure anymore and the subject of the photo gets drowned out but the bottom of the image is horribly underexposed.
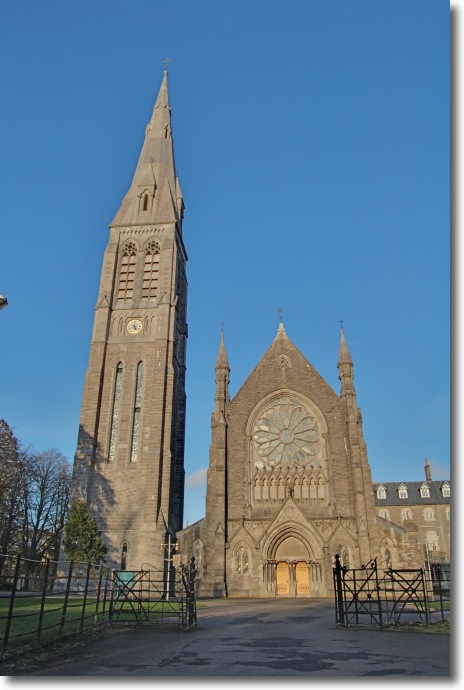
The reality is that there are entire types of shot that a DSLR just can’t handle. You can choose to accept this and just ignore those kinds of shots, or you can work a little harder and get around the problem by taking multiple shots with different exposures and then combining the lot into a single shots with all the data. That’s what HDR imaging is all about. Below we have the same scene as above but this time as an HDR. Notice how the shaded areas of the scene are now perfectly visible.
There’s two distinct steps to producing an HDR image. The first is to combine the multiple shots into a single image and the second is to tweak the display of that image to actually show all the data in a sensible way. The last part is the hard part and is called Tonal Mapping.
You’re always going to have to tweak the tonal mapping yourself to get the shot looking exactly like you want it, however, combining all the shots into one is something your camera can help you with. Many modern cameras now allow you to bracket exposures. This means that you click the shutter once and the camera takes three or five shots one after the other through a range of exposures centred on the one you took. This gives you your exposure plus or minus one or two f-stops. A few really fancy cameras will even combine those exposures for you into a single file. However, the Nikon D40 does neither of these things so you have to do it all yourself. Don’t let that put you off though, you can still use your D40 for HDR shots.
I’m not saying the way I chose to do HDR is the only way or even the best way but it does work. To get started with HDR You’ll need the following:
- Your Camera
- A tripod
- Software for assembling the HDR (I use Bracketeer)
- Software for tweaking the tonal mapping (I use iPhoto 7 – the one that comes with iLife ’08)
If you’re a Mac user with a recent Mac then you’ll already have the latest version of iPhoto so all you’ll need to buy in terms of software is Bracketeer which costs just under $20. There are loads of other options for the software end of things and they are well explained in Episode 9 of the TWIP Podcast.
Since the D40 doesn’t support bracketing you’re going to have to adjust the settings manually between each shot. That’s why a tripod is an absolute must. If you have a camera that supports bracketing and a steady hand you can get away without the tripod but not with the D40. The simplest way to do this is to put the camera into Aperture Priority mode (A) and then adjust the exposure compensation between each shot. First you shoot the main shot and then you shoot the brackets. To do this you hold down the compensation button (the one with the +- sign on it next to the info button) and turn the thumb wheel three clicks to the left, shoot, then turn six clicks to the right, shoot again, and finally turn three clicks to the left so you leave it back on 0. This should give you your central shot with no exposure compensation, a shot with a compensation of +1 and a shot with a compensation of -1. If your scene has a very big range you can take 5 or even 7 shots continuing to bracket in additional increments of 1 in each direction.
That’s all you can do ‘out in the field’. Next you have to transfer the files to your computer and import them into whatever software you are going to use to combine the bracketed exposures into single files. I used Bracketeer so I’m going to show you how to do that. First you launch Bracketeer, then you drag-and-drop in your images. At this stage you get a preview and a closeup preview. Even when using a tripod my source images were never perfectly lined up so I start each time by clicking the Auto Align Source Images button and let it do that with it’s default settings. Then you click on the Enfuse It! button to combine all the exposures into a single TIF file. I then use Preview to convert that TIF back into a JPEG to save disk space. The reason I use Preview for this is to preserve the EXIF data which Bracketeer preserves for you.
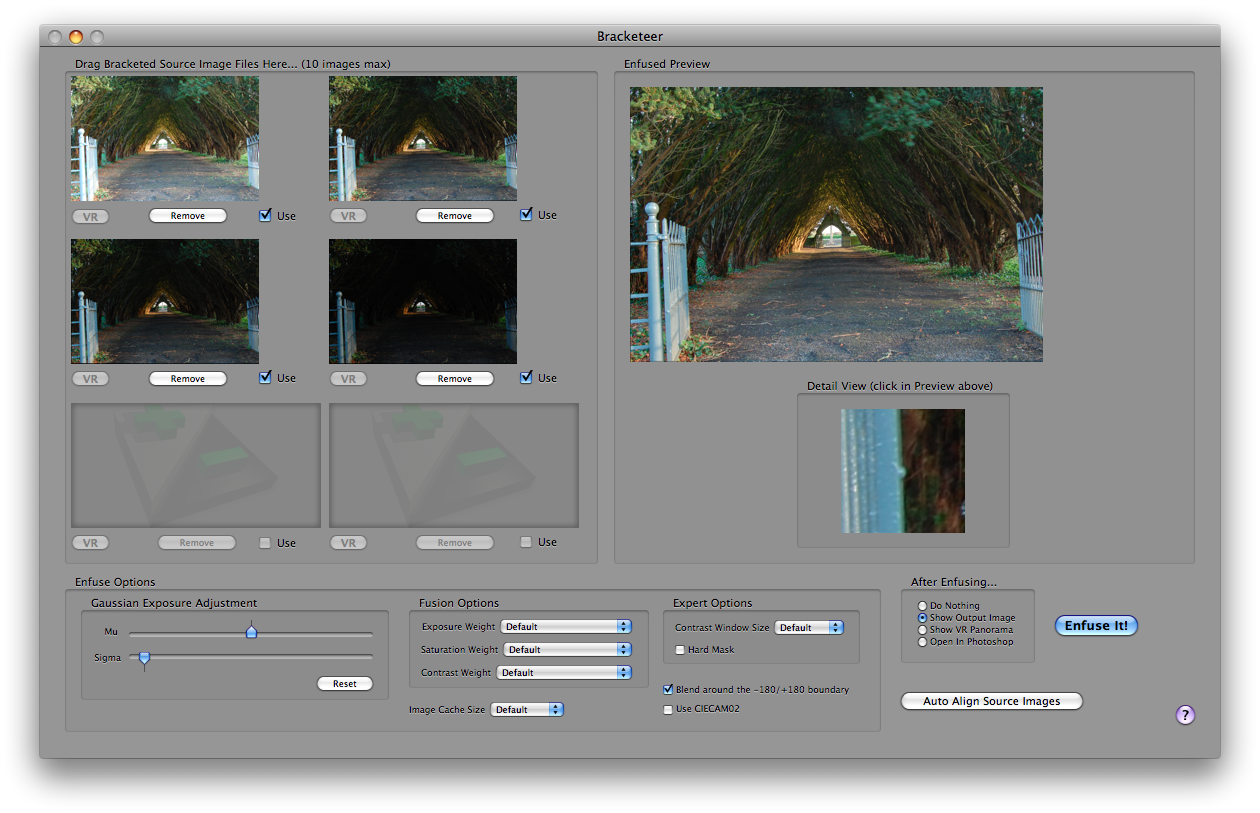
Bracketeer Screen Shot (Click to see Full-Size)
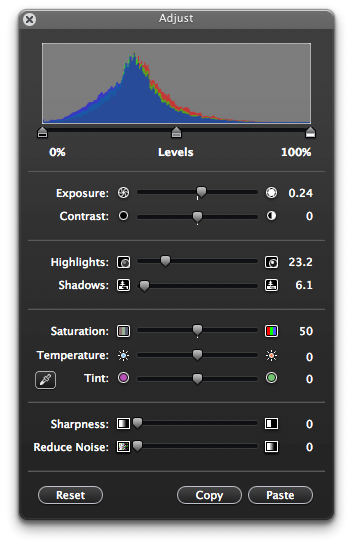
It’s this JPEG that you then import into your iPhoto library to tweak the tonal mapping. Bracketeer will have had a go at the tonal mapping but it won’t be perfect. HDRs often have rather washed out colours, the Enhance button in iPhoto often does a good job of combating that. Then it really all comes down to playing with three sliders in the iPhoto Adjust pallet. To brighten or darken the entire image use the Exposure slider, to brighten the dark regions use the Shadows slider, and to darken the brightest regions use the Highlights slider. You can use these same sliders on regular images but since regular images simply don’t have enough data the image gets noisy very quickly, with a HDR image the data is all there so you can do very dramatic edits with these sliders.
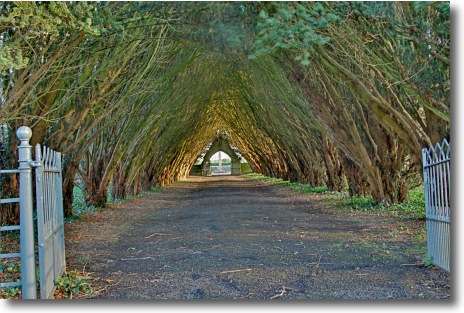
You can use HDR in two ways. You can go for the subtle approach where you simply user HDR to compensate for the short-comings of DSLRs and get a shot that looks something like what you’d see with your eyes, or you can really push things and show more detail than your eyes could see. The latter approach tends to result in images that look very other-worldly but they can be very nice none-the-less. There’s a sample of each kind of image below and you can see all the HDRs I look over the weekend here.
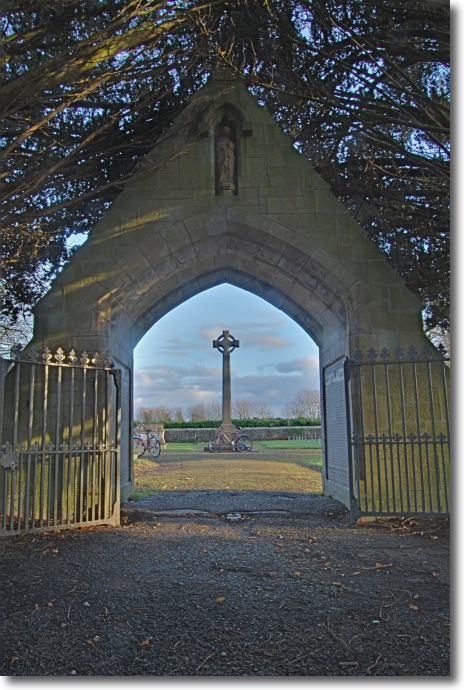
This is an example of a more natural shot. The dynamic range here is not more then the human eye would see.
This is a more psychedelic shot, though they do get much more dramatic than this. The dynamic range here is greater than what the human eye can see.
Typo paragraph 2 line 1. It says : When you try to shoot a scene with a high dynamic range with a DSRL you have to. It should say : When you try to shoot a scene with a high dynamic range with a DSLR you have to.
You mistyped DSLR.
Connor
Thanks for that Connor, fixed now.
Bart.
Great photos and even better explanation! Wish I had a D40!
I just recently bought a Nikon D40x without noticing that it didn’t bracket exposures. I was planning on using the Tonal Mapping feature of Photoshop, but will investigate using Enfuse. Thanks~
[…] HDR with a Nikon D40, Bracketeer & iPhoto […]
Great photos! Bracketeer is an excellent program and I like the results – so much more realistic than other HDR programs. Version 3.1 now does image alignment so correcting for small shifts with tripod or handheld shots is possible. I have some indoor (cathedral) examples on my photoblog, A Momentary Light – see website link above.
Although the D40 doesn’t have AEB, the RAW file is usually overlooked
A JPG file has 8 bits of light intensity (256 levels), but a RAW file store all the light levels the sensor can see with 12 bits (4096 levels). So, for example, if you use Ufraw or Rawstudio to slide the exposure of a RAW file from -3EV to +3EV, basically you are seeing all the exposures as if you were bracketing. When the camera convert a RAW to a JPG file, basically it has to pick a small window within that high dynamic range to save, so are we.
Thus, unless you need to bracket more than +/- 3EV, a RAW file is just enough. This is an advantage in case where the object changes in between frames which make it impossible to perform bracketing.
In detail, I wrote a shell script that use ufraw to extract 5 photos from a RAW file at different exposures: -3, -2, -1, 0, 1, 2, 3 then feed them all to enfuse. Usually the scrip takes about 1.5 minutes to finish. However, I still have to post-processing the enfused photos.
Hi Silly One, would you maybe share your script with me? 🙂
ups, my email adresse (fbeutell (at) yahoo ( punkt ) de
Can’t you just load the TIFF image into iPhoto and skip the whole jpeg conversion with Preview.app?
Hi Dan,
You can indeed. If you do that you retain a little more data but loose a lot of hard drive space, 23MB per image with my D40. I’d suggest lossless JPEG-2000 as a good alternative, seems to hold the identical data but about a fifth the file size.
Bart.
Could you go into more detail about the specific setup used for the D-40. Isn’t there more to do to ensure auto settings don’t override during exposures.
Things like…
Auto ISO
AE Lock
AF Lock
Auto WB
and the like.
Thanks
Hi Phil,
All I do is put the camera in aperture priority mode, set the ISO to manual, set the white-balance to manual and then bracket using the exposure compensation. Unlike a panorama the scene doesn’t change between shots so you don’t need AE lock or AF lock.
If you have any more question feel free to post back.
Bart.
The D40 also does image overlay in camera. I have only messed with it a little bit. It works on two pictures but then you can overlay a third with the output of the previous two overlays. All done in camera.
if you want to hack a bit, you can just use ‘enfuse’ – the command line utility bracketeer is based on (and where all the real magic happens anyway).
combine it with the iphoto plugin from below:
http://www.n8gray.org/code/scriptexport/
create a few simple shell scripts, and then the whole process is automated. you just select the multiple exposures in iphoto, run “export..” and the final image is created on your desktop (or wherever)
here are the 3 scripts i created for scriptexport:
enfuse-pre.sh:
#!/bin/sh
# create a working dir (make sure it’s empty first)
rm -rf ~/Desktop/enfuse-working &1>/dev/null &2>&1
mkdir ~/Desktop/enfuse-working
enfuse-per.sh:
#!/bin/sh
cp “$iPImagePath” ~/Desktop/enfuse-working
enfuse-post.sh:
#!/bin/sh
#process the images, putting a timestamp on output file
/path_to_enfuse/enfuse -o /path_to_put-result/enfused-`date “+%Y-%m-%d_%H:%M:%S”`.jpg ~/Desktop/enfuse-working/*
#remove the working files
rm -r ~/Desktop/enfuse-working
Thanks blobo!
Bart.
Great photos anymore to enjoy
Thanks Donal! my full archive is online at http://www.bartbusschots.ie/gallery and I upload some of my better stuff to flicker at http://www.flickr.com/photos/bbusschots/
Bart.
Don’t have I photo 08. Instead I have Iphoto 05. I can’t seem to upload it to Iphoto 05 I have changed it to jpeg. I’m new to this please help anyone.
Hi Nick,
I don’t actually remember back to iPhoto ’05 very well, but you should be able to import the image using File -> Import to Library or something like that. The image editing controls in ’05 were very poor though, so you probably won’t have enough control to do anything particularly interesting with the HDR in there.
Bart.
Hello Bart,
Nice article and pictures. I own a D40 and would like to know if I can shoot in RAW mode or it is better to use JPEG? Thanks
Best regards
Hi Ganesh – by all means shoot RAW for this kind of thing or for any kind of thing! I wrote this article quite a while ago, before I made the big switch to RAW. I shoot RAW all the time now, and also do a lot of HDR stuff from just a single RAW, it can work really well with moving subjects.
Bart.
So glad I stumbled upon this, it explained much that I’ve struggled with. Thanks.