The Author – Bart Busschots
Creative Commons
Unless otherwise stated, the content on this site is licensed under Creative Commons Attribution, Noncommercial, No Derivative Works 3.0 License


Apr
8
HDR Revisited
Filed Under Photography on April 8, 2008 at 1:02 am
 Since I wrote my article on HDR a few weeks ago myself and Allison also discussed it on our Chit-Chat Across The Pond segment on the NosillaCast. When just talking about it left quite a few listeners a little confused Allison asked me to screen cast my workflow for creating an HDR image. I made it clear in my original article and on the NosillaCast that I was just describing my way of doing HDR, and that I wasn’t claiming it was the best way, or the right way. I also included quite a few examples of images produced with my workflow in my original article so people could clearly see the kind of results my workflow can generate. Since writing that original article two new and interesting pieces of information have come my way so I thought I’d re-vist the topic to expand on it a little.
[tags]HDR, Photography[/tags]
Firstly, Victor Cajiao of the Typical Mac User Podcast and a commenter on my blog pointed out that there is way to take HDRs on the Nikon D40 without needing to take multiple exposures. You simply shoot in RAW and then export the same RAW file to JPEG at different exposure settings. Since the RAW file contains a lot more data than a JPEG does this should work for at least plus or minus one stop and perhaps even for more. I haven’t tested the idea yet but I’ve seen some good results produced that way on the TWIP Flickr group.
Secondly we come to a somewhat controversial point-my choice to convert the TIFF file produced by Bracketeer to a JEPG before importing into iPhoto. I did this for one very simple reason, I have a serious space shortage on my MacBook Pro, so I simply can’t afford to have 25MB TIFFs lying around when I can get sufficient data from a 3MB JPEG. Some people have commented that this is an insane thing to do because it means I’m un-doing all the good work I did with Bracketeer. This is not so. Yes, I am loosing some data, but I am keeping a lot more than I had to start with.
As a scientist I figured the natural way to investigate this issue was with an experiment. I took five exposures, combined them in Bracketeer to produce an HDR TIFF. As well as keeping this TIFF I also converted it to JPEG and JPEG-2000 format. I also used the best of the five original shots as a control point to make sure I was actually getting something substantial out of this whole HDR thing. I imported all four images into iPhoto and tone maped them all as best I could.
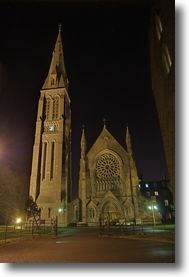
As I suspected the non-HDR image just couldn’t be turned into anything descent. Despite my best efforts the image below was the best I could do:
Next I worked on the regular JPEG. If my strongest critics were correct then I shouldn’t be able to do any better with this image. If I was correct in my assumption that I was still retaining sufficient information despite the JPEG conversion, then this image should turn out markedly better than the control. I have to say I think it did, but judge for yourself:
Thirdly I moved on to the TIFF file. Given the fact that TIFFs can store data with a higher dynamic range than JPEG you’d expect the TIFF to be better. It certainly was to some extent. The adjustments needed on the sliders were much more subtle with the TIFF than with the JPEG, however, the results were quite similar. The images look about the same except that the JPEG looks a little over-sharpened because I had to push the shadows and the highlights significantly further. The fact that I had less manipulation to do to the TIFF resulted in a slightly more natural look. The improvement is quite subtle though:
Finally we come to the JPEG-2000 image. This image is about one fifth the size of the TIFF when saved as lossless but appears to contain the identical information. When I apply the identical edits I get exactly the same result. Judge for yourself:

The conclusion I draw from this that the best option is to convert the TIFF to a JPEG-2000 image with Preview.app, making sure to slide the slider all the way up to “loss less” so that you don’t introduce any JPEG artifacting. Keeping the enfused file as a TIFF appears to be a waste of space, at least according to my experiment.
Using only one RAW to create HDR photos is very bad practice imho. You can get more data, but what’s seriously overblown is gone, as well as extremely dark parts.
These parts will only come out good with at least 3 photos. By the way, I’m seriously thankful for the 3-image-brackaeting of my D80 😉
I’m just glad Bracketeer is VERY good a lining up multiple hand-held images into a single HDR.
I agree with you that using a single RAW for HDR is not great but I look at it as a good way of getting the most out of a single image. Sometimes you don’t set out to take an HDR but when you get home you wish you had. In that situation it’s not a bad alternative.
Bart.
Hi Bart,
thanks for doing that revision on HDR. I still have my doubts on whether I would be really able to manage that using handheld shots with my cam nor could I really identifiy any real subject to try on yet… but it still sounds very interesting and I really have to give it a try.
[…] some concerns Frank Jones brought up. Bart’s scientific experimental results are available at bartbusschots.ie/blog/?p=744. Bart’s RDP instructions for Windows are at bartbusschots.ie/blog/?p=748 and Bart finds a […]
[…] of money on more professional software. It can’t be denied that I got some good results with the process I’ve been using until now, but I was never completely happy with the results. In particular […]