The Author – Bart Busschots
Creative Commons
Unless otherwise stated, the content on this site is licensed under Creative Commons Attribution, Noncommercial, No Derivative Works 3.0 License


Jul
25
Photographing at Dusk – My Approach
Filed Under Photography on July 25, 2014 | Leave a Comment
As with everything in photography, there are an infinity of right ways of capturing that wonderful light you get just before and just after sunset. This is a description of the workflow I’ve settled on after much experimentation. It works for me, and it gives me shots with a look and feel that I like – largely realistic, but with a touch of artistic license to try capture the feel as well as the physicality of the light.
I put a lot of effort into processing my dusk shots, but, my aim is to end with a final product that doesn’t look like it’s been heavily processed. There are two reasons so much processing is needed on these kinds of shots:
- High Dynamic Range – Our eyes have a much greater dynamic range than our screens or a JPEG image can represent, and at dusk, the dynamic range is well beyond what a JPEG can represent, so what our eyes seen, and what you get straight out of a digital camera look very very different indeed.
- Mixed White Balance – Dusk scenes almost always involve mixed white balances across the scene. If you balance for the sky, the ground is usually wrong, if you balance for the ground, the sky will usually be wrong.
Shooting at dusk is all about dealing with these two problems.
May
15
In Defence of HDR & Tonemapping
Filed Under Photography, Computers & Tech on May 15, 2011 | 9 Comments
I posted the shot below to Flickr yesterday, and it generated a lot of attention, as well as a thought-provoking comment asking, without being at all rude, if HDR was really photography, or if it was something else, perhaps graphic art? This sparked a bit of a discussion in the comments on the photo, but it also lit a fire under my backside to do something I’ve been meaning to do for literally years – to lay out exactly why I feel strongly that HDR is every bit as valid a photographic technique as any other. Indeed, HDR is just the latest in a very long trail of techniques throughout history for dealing with high-dynamic range situations, stretching back to the very dawn of photography.
Feb
7
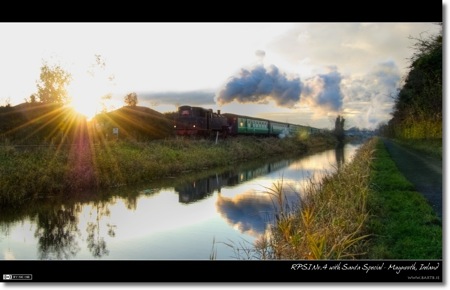
Photo of the Week 102 & 103 – 2009 RPSI Santa Specials
Filed Under Photography on February 7, 2010 | 1 Comment
Each December the Railways Preservation Society of Ireland (RPSI) run a series of special excursions called Santa Specials. The trains run from Dublin’s Pearse Station to Maynooth and back, and are usually pulled by Steam Locomotive No.4. For three weekends in December there are up to three trips a day on Saturdays and Sundays, so lots of fantastic opportunities to get some shots of steam in action on Irish rails. This year there was a slight hitch on one of the days though, No.4 broke down on the last run on one of the Saturdays, so a Northern Irish Rail diesel loco had to fill in for the runs on the following Sunday, but by the next Saturday No.4 was back in action and was able to finish out the rest of the runs.
Since I missed posting a photo last week this is a double week, and I’ve chosen my two very favourite shots from last December’s season of Santa Specials. I have to say I really found it hard to pick just two, I’m really happy with quite a few of my shots from the month. If you want to see more than just these two shots I’ve created a set on Flickr with my best shots.
So, on to the first shot, in this case we see No.4 leaving gathering speed as it leaves Maynooth on the return leg back to Dublin Pearse. One thing you’ll note here is that the train appears to be going backwards, or “bunker first”. This is true, except it was designed to run just as well in both directions, so arguably there is no such thing as backwards. It’s this ability to run in either direction that made No.4 such a useful engine during it’s working life, because it could run to stations that didn’t have turntables for turning engines around. In the past all major stations had to have turntables, but very few of those now remain, and Maynooth never even had one because it only became an important station in the 1980s when it became the terminus for the new Western Commuter service out of Dublin.
- Camera: Nikon D40
- Lens: Nikon DX AFS 18-55mm (D40 kit lens)
- Exposure: 1/30 sec
- Focal Length: 18mm
- Focal Ratio: f/11
- ISO: 200
- Camera Mode: Shutter Priority
- Processing: This shot was generated by tonemapping the original RAW file with Photomatix Pro, and then using layer masks in Pixelmator to selectively blend it with the original to merge the best elements from both versions of the shot into the final image.
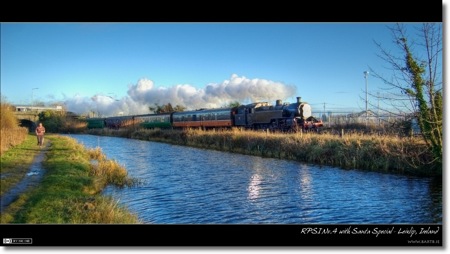
The second shot I chose shows No.4 on it’s way out to Maynooth running forwards. In this case the shot was taken in Leixlip just outside Leixlip-Louisa-Bridge station. This was No.4’s second run of the day, and this run had the best weather of any of this season’s runs.
- Camera: Nikon D40
- Lens: Nikon DX AFS 18-55mm (D40 kit lens)
- Exposure: 1/800 sec
- Focal Length: 18mm
- Focal Ratio: f/3.5
- ISO: 200
- Camera Mode: Aperture Priority
- Exposure Bias: -1.0ev
- Processing: This shot was generated by tonemapping the original RAW file with Photomatix Pro.
Jan
10
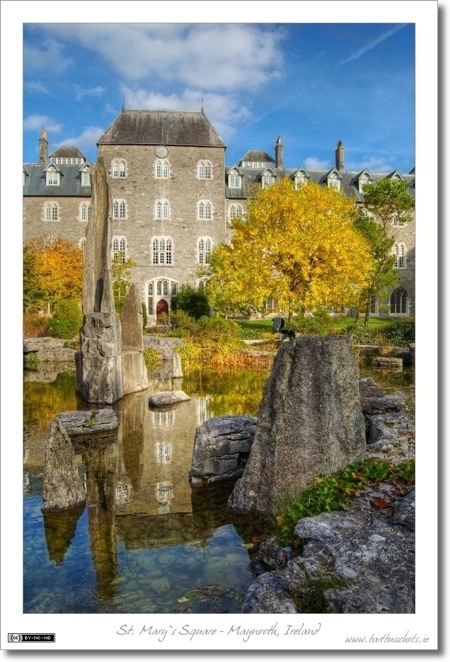
Photo of the Week 99 – St. Mary’s Square in Autumn
Filed Under Photography on January 10, 2010 | 6 Comments
I’ve gotten quite behind at processing my shots – so this week I finally finished the last of my Autumn shots for 2009. With them all edited and tagged I could choose my very favourite shot of the season, and here it is! I just love this place, the buildings are amazing, and the water garden inside the square is amazing. I’ve taken many shots in here, and very few of them capture the coolness of the place, but I think this one comes close. I’m also a sucker for reflections and vibrant colours, all the more reasons to pick this as my favourite!
- Camera: Nikon D40
- Lens: Nikon DX AFS 18-55mm (D40 kit lens)
- Exposure: 1/200 sec
- Focal Length: 18mm
- Focal Ratio: f/11
- ISO: 200
- Camera Mode: Aperture Priority
- Exposure Bias: -1.0ev
- Processing: Single RAW image first tonemapped with Photomatix Pro, then tweaked with the Dodge & Burn plugin in Apple’s Aperture
Dec
27
Photo of the Week 96 & 97 – The Beauty of Winter
Filed Under Photography on December 27, 2009 | 1 Comment
With the silly-season in full swing it’s probably no big surprise that I find myself a week behind again, so another double post this week. This time I decided to choose a seasonal topic – winter scenes. As it happens both these shots were taken on the same day, the 3rd of February this year. It started to snow in the late afternoon, stopped in time to get some lovely day-time shots, and then the sky cleared to give a dramatic sunset over the snow-covered landscape. A photographer’s dream, and this afternoon has already supplied two pervious Photos of the Week (50 “Braving the Snow” & 52 “Fire & Ice”).
- Camera: Nikon D40
- Lens: Nikon DX AFS 18-55mm (D40 kit lens)
- Exposure: 1/50 sec
- Focal Length: 26mm
- Focal Ratio: f/8
- ISO: 800
- Camera Mode: Aperture Priority
- Camera: Nikon D40
- Lens: Nikon DX AFS 18-55mm (D40 kit lens)
- Exposure: 1/100 sec
- Focal Length: 34mm
- Focal Ratio: f/8
- ISO: 800
- Camera Mode: Aperture Priority
- Exposure Bias: -1.0ev
- Processing: Single RAW image first tonemapped with Photomatix Pro, then tweaked with the Dodge & Burn plugin in Apple’s Aperture
Nov
8
Photo of the Week 89 & 90 – Steam Loco No. 186
Filed Under Photography on November 8, 2009 | 4 Comments
Since I was ill last weekend I’m doing a double-post this weekend. In this case, it’s actually the same shot post-processed in two different ways.
Both shots are of the steam locomotive No. 186 which started it’s life as a mainline locomotive for Ireland’s Great Southern & Western Railway (GS&WR or just GSWR). No. 186 is now lovingly maintained by the Railway Preservation Society of Ireland (RPSI), and gets to stretch it’s legs on various Irish Rail mainlines on steam specials. This shot was taken when No. 186 was pulling the Ghost Train steam special from Dublin Connolly to Mullingar and back to Dublin Connolly. Here we see No. 186 crossing the Leixlip Viaduct on her way out to Mullingar in the morning. You can read more about No. 186 on the RPSI’s Website.
Normally when I tone-map shots I like to keep them looking natural, but in this case I really liked the result of pushing things a little further. The result is still quite natural, but yet also somewhat hyper-real.
The second version uses the first as the base for the conversion to monochrome. Because black and white shots tend to pick up a lot of texture anyway, the hyper-real look of the first version is completely lost in the second. We’re used to Sepia tone shots having this level of texture and detail in them.
You can see all my photos from this steam special in this Flickr Set.
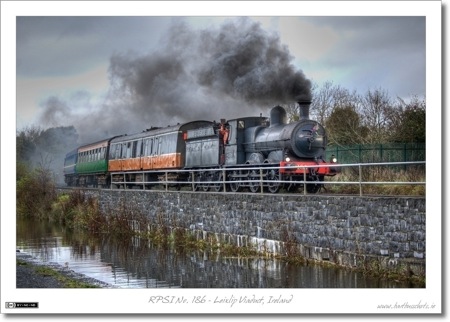
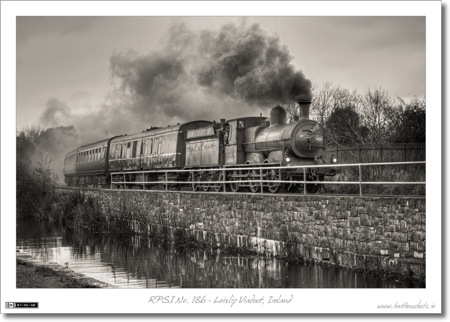
- Camera: Nikon D40
- Lens: Nikon DX AFS 55-200mm
- Exposure: 1/320 sec
- Focal Length: 55mm
- Focal Ratio: f/4.5
- ISO: 400
- Camera Mode: Aperture Priority
- Processing (Version 1): Started by tonemapping a single RAW image in Photomatix Pro, then selectively tweaked the exposure, contrast, and saturation using the Dodge & Burn plugin in Aperture.
- Processing (Version 2): Took the veresion described above as the starting point, then converted to monochrome using the Channel Mixer brick in Apeture, then added a subtle Sepia Tone using the Colour Monochrome brick.
Aug
30
Photo of the Week 80 – O.-L.-Vrouw van Goede Wil
Filed Under Photography on August 30, 2009 | Leave a Comment
In some ways this photo is a continuation of an ongoing theme in my recent Photo of the Week instalments – photos shot during the Golden Hour and then tonemapped to bring out the best in them. However, unlike the previous examples, this shot was not taken in Ireland, but rather in my native Belgium.
Although I was baptised into the Catholic Church, we’ve parted ways in the almost 30 yeas that have elapsed since then. However, despite me turning my back on the church (not the ideals of Christianity, just institutionalised Christianity), I still love church Architecture. Churches are usually designed with great care, and are often the most beautiful buildings in a town. This is not just any church though, it’s one of the churches in my home village of Duffel in Belgium, it’s also the church myself and my brothers were baptised in (at least I think all three of us were baptised here). This is not the biggest church in Duffel, but, in my mind, it’s the one with the most character.
The full name of the church is Onze Lieve Vrouw van Goede Wil, but you almost never see it written like that, on paper or signs you’ll generally see it as O.-L.-Vr. van Goede Wil or O.-L.-Vrouw van Goede Wil. In English that roughly translates to Our loving Lady of good will, in other words, it’s a church dedicated to the virgin Mary. Today it’s a small church in a small parish in a small village in the Belgian countryside, but in the past it was a place of pilgrimage. A supposedly miraculous statue of the virgin mother was found in a Willow tree growing in a marshy field where the church now stands.
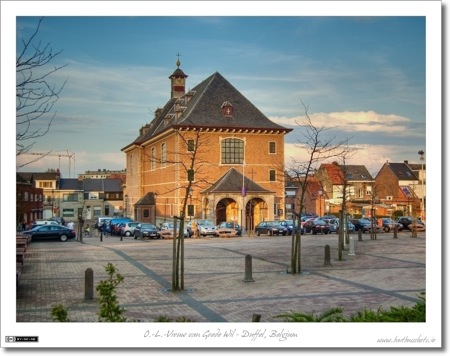
- Camera: Nikon D40
- Lens: Nikon DX AFS 18-55mm (D40 kit lens)
- Exposure: 1/640 sec
- Focal Length: 32mm
- Focal Ratio: f/4.5
- ISO: 400
- Camera Mode: Aperture Priority
- Processing: Generated by tonemapping a single RAW file in Photomatix Pro and then selectively tweaking the exposure slightly using the Dodge & Burn plugin in Aperture.
Aug
24
Photo of the Week 79 – Pike Bridge Re-Visited
Filed Under Photography on August 24, 2009 | 1 Comment
If this week’s instalment reminds you a lot of last week’s, that’s no coincidence, this week’s shot is also of Pike’s Brige, and also shot at the same time of day, the so-called golden hour around sunset. There are some marked differences though, last week’s shot was taken into the sun, this week’s is taken with the sun directly behind the camera – meaning this is the opposite side of the bridge. Although the conditions look identical, the shots were actually taken two days apart.
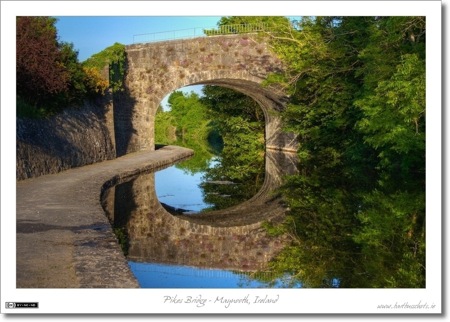
- Camera: Nikon D40
- Lens: Nikon DX AFS 18-55mm (D40 kit lens)
- Exposure: 1/500 sec
- Focal Length: 42mm
- Focal Ratio: f/8
- ISO: 400
- Camera Mode: Aperture Priority
- Exposure Bias: -0.3EV
- Processing: Generated by tonemapping a single RAW file in Photomatix Pro
Aug
16
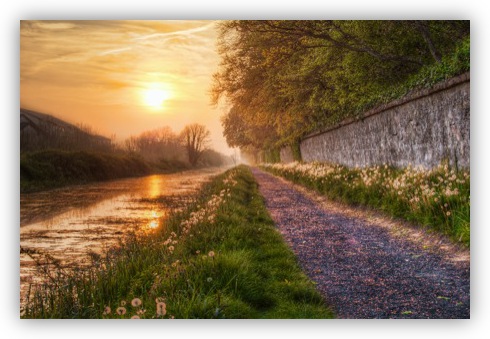
Photo of the Week 78 – Evening at Pike Bridge
Filed Under Photography on August 16, 2009 | 3 Comments
Photography is all about light, and you get some of the nicest light each day in the hours around sunrise and sunset, or the so-called ‘golden hours’. I’m not a fan of early mornings, so, for me, there is only one golden hour each day, but some of my very favourite pictures are taken during that hour, including this one.
I got this photo on an evening when I wasn’t really planning to shoot, I was out getting some much-needed exercise, and brought the camera along ‘just in case’. I’m certainly glad I did. The light was superb, and it’s very rare that the water is this still under the bridge. The dynamic range was very large in this shot so I tonemapped the RAW file in Photomatix Pro to recover both the shadows and the highlights. I have also edited this image for use as a desktop wallpaper on either a standard (4:3) or widescreen (16:10) monitor.
This is Pike Bridge between Maynooth and Leixlip in Co. Kildare, Ireland. It has two arches, one crossing the Dublin to Sligo railway line, and this one crossing the Royal Canal.
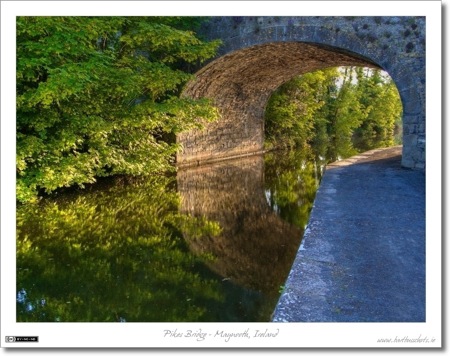
- Camera: Nikon D40
- Lens: Nikon DX AFS 18-55mm (D40 kit lens)
- Exposure: 1/80 sec
- Focal Length: 20mm
- Focal Ratio: f/8
- ISO: 400
- Camera Mode: Aperture Priority
- Exposure Bias: -1.0EV
- Processing: Generated by tonemapping a single RAW file in Photomatix Pro
Jul
25
What’s the Story with Tonemapping?
Filed Under Photography on July 25, 2009 | Leave a Comment
I’ve become very fond of tonemapping as a photographic technique, and have mentioned it quite a few times in the descriptions of the photos I pick for my Photo of the Week blog posts. The more people see my tonemapped photos, and the more I mention tonemapping on Flickr, the more questions I get about it, so, instead of repeating myself over and over again, I figured I may was well just write an article about it that I can then link people to.
Lets start with some background, particularly with the concept of the dynamic range of a scene. You hear the term a lot, but I get a feeling a lot of people are not sure what it means. The simplest way I can describe it is as the difference between the brightest objects in the scene, and the darkest objects in the scene. Our eyes have quite a large dynamic range, at mid-day on a sunny day we can see both the things illuminated by the sun, and the things in shadow at the same time. Try that with a camera, and you’ll soon find that cameras have a much smaller dynamic range than our eyes. You’ll either end up with no detail in the shaded bits, or no detail in the bright bits, but try as you might, you won’t capture both! This is not a new problem, although it has gotten worse. Film has a bigger dynamic range than the JPEG images that come out of our digital cameras, but even film has a signifficatly smaller dynamic range than our eyes.