The Author – Bart Busschots
Creative Commons
Unless otherwise stated, the content on this site is licensed under Creative Commons Attribution, Noncommercial, No Derivative Works 3.0 License


May
15
In Defence of HDR & Tonemapping
Filed Under Computers & Tech, Photography on May 15, 2011 at 9:31 pm
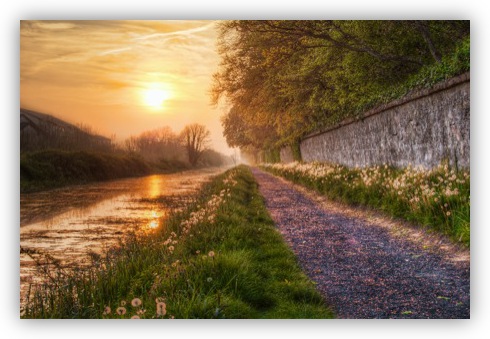
I posted the shot below to Flickr yesterday, and it generated a lot of attention, as well as a thought-provoking comment asking, without being at all rude, if HDR was really photography, or if it was something else, perhaps graphic art? This sparked a bit of a discussion in the comments on the photo, but it also lit a fire under my backside to do something I’ve been meaning to do for literally years – to lay out exactly why I feel strongly that HDR is every bit as valid a photographic technique as any other. Indeed, HDR is just the latest in a very long trail of techniques throughout history for dealing with high-dynamic range situations, stretching back to the very dawn of photography.
Before I start my argument in defence of HDR, I want to get something off my chest, something which is very relevant, but also much broader. I think it’s absolutely ridiculous to judge any photo based on the processes used to create it rather than on the final product. I don’t see how the technique used is any more relevant in judging a photograph than the brand of robot used in construction is for judging a car. What matters is the end product, that’s what should get critiqued, for better or for worse, not the process! When you show a photo to a non-photo-nerd, the last thing on their minds is what camera you used, what lens you used, or what filter or filters you ran it through in Photoshop or Aperture or what ever, they just care about the photo they’re looking at.
Before diving into the HDR question, lets have a look at the motivation behind its invention. I think anyone who’s ever used any camera at all, even the one on their phone, will have noticed that the world looks different photographed than it does to our eyes. The effect is always present if you look hard enough, but it becomes really obvious when there’s a big difference between the darkest and brightest things in the scene, like at sunset. You’re standing there looking into the bright setting sun, you see lovely colours, you see nice fluffy clouds, and you see perfect detail on the ground in front of you. You whip out your camera and you try to photograph this beautiful sunset. What do you get? Generally one of two things, either you see the sky and sun perfectly, but you’ve lost all detail on the ground, probably reducing it to a silhouette, or, you have the opposite, you have perfect exposure on the ground, but the sky has been completely lost, getting ‘blown out’ to pure white, with all the detail in the lovely clouds missing. What’s going on here?
The answer is that it’s down to dynamic range – the difference in brightness between the darkest and brightest things in the scene. Our eyes can deal with a big range of brightnesses at the same time and see detail in them all. We can see the sky and ground at the same time without loosing detail in one or the other, even at sunset. A camera on the other hand, has a much more limited range, so, it can’t show you the sky and the land together, it has to choose to expose for one or the other, so you get black land or a white sky. In every-day shots the same is happening, but it’s less obvious, it’s often just little things like fluffy clouds losing their detail and becoming solid white splodges, or shadows being harsher in the photo than they were in real life.
Different camera technologies suffer from this same problem to a lesser and greater extent, but it’s a problem that’s been there throughout time. Digital images displayed on computer screens have a limited range of possible brightness values (8bits). This is less than you can get with 35mm film and photographic prints, so we have actually taken a step back in this regard by going digital. In the very early days of photography they had problems with their chemical emulsions being sensitive to different colours of light by wildly different amounts. Films were very sensitive to blue, but much less so to red. This meant that although the photos were black and white, the blue things like the sky were all wildly over-exposed, hence all the blank skies in old photos.
Even in the early days of photography the lack of skies bugged some photographers, and they invested their time and effort to counter the problem. Two early solutions I particularly like are the sky-shade used by Eadweard Muybridge, and the multiple exposure method used by Gustave Le Gray.
Muybridge created a device that consisted of a number of slideable rods that fit tightly against east other. They could be slid up and down independently to conform to any horizon. You’d match the shade to your horizon, then place it on the film plane for part of the exposure, and remove it for the end of the exposure. The result was that you had separate control over the exposure of the sky and the land, and, if you did it right, got a photograph that was perfectly exposed all over. Muybridge first published a description of his sky shade in 1869 (under his pseudonym Helios).
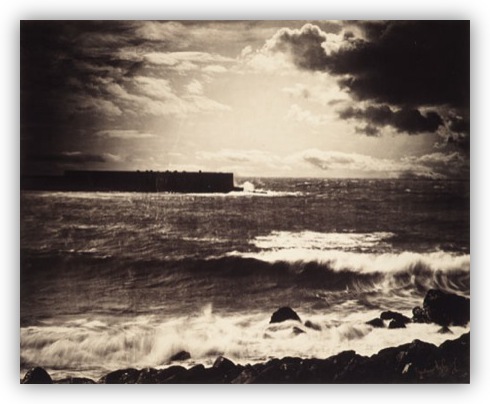
Even earlier still, Gustave Le Gray was using a technique of multiple printing where he’d take two exposures of the whole scene, one for the ground and one for the sky, and then mask off the relevant bits on each negative before printing both of them onto the same piece of photographic paper to create the final positive image. The earliest such image I’m familiar with is Le Gray’s ‘The Great Wave’ (shown below) from 1865.
Moving forward in history we have the development of the platinum printing process. This used salts of platinum instead of salts of silver for the printing process, and has the highest tonal range of any of the chemical processes yet invented. This allowes photographers to capture very high-dynamic range scenes like the insides of cathedrals without needing to resort to sky shades or multiple exposures. Experiments with platinum had been going on since the 1830s, but it wasn’t until 1873 that all the pieces came together, and William Willis was able to patent the ‘platinotype‘. My favourite photographer to use the platium process was Frederick Evans, who specialised in photographing French and English cathedrals. Unfortunately there seem to be almost no high quality scans of his work in the Wikimedia Commons or the Flickr Commons, so I can’t include my favourite examples where he shoots the naves of cathedrals with light streaming through the windows, without even the smallest detail being lost in the shadows. The best I can do is show the image below which I also like a lot, but which doesn’t quite illustrate my point as well. You should notice though that the image contains both brightly lit areas, as well as shadows, but that none of the shadows are deep because of the long smooth tonal range of the platinum process:

Moving forward in time again we get darkroom solutions like Dodging and Burning, where parts of a print are developed at different exposures, letting you show detail in both highlights and shadows at the same time. This technique was beloved by great photographers like Ansel Adams. It works because a film negative can record a higher dynamic range than a silver-based photographic print can. By dodging and burning you are letting more of the information in the negative make it’s way into the print than you possibly could with an evenly developed print.
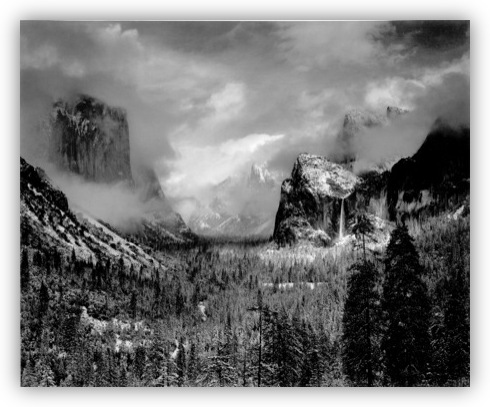
A nice example of an Ansal Adams shot with an almost hyper-real HDR-ish feel to it is the one below from 1942 ‘Yosemite Valley – Clearing Winter Storm’:
We also shouldn’t leave out hardware solutions like graduated neutral density filters, which are really just modern variants on Muybridge’s sky shade when you think about it, though perhaps a little less advanced because their horizon is not configurable.
So, as you can see, there is a long history of trying to find ways of dealing with high dynamic ranges in photography. HDR and tonemapping are just the latest instalment in this long saga.
HDR is a very abused word, and most people use it when they mean tonemapping or tonemapped. I don’t want to get too technical, but I think it’s important to explain the process so that it’s, at least somewhat, de-mystified.
The logic goes something like this – if your camera does not capture enough of a dynamic range with one firing of the shutter, why not fire the shutter many times at varying exposures and then combine all those images into one master image that encapsulates the combined dynamic range of all the individual images. This master image file is said to be an HDR image.
This is quite easy for computers to do, but it’s only half of the solution. The real problem is that our screens can’t display more than 8bits worth of tones (we’re not talking colours here, but different levels of brightness), so although it’s easy to make an HDR image by combining multiple exposures of the same scene, we can’t display it!
This is where tonemapping comes in. This is a mathematical algorithm for compressing the dynamic range of an HDR file into 8bits. The actual workings are quite complex, and there are many adjustable variables that allow you to change the look of the resulting tonemap, but fundamentally, what is going on is that each part of the image is looked at separately, and the exposure for that part is set to the best value within the massive range of the HDR file. If we think back to our sunset, this means that the parts of the image that are sky will be rendered at a low exposure so that no detail is lost, while the parts of the image that are ground will be rendered at a higher exposure so that they’re not too dark. The end result is that both the sky and the land are well exposed.
An interesting side-note to the HDR story is that you don’t actually have to use multiple exposures to capture more than 8bits of tonal range. Digital SLR cameras these days generally capture 11 or 12 bits of tonal data, which they then cut down to 8bits when they create the JPEG that gets displayed. If you configure your camera to shoot in JPEG mode the extra 3 bits of tonal data are discarded, but if you instead set your camera to shoot in RAW mode those extra bits of data are kept, and you can use that single RAW file as the input to the tonemapping algorithm and still recover a significant amount of lost dynamic range.
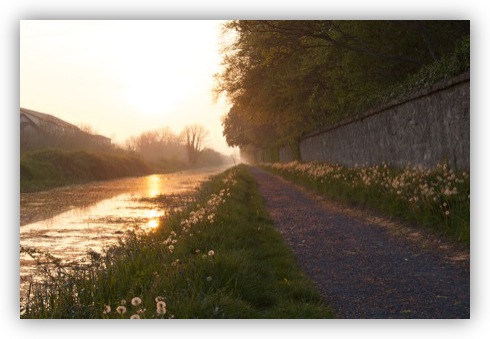
At this stage I think a demonstration is in order. All these shots were taken within a few minutes of each other, and were generated using a range of techniques. Lets start simple, by looking at the best exposure I could get straight out of the camera:
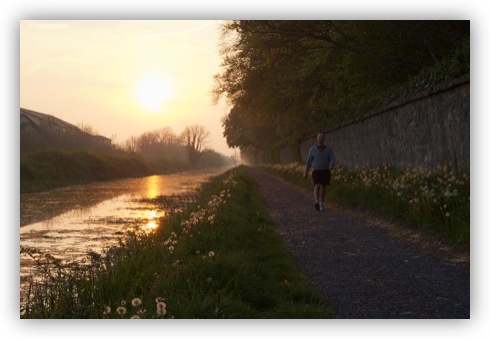
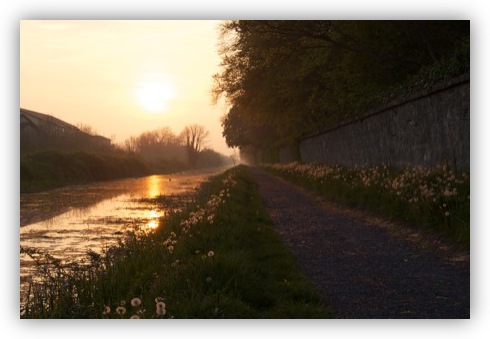
As you can see, there is almost no detail in the sky, and most of the detail in the shadows has been lost. If we just use the single RAW file for this exposure and tonemap it we can recover quite a bit of detail in both the sky and the ground:
There is definitely more detail in the sky, and loads more on the ground, but there is still a lot of lost detail, especially in the sky. Lets take things a step further and combine a number of exposures. Note that I had to shoot the HDR after the chap out for a walk had moved out of the frame, because you need a scene that doesn’t change over the space of about 20 seconds to take an HDR. In this case it took four brackets to capture the full dynamic range of the scene:
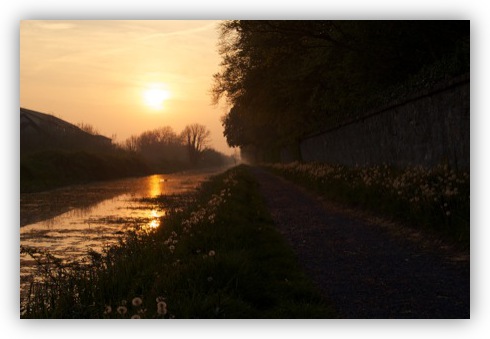
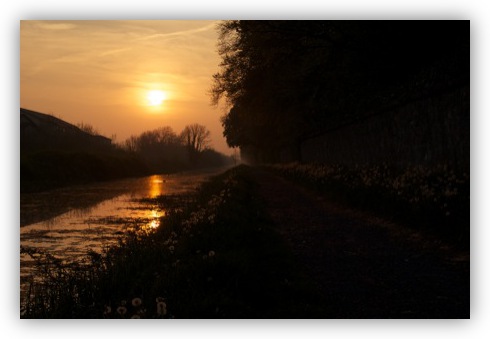
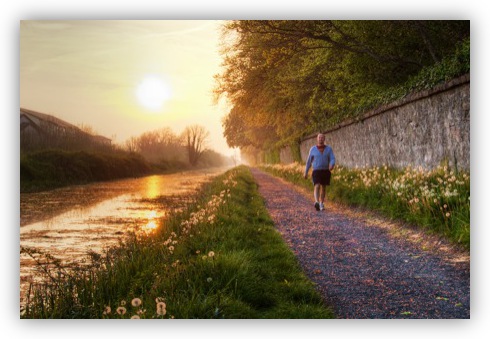
With all this information as input we can generate an HDR that captures the entire dynamic range of the scene, and then tonemap that down to an 8bit final image that shows detail all over:
So – ignoring the complexities of actually getting a nice tonemap, that should explain the process and what it’s doing.
Ultimately, the combination of HDR imaging and tonemapping is simply a more advanced and flexible version of Le Gray’s multiple exposure technique or Muybridge’s sky-shade, but rather than just combining two exposures into one shot you can combine as many exposures as it takes to render the scene, and the areas where each exposure is used don’t have to be so rigid. If fact, tonemapping actually interpolates between the given exposures, so really you have a continuum of exposures to choose from for each region of the image.
What I hope you will notice here is that this is an entirely photographic process. No data displayed in the final image did not come from the action of light on a sensor. No non-photographic elements were added to the image. All we did was apply some math to the data recorded by the sensor. This is really no different to the many other mathematical transforms we apply to our images all the time, like curves adjustments, unsharp masks, white-balance adjustments etc.. So – I think there can be no doubt that HDR photography is photography.
Although we can apply HDR & tonemapping in artistic ways, it can also be applied to images in a purely robotic way. The best example of this is the HDR feature in the iPhone 4 camera app. The user gets zero control over how the HDR is tonemapped, the camera just slavishly follows a set of mathematical rules to turn the three exposures it takes into a single final image.
So – at the end of the day, is there any need to pigeon hole an image into any particular category simply because HDR techniques were used to make it? I don’t think so. You can certainly categorise individual tonemapped images as fine art or snapshots or what ever, but that has nothing to do with the process used to create them, and everything to do with the final product, the image itself.
I am by no means a professional photographer. And I am no HDR expert.
Your article is very well written. I did not know about those “HDR” techniques that date back to the 19th and 20th century. Very, very interesting!
I see HDR in two different ways:
1) HDR as a way of artistic expression.
2) HDR as a means to deal with the camera’s inability to catch a picture like our eyes see it.
I have no problem whatsoever with HDR as a way of artistic expression. I love the vivid colors. I love this look into a fairy-tale world full of warmth, full of color, full of perfection. I love the surreality of some HDR shots.
Sometimes, I do have a problem with HDR as a means to deal with photography’s insufficiencies. Because it is very difficult to find the right dose. It is difficult to get to the “realistic” result. My favorite HDR pictures are the ones nobody has identified as being HDR.
Again, thanks for this article!
And please come back to the NosillaCast! I miss your Chit Chat Across The Pond! 😉
Thanks Christian!
To me the real skill with HDR is in using it subtly. So many great tonemapped images pass completely under the radar, with people just seeing them as nice photos, and having no idea how they were arrived at.
Having said that, I don’t object to artistic use of more extreme HDRs, just look at Trey Ratcliff’s work. It’s very obvious that the shots are not ‘natural’, but they are extremely beautiful, and capture the feel of a place more so than the exact look.
What I have no time for is when people try to use HDR to make a poor shot interesting. It just doesn’t work. Garbage in garbage out! A tonemapped image needs to be every bit as well composed, focused, and exposed as any other shot. Trying to use HDR/tonemapping to make a poor shot great is a lost cause! Those kinds of ‘because I can’ HDRs give the whole process an un-deserved bad name. Because they are so obviously awful, everyone notices they are HDRs, and conflate those terrible out-liers with the whole field!
I like to think of it like photoshop, which was also once controversial and hated like HDR/tonemapping is now. Badly photoshopped shots are REALLY obvious, but well processed shots aren’t at all obvious. This skews the field, and people think that all photoshop work results in the garbage they hate. They think they hate Photoshop, when in fact they hate bad taste and poor skill.
Bart.
Hi Bart,
A very lucid description, if I may say so.
I think the point about subtlety is very important. I see too many photographs where the effect has been laid on with a trowel and the results are truly awful.
Hi Bart
A very informative and, in my opinion, valid post. Thanks for taking the time to write it up.
I suspect I currently fall into the category of user that is attempting to use it subtly (in most cases) but still has an awful lot to learn in order to get the most from his tools (Luminance HDR, with blending of tonemaps done in Gimp). But I’m starting to see some progress.
By the way, I also used your tilt shift tut on a couple of images. Many thanks!
[…] In Defence of HDR & Tonemapping […]
Great article…
Unfortunately there are too many people overusing this wonderful technique just ‘to try something weird’.
And that crap is what ‘serious photographers’ think of when you tell them that you are into HDR…
So keep up your beautiful HDR images and your great writing.
Slà inte from Germany
matmaxx
A great, informative and well written article. I don’t see why so many people get upset at using other ‘tools’ to achieve an effect. Just look back over the centuries, before photography, when artists discovered the convex mirror and camera obscura to perfect their painting. Check out David Hockneys book ‘Secret Knowledge’ its a really interesting read.
Keep up the HDR work.
Eleanor
Flash photography controls dynamic range by reducing it before the image is committed to a file or negative. I made some HDRs out of bracket sets shot in a sandwich shop and a small museum that simply look like flash was used followed by some curve control and maybe a plugin. There is a video on Youtube that points out they results are not exactly the same. Flash is directional and controlled by a whole set of techniques. Indoor HDR lets you show both the inside and the outside, into shadows, eliminates hot spots etc.
[…] Bart’s Article “In Defence of HDR” […]