The Author – Bart Busschots
Creative Commons
Unless otherwise stated, the content on this site is licensed under Creative Commons Attribution, Noncommercial, No Derivative Works 3.0 License


Mar
6
MacOS Quick Actions for Text
Filed Under Automation, Software Development, Computers & Tech on March 6, 2020 | 2 Comments
While I wrote these MacOS Quick Actions to scratch my own proverbial itch, I think they could be of use to others, so I’m releasing them as open source.
The actions allow you to calculate the word count, line count, and character count of selected text, to convert a text selection to upper case, lower case, or title case, to do the same to the contents of the clipboard, and to convert the clipboard from rich text to plain text and to trim the contents of the clipboard.
You can download the actions and read the docs on GitHub.
As well as describing what each of the Quick Actions do, the GitHub docs also describe how to install the actions, how to use them, and how to assign keyboard shortcuts to them if desired.
If you’re curious to learn how these Quick Actions work, read on.
Jul
26
Right-click to Copy File Contents to Clipboard on macOS with Automator
Filed Under Automation, Computers & Tech on July 26, 2019 | Leave a Comment
How often does someone email you a file who’s content you need to copy-and-paste into a web form of some kind? Maybe it’s just me, but I find I need to do it a lot!
What I wanted was the ability to right-click any file with plain-text content (text, markdown, XML, JSON, Certificate Signing Requests, …) and send its content to the clipboard.
By combing Automator, the cat and pbcopy terminal commands, and a little JavaScript, I was able to build a nice service that can be accessed by right-clicking any file in any app that reports its outcome using a standard OS notification.
Download the Quick Action here, extract it, and copy it to your ~/Library/Services folder.
Sep
30
OS X Service for Markdown Link Creation
Filed Under Software Development, Computers & Tech on September 30, 2014 | Leave a Comment
At the request of listeners I’m going to be publishing a big list of links with future Let’s Talk Apple shows. The logical format for me to create those notes in is Markdown – it’s plain text, and quick and easy for me to add new items and re-arrange them into logical groupings. for the most part markdown has little to no overhead, but when it comes to links there is a little work. What I wanted was a way of automatically taking a URL, and turning it into a markdown link where the text for the link is the site the story is from with /… after it.
When all is done I want to turn a url like http://www.macobserver.com/tmo/article/every-important-link-from-apples-9-9-event-on-one-page into a link that looks like: www.macobserver.com/…. In other words, I need to take the URL above as input, and turn it into the following Markdown code:
[www.macobserver.com/...](http://www.macobserver.com/tmo/article/every-important-link-from-apples-9-9-event-on-one-page)
My reason for choosing this format is that I want to give obvious credit to the sources of the stories, but not waste screen real-estate on long URLs.
Perl’s URI module can interpret URLs, and easily extract the host part of the URL, OS X Services can take selected text as input and replace it with processed output, Automator can create OS X Services, and Automator can execute Perl code. By putting all these pieces together I was able to solve my problem in just 20 minutes with a few clicks and a few lines of code.
You can just download the service with the link below, or you can read on to see how it’s done.
Download OS X Service …
Aug
30
Play a Sound in Automator
Filed Under System Administration, Software Development, Computers & Tech on August 30, 2014 | 5 Comments
In a recent Chit Chat Across the Pond segment on episode 484 of the Nosillacast Mac Podcast myself and Allison walked through the process of creating an automator action for generating secure memorable passwords with the XKPasswd 2 perl module (we basically walked through the steps in this blog post). During that discussion Allison mentioned it would nice if Automator could play a sound when it was finished so you could know when automator was done generating the password without installing a third-party notification app like Growl.
At the time I didn’t know of a way to do that, but now I do, and it’s really quite straightforward thanks to the OS X terminal command afplay which will play an audio file without opening any sort of GUI.
Aug
16
Creating an XKPasswd 2 OS X Service with Automator
Filed Under System Administration, Computers & Tech on August 16, 2014 | 5 Comments
It’s going to take me a few months to re-write the www.xkpasswd.net site so it uses the new XKPasswd 2 perl module. In the mean-time, thanks to the magic of Automator an OSX Services, Mac users can integrate XKPasswd 2 right into their OS with out very much effort at all.
This blog post is intended as a follow-on post to my earlier XKPasswd 2 beginners guide. This post assumes you have followed the installation instructions in the beginner’s guide to install the XKPasswd 2 module, that you followed along with that post and created a script that generates passwords in a format of your choice, and that you have tested that script to be sure it works. In this post I’ll be using the final example script from the beginner’s guide as my pre-written script.
Jul
26
OS X Service – Word Count (and More)
Filed Under My Projects, Software Development, Computers & Tech on July 26, 2013 | 9 Comments
Inspired by a recent episode of The Mac Cast I decided to see if I could come up with a simple way of getting a word count of a PDF on OS X using only tools that come standard with the OS.
Because of OS X’s Unix underpinnings, all Macs have access to the Unix wc command which calculates word counts on given input. OS X also has a handy built in Terminal command to access the contents of the clipboard (pbpaste). This leads to an obvious simple manual solution:
- Open the PDF in Preview
- Select All Text
- Copy to clipboard
- Run the Terminal command:
pbpaste | wc -w
This is a bit cumbersome though, so I went on to create a simple OS X Service to calculate the word count of any selectable text in any app (the fact that this is even possible, let alone easy, is why I love OS X).
For those of you just looking for a copy of the Service, you can download it here:

To install the service simply extract the automator file from the ZIP archive and copy it into either the Library/Services folder in your home directory, or the system-wide service folder /Library/Services.
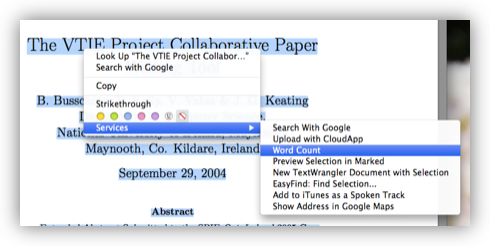
Once the Service is installed you can use it in almost any OS X app (specifically in any app written using the standard Cocoa libraries) by selecting some text, right-clicking on it, and selecting the Word Count service:
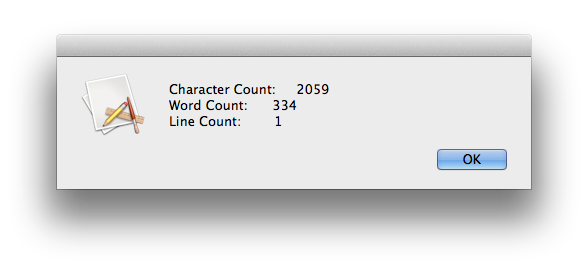
When done the results will look something like this:
Those of you who want to see how easy this Service was to write, read on and I’ll walk you through it.
Dec
29
OS X Service for Stripping Geotags from JPEG Images
Filed Under Photography, My Projects, Software Development, Computers & Tech on December 29, 2012 | 1 Comment
Back in 2011 I wrote a blog post explaining how to create an OS X Service for stripping keywords from image files. In this post we’ll use the same technique to create a Service for stripping geotags from JPEG images.
As with the keyword stripping service, there are two prerequisites for this action, one is required, one is optional. You absolutely MUST have install EXIFTool installed, and it would be good if you also had Growl installed, but it’s not essential.
Aug
4
Making an XKpasswd Automator Action
Filed Under Computers & Tech, My Projects, Software Development on August 4, 2012 | 2 Comments
 A few weeks ago on the Chit Chat Across the Pond segment of the Nosillacast, I mentioned that I had an OS X service set up to generate a random password using my XKpasswd Perl module and copy it to the clipboard. Listeners enquired as to how they would go about doing that, so as promised, here’s a quick tutorial.
Obviously this tutorial is for Mac OS X users only, because OS-wide Services and Automator are OS X features. The screenshots are taken on 10.8 Mountain Lion, but this same technique definitely also works on OSX 10.7 Lion, and probably even on 10.6 Snow Leopard. This tutorial also assumes that you have downloaded the XKpasswd module, and saved it somewhere on your computer, along with either the sample dictionary file included with the module or one of your own making, and that you know where on your computer those files have been saved. In other words, you need to have XKpasswd.pm and a text file with one word per line somewhere on your hard drive. In my sample code I’m going to assume you’ve installed the Perl module to the suggested location, /usr/local/xkpasswd/XKpasswd.pm, and that you have customised the sample dictionary a little (more secure that way), and saved it to /usr/local/xkpasswd/dict.txt.
Mar
2
Automator Workflow for Stripping Keywords from Images
Filed Under Photography, My Projects, Software Development, Computers & Tech on March 2, 2011 | 5 Comments
Following on from my post yesterday with three examples of using Automator to create Services, and some good suggestions in the comments, I spent some time this afternoon making the script in the third of those examples a little more efficient, and a lot more robust.
The Service I optimised was the one to strip keywords from image files. This Service assumes that both Growl and EXIFTool are installed, and that you’re running OS X 10.6 Snow Leopard or later.
Mar
2
Automator + Services = Image Editing Automation Heaven
Filed Under Software Development, Computers & Tech on | 6 Comments
![]() Some Apple haters just love to say that there is nothing to a Mac except for flashy marketing. There are a million different reasons that’s BS, but one in particular is ease of automation. The learning curve to start automating your Mac is very short and very gentle. Without ever seeing a single line of code you can add your own custom functionality to OS X to relieve you of your most boring repetitive tasks. If you can tolerate seeing a line or two of code, you can take things even further and tie Unix command line tools straight into your GUI. The best candidates for automation are simple repetitive tasks that you do often. You might only save 30 seconds each time, but if do that 10 times a day that soon adds up! In this post I just want to give three simple examples to whet your appetite and hopefully get you thinking about some simple tasks in your computing life that you could easily automate.
Some Apple haters just love to say that there is nothing to a Mac except for flashy marketing. There are a million different reasons that’s BS, but one in particular is ease of automation. The learning curve to start automating your Mac is very short and very gentle. Without ever seeing a single line of code you can add your own custom functionality to OS X to relieve you of your most boring repetitive tasks. If you can tolerate seeing a line or two of code, you can take things even further and tie Unix command line tools straight into your GUI. The best candidates for automation are simple repetitive tasks that you do often. You might only save 30 seconds each time, but if do that 10 times a day that soon adds up! In this post I just want to give three simple examples to whet your appetite and hopefully get you thinking about some simple tasks in your computing life that you could easily automate.