The Author – Bart Busschots
Creative Commons
Unless otherwise stated, the content on this site is licensed under Creative Commons Attribution, Noncommercial, No Derivative Works 3.0 License


Aug
16
Creating an XKPasswd 2 OS X Service with Automator
Filed Under Computers & Tech, System Administration on August 16, 2014 at 11:51 pm
It’s going to take me a few months to re-write the www.xkpasswd.net site so it uses the new XKPasswd 2 perl module. In the mean-time, thanks to the magic of Automator an OSX Services, Mac users can integrate XKPasswd 2 right into their OS with out very much effort at all.
This blog post is intended as a follow-on post to my earlier XKPasswd 2 beginners guide. This post assumes you have followed the installation instructions in the beginner’s guide to install the XKPasswd 2 module, that you followed along with that post and created a script that generates passwords in a format of your choice, and that you have tested that script to be sure it works. In this post I’ll be using the final example script from the beginner’s guide as my pre-written script.
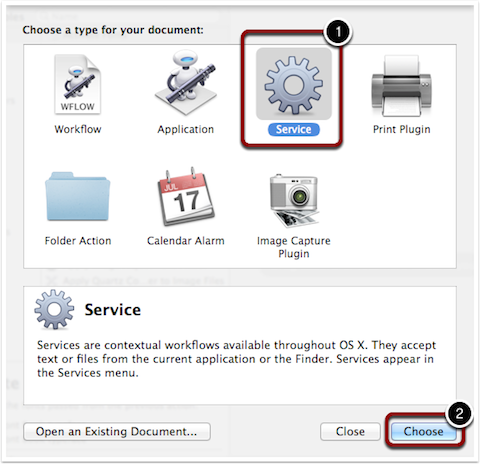
Start by opening the Automator app located in /Applications/Utilities and creating a new document. When you create a new document Automator will give you a choice of document type, choose Service.
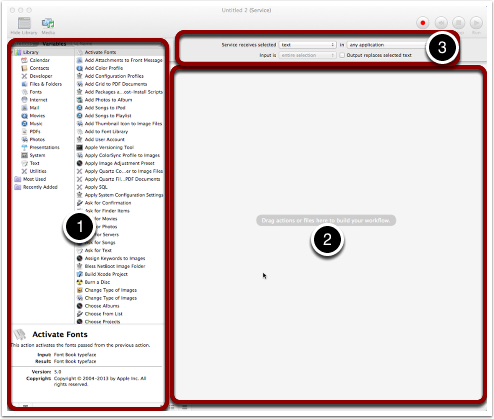
This will open a blank Automator workflow. There are three areas of interest in this window – the left pane allows us to search for actions to drag-and-drop into the workflow (1 in the screenshot below), the right of the screen is the Workflow area (2 in the screenshot), and above the Workflow area are the Service settings (3 in the screenshot).
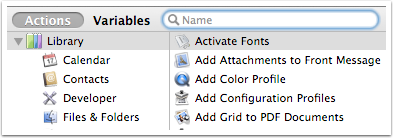
Pay special attention to the search box at the top of the left pane. This is where we will search for the Actions we need to assemble our Workflow. Next to this search box are two toggle buttons, one labeled Actions, the other Variables. Make sure you have the one for actions selected as shown below:
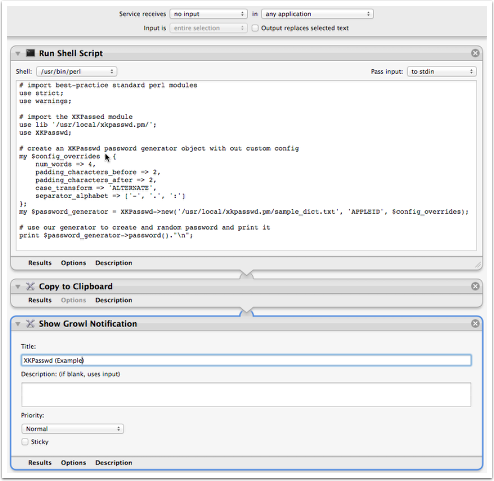
Before we add our first action to our workflow we need to alter the Service settings above the workflow area. We need to set the Service Receives drop down to no input and leave the in drop down as any application.

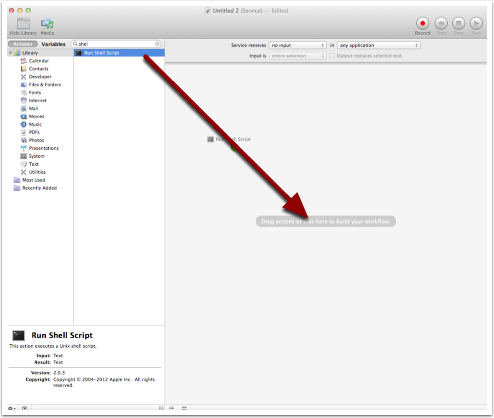
The first action we want to search for is Run Shell Script. When we find it we want to drag and drop it into the workflow area.
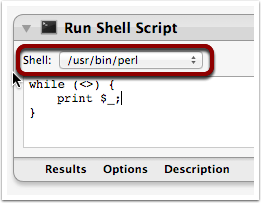
We now need to configure this action to run Perl code by changing the Shell drop down at the top of the action to /usr/bin/perl:
Next, replace the default code in the body of the Run Shell Script action with your XKPasswd password generation script, minus the shebang line at the top of the script. I’ll be using the following code:
# import best-practice standard perl modules
use strict;
use warnings;

# import the XKPassed module
use lib '/usr/local/xkpasswd.pm/';
use XKPasswd;

# create an XKPasswd password generator object with out custom config
my $config_overrides = {
    num_words => 4,
    padding_characters_before => 2,
    padding_characters_after => 2,
    case_transform => 'ALTERNATE',
    separator_alphabet => ['-', '.', ':']
};
my $password_generator = XKPasswd->new('/usr/local/xkpasswd.pm/sample_dict.txt', 'APPLEID', $config_overrides);

# use our generator to create and random password and print it
print $password_generator->password()."\n";
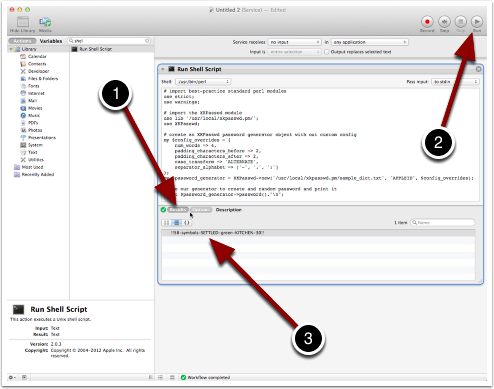
Once you have copied and pasted in your code you can test it by expanding the Results section at the bottom of the Run Shell Script action (1 in the screenshot below), and pressing the Run button (2 in the screenshot) at the top-right of the window. You should seen your randomly generated password appear in the results section (3 in the screenshot).
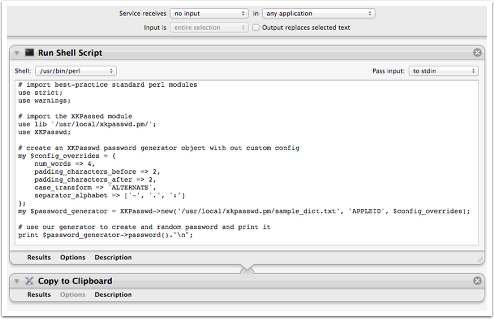
To make this workflow useful we now need to save the password somewhere. The most useful place I could think of was the clipboard, so next we search for and then drag and drop a Copy to Clipboard action. Be sure to add this action below the Run Shell Script action. Your workflow should now look something like:
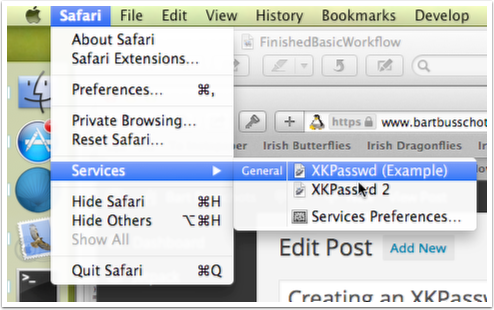
The workflow is now finished and ready to use. Save it and give it a name that makes sense to you. I called mine XKPasswd (Example). You will now find this Service available in the Services sub-menu in any app that supports Services (just about every OS X app). The Services menu item is always located in an app’s main menu – the one with the same name as the app in bold right next to the Apple logo at the top-left of the screen.
Optional Enhancements
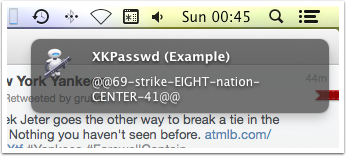
If you have Growl installed you can add in a Show Growl Notification action at the end of the workflow and give it a sensible title. If you leave the content area blank then the output of the workflow will be used as the body of the message – in this case, the automatically generated password.
Now, each time you run the service you’ll see a popup like the one below when it is finished running and the password is waiting for you in the clipboard.
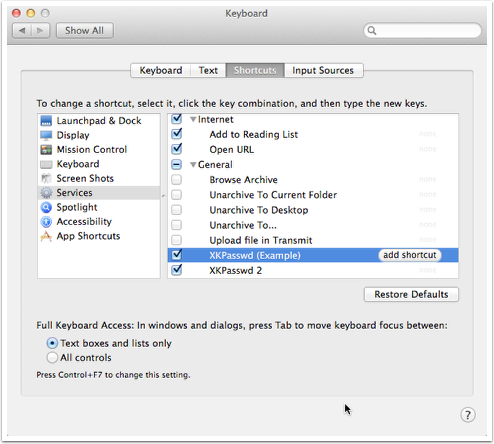
Finally, you can also assign a key-stroke to the Service in the Keyboard applet in the OS X System Preferences. You’ll find the relevant interface for adding a shortcut of your choice in the Shortcuts tab. To find the Service you’ll need to select Services in the left pane and scroll down to the General section in the right pane.
[…] For OS X users there is a better option though – you can incorporate your script right into the OS X GUI, meaning you won’t need the Terminal to generate passwords. The key to this is Automator’s abilities to execute shell scripts and save workflows as OS X Services. I’ve written a separate post explaining how to create such an OS X Service with Automator. […]
[…] Reminder to opt in to the NosillaCast News to get the shownotes fed to you every week via email at NosillaCast News Signup Page, my maudlin and sentimental look back at 10 years of podcasting and what it’s meant to me, Kevin from Connecticut reviews eM Client which allows him to check iCloud email on Windows, and Ken Knight reviews the Zoom IQ5 Microphone for iPhone. My Dumb question this week was about Clarify 2, and I do experiments to prove that your PDF output won’t be huge if you let Clarify scale your images. In Chit Chat Across the Pond Bart walks us through how to run xkpasswd locally and then how to modify it using scripting, and finally how to create an Automator Service which we can run from any application to generate secure password…. […]
[…] memorable passwords with the XKPasswd 2 perl module (we basically walked through the steps in this blog post). During that discussion Allison mentioned it would nice if Automator could play a sound when it […]
[…] Tutorial showing how the module can be used to create a an OS X Service with Automator – https://www.bartbusschots.ie/s/2014/08/16/xkpasswd-2-service-with-automator/ […]
[…] Reminder to opt in to the NosillaCast News to get the shownotes fed to you every week via email at NosillaCast News Signup Page, my maudlin and sentimental look back at 10 years of podcasting and what it’s meant to me, Kevin from Connecticut reviews eM Client which allows him to check iCloud email on Windows, and Ken Knight reviews the Zoom IQ5 Microphone for iPhone. My Dumb question this week was about Clarify 2, and I do experiments to prove that your PDF output won’t be huge if you let Clarify scale your images. In Chit Chat Across the Pond Bart walks us through how to run xkpasswd locally and then how to modify it using scripting, and finally how to create an Automator Service which we can run from any application to generate secure password…. […]