The Author – Bart Busschots
Creative Commons
Unless otherwise stated, the content on this site is licensed under Creative Commons Attribution, Noncommercial, No Derivative Works 3.0 License


Mar
2
Automator + Services = Image Editing Automation Heaven
Filed Under Computers & Tech, Software Development on March 2, 2011 at 12:20 am
![]() Some Apple haters just love to say that there is nothing to a Mac except for flashy marketing. There are a million different reasons that’s BS, but one in particular is ease of automation. The learning curve to start automating your Mac is very short and very gentle. Without ever seeing a single line of code you can add your own custom functionality to OS X to relieve you of your most boring repetitive tasks. If you can tolerate seeing a line or two of code, you can take things even further and tie Unix command line tools straight into your GUI. The best candidates for automation are simple repetitive tasks that you do often. You might only save 30 seconds each time, but if do that 10 times a day that soon adds up! In this post I just want to give three simple examples to whet your appetite and hopefully get you thinking about some simple tasks in your computing life that you could easily automate.
Some Apple haters just love to say that there is nothing to a Mac except for flashy marketing. There are a million different reasons that’s BS, but one in particular is ease of automation. The learning curve to start automating your Mac is very short and very gentle. Without ever seeing a single line of code you can add your own custom functionality to OS X to relieve you of your most boring repetitive tasks. If you can tolerate seeing a line or two of code, you can take things even further and tie Unix command line tools straight into your GUI. The best candidates for automation are simple repetitive tasks that you do often. You might only save 30 seconds each time, but if do that 10 times a day that soon adds up! In this post I just want to give three simple examples to whet your appetite and hopefully get you thinking about some simple tasks in your computing life that you could easily automate.
In this post I want to walk you through three simple image-editing tasks that I’ve automated on my Mac as examples of what can be done. Before we start – the more repetitive a task is, and the less it varies each time, the easier it will be to automate. The more brain-dead the task the better for automation, and the happier you’ll be to be able to delegate it to the computer. Computers are so much better and brain-dead repetition than we are!
Also – all these examples and instructions are for Mac OS X 10.6 Snow Leopard or later. Apple completely over-hauled both Automator and the Services system in 10.6, so these instructions just won’t work on earlier versions of the OS.
My first example is a simple action to re-size an image to a given size. I try to post to this blog at least twice a week, and when I do I like to include images to liven things up a bit. All those images need to be re-sized to have a maximum dimension of 450pixels before I can use them in a post. This is not difficult to do manually, just double-click the image to open it in Preview, go to Tools → Adjust Size ..., choose 450 pixels, and save the image. But, it most certainly is monotonous, and repetitive. Nothing in the process ever changes apart from the image to which it’s applied, so it’s a perfect candidate for automation. Lets go through the steps to build a simple Finder Service to automate this task.
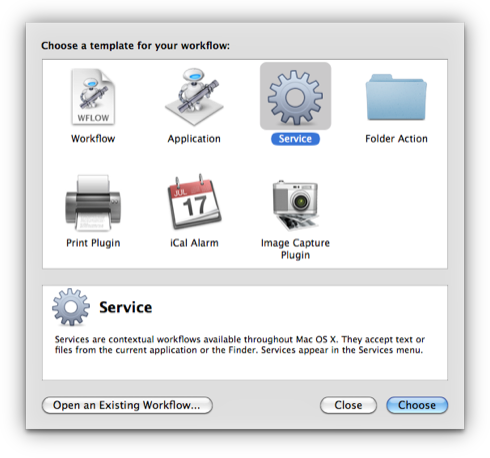
Start by opening up Automator (which you’ll find in the Applications folder), and when it asks what kind of workflow your want to create, choose Service.
Once you go ahead and choose Service you’ll be presented with the normal automator window. Before we go any further, I just want to pause for a moment to explain the basic concept behind Automator. Automator lets you build workflows by combining Actions. Each Action takes an input, usually the output of the previous step, and then does something to that input with the option of producing an output that can then be used by the next Action in the Workflow. You just drag and drop Actions into your Workflow, and sometimes you have to set some options to control the behaviour of more complex Actions, that’s all there is to it!
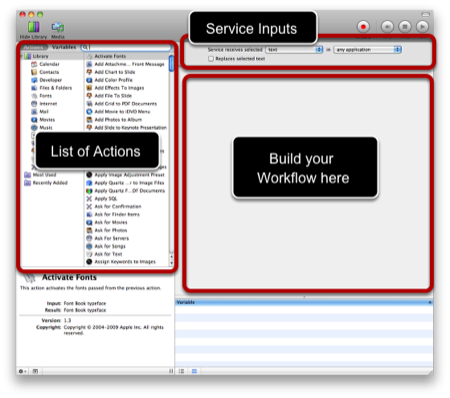
Within the main Automator interface there are three important areas that we will need to use (see the image above) to create out sample Services. The first is the left-hand pane which lists all the Actions available within Automator, along with a search window to help us find the ones we need more quickly. At the top of the wider right-hand pane we have the controls for specifying which kinds of items in which applications we want our service to interact with, and below that we have the large pane within which we will build our Workflow by dragging and dropping Actions from the left pane into it.
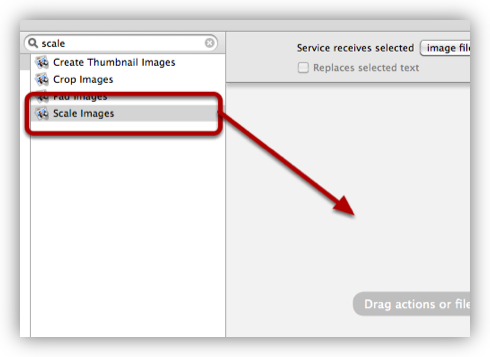
We first need to configure the inputs to the Service as shown below. What we are doing here is specifying that this service will operate on Image Files from within the Finder.

With that done we can use the search field to search for an action which re-sizes images, and when we find it, drag it into our still empty Workflow. In this case, the action we need is Scale Images.
When you drag the Action into your Workflow your’ll get a message warning that this Action will modify the files passed to it, and offering to insert an Action before it to duplicate the file before it is modified. Personally, I only ever work on copies of files, so I don’t do this, but you may want to.
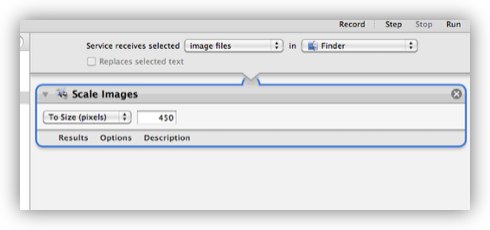
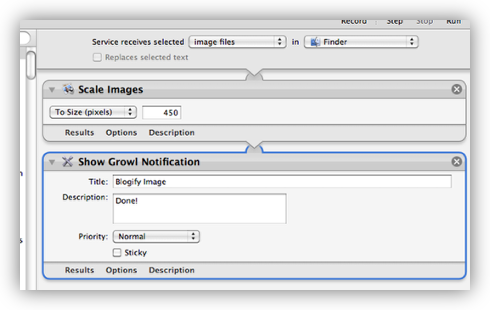
When you’ve dragged in the Action (and either added the Duplicate File Action or not) you’ll see the Scale Images Action in your Workflow, and you can use the two options within the Action to control it’s behaviour. In my case I need the images scaled to be no bigger than 450 pixels on their widest side (the Action won’t distort the aspect ratio of the image), so I’ve configured it as shown below.
You may also notice that the Action has a description which you can show or hide by clicking on the word Description at the bottom of the Action. This can be handy if you’re not exactly sure what an Action does, what inputs it expects, or what outputs it produces.
At this stage you actually have a working Workflow that you could save and use, but I like to add in a notification at the end of my Workflows to tell me when they’ve finished. If you have Growl installed, then the nicest way to do this is to add a Growl Notification Action to the end of your Workflow, if not, the best you can do is insert an Ask For Confirmation Action instead. The screenshot below shows my complete Workflow with a Growl Notification Action at the end.
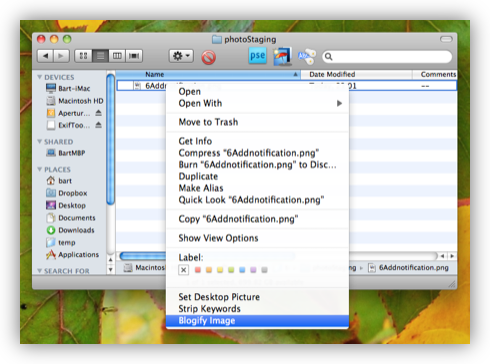
Once you’ve completed the action, you need to save it, to do this just go to File → Save As ... and give it a name. So – now that you’ve created a service, how do you invoke it? Simple, from now on, every time you right-click on any image file in the Finder you’ll see your Service near the bottom of the popup menu. I called my Service Blogify Image, and you can clearly see it in my Finder in the screenshot below, along with some other Services.
Now lets take things up a level, how about applying a Workflow to an entire folder at once? No problem, you can set your Service to work on a folder instead of a file. The example Workflow below will duplicate a folder full of non-JPEG files, say old BMPs or TIFFs, and then convert all those images to JPEGS.
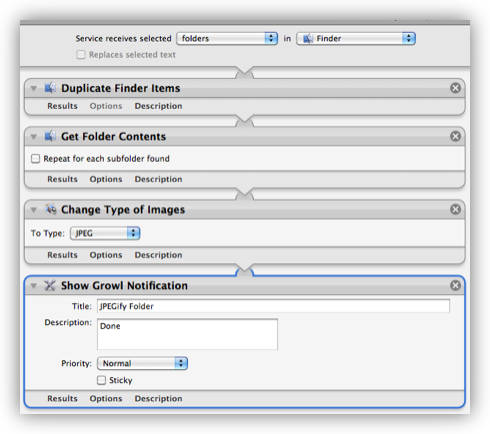
I called this service JPEGify Folder, and it shows up in the Finder when ever I right-click on a Folder. If there are files in the folder that are not images they’ll just be skipped.
What’s fantastic about Automator is that we’ve been able to achieve so much without ever seeing a single line of code. We’ve just done computer programming, but in a purely graphical way. This is fantastic for people who are put off by seeing code, but if you’re a programmer, or even if you’re curious and perhaps know a few Terminal commands, you can take things to a an even higher level, and add code or Terminal commands into your Workflows. If you’re an AppleScript developer you’ll be interested in the Run AppleScript Action, and if you’re comfortable on the Terminal or a script programmer you’ll be interested in the Run Shell Script Action.
Since I can’t program in AppleScript, but am fluent in Perl, I like to use the Run Shell Script Action with Perl selected as the shell, from which I can then invoke Terminal commands using Perl’s back-tick operator if I need to. This is probably sounding way more complex than it needs to, so let me share an example problem and solution with you.
As any regular reader here will know, I’m quite a serious amateur photographer (and I mean that in the original sense of the word, as in I do photography for love rather than for money). I use Aperture 3 to store and organise my extensive library, and to do most of my editing there, but form time-to-time I also round-trip images through other image editors like Pixelmator, Photoshop Elements, or Photomatix Pro. I do this by exporting the shot, editing it, and then importing the edited version back into Aperture. This works very well, but, on occasion, I run into a ‘feature’ of Aperture that really messes things up for me.
I’m very meticulous about keywording my images, and I have a complex nested hierarchy of tags defined in Aperture. I normally do all my editing before I tag the images, so normally when I round-trip an image it has no keywords associated with it yet, but, sometimes I go back and re-edit older images that have already been keyworded, and that’s when I hit an annoying issue that I was able to use Automator to fix.
So, what’s the problem? Well – on export, I preserve the metadata, because I want it there when the image comes back into Aperture, however, that means that the keywords are also retained. When I re-import the images, Aperture sees the keywords, and adds those to my library of keywords at the root level. Aperture should be smart enough to find the keywords in my nested hierarchy, and then re-apply the nested version, but it isn’t, and instead sees them all as new keywords, and creates duplicates at the root level of my complex keywords hierarchy. I then have to go and delete these duplicate keywords from my hierarchy. It’s not the end of the world, but it is bloody annoying! Aperture will let me strip either ALL or NO metadata on export, so what I want is and easy way to only strip keywords after export but before import.
I found it very hard to find a nice way to strip just the keywords out of images, but after some Googleing I found a workable solution, but not an easy one to use. The fantastic command-line tool EXIFTool allows the keywords to be stripped by entering a command like this:
$ exiftool -Subject="" -Keywords="" DSC_7736.tiff
It’s not the most complex terminal command in the world, but a GUI solution would be nicer! One thing I will say about EXIFTool is that it’s fantastically easy to install, they have an OS X installer right at the top of their home page that does the entire configuration for you in seconds. Compared to installing other command-line image editing tools like ImageMagick this is a cake-walk!
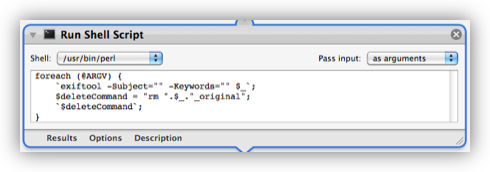
Anyhow – this is prime candidate for automation and integration into the Finder like the above Services. Despite the added complexity of needing to use a command-line tool, the Workflow is actually very simple. You just have to use the Run Shell Script Action to execute the terminal command above on the file (or files) that you’re invoking the Service on. The screenshot below shows my Strip Keywords Workflow.
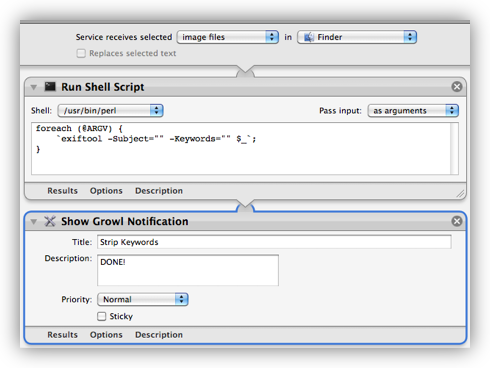
Again, I have used Growl to let me know when the action has completed. This action, as-is, has just one flaw, EXIFTool creates a duplicate of every file it edits before it does the editing. If you don’t mind manually cleaning up these duplicate files you can use the above example exactly as show (assuming you first installed EXIFTool of course). But, if you want the Service to automatically delete those duplicates, you just need to add two more lines of Perl code to the Run Shell Script Action as shown below.
Note: I created a more robust final version of this Service since writing this post, you can find out more about the more robust version here
These three examples are just three ways in which I’ve recently used the combination of Automator and Services to automate some repetitive Image Processing tasks for me, they just scrape the surface of what Automator can do. What’s really great is that every app you install can, if the developer chooses, provide Automator Actions to let you interact with that app through Automator. Some handy examples of such thoughtful apps that I have installed are the FTP client Transmit, the image Editor Pixelmator, and most of Apple’s own apps.
If you have OS X 10.6 or later, and you don’t yet use Automator, I hope this has inspired you to give it a go. If you’re a Windows user, and you think I’m wrong in saying Windows has nothing that comes even close to making automation as easy as this, then please correct me by providing a link to a sample tutorial demonstrating the process.
Downloads
Below are links to download zipped versions of the three Workflows described in this post. To install them just unzip them and put them in the folder Library/Services in your home directory. You can double-click them to open them in Automator and see how they work and edit them. All three of these services expect Growl to be installed, so if you don’t have Growl yet, you now have one more reason to get it 🙂
- Blogify Image Service (requires Growl)
- JPEGify Folder Service (requires Growl)
Strip Keywords ServiceUpdated Version of Strip Keywords Service (requires Growl and EXIFTool)
You could have used the exiftool -overwrite_original option to get exiftool to delete the “_original” images for you. Also, you could speed things up a lot by calling exiftool only once. If there are no spaces or other special characters in the file names, this could be done simply with:
`exiftool -subject= -keywords= -overwrite_original @ARGV`
But for a robust script you should do the necessary escaping and/or quoting of file names first.
Cheers for this tips Phil – I’m not sure the optimisations really matter for a handful of files on a modern CPU, but you are right – there are neater ways to do this. The escaping is a more important point though – I think I’ll spend some time today doing a more polished version of the script.
Bart.
[…] Automator + Services = Image Editing Automation Heaven […]
Hi again Phil – I just created a more polished version of the Strip Keywords service, you can find it here: http://www.bartbusschots.ie/blog/?p=1906
I’d love you thoughts on it, especially if there’s something I’ve overlooked.
Cheers,
Bart.
Hi Bart
Listening to you the other day on Adams show I think and you mentioned you automator services for resizing photographs. You also mentioned adding a drop shadow and I can’t seem to find out how to do it within Automator
Hi Bart,
Thank you for this post. I’ve been looking for a while and I think your post is the closest to what I need.
So basically, I want to right click any image/video or any folder that contains images or videos and add keywords and geo tags to it via an automator service.
So here’s an ideal workflow:
take this image/video/folder => optimize the image first => then add KWs (from a .txt or .csv file) and GEO tags (from a .txt or .csv file)
Is this something that is even doable with automator and exiftool?
Thanks in advance for all your help!
~ Roselle