The Author – Bart Busschots
Creative Commons
Unless otherwise stated, the content on this site is licensed under Creative Commons Attribution, Noncommercial, No Derivative Works 3.0 License


Aug
30
Play a Sound in Automator
Filed Under Computers & Tech, Software Development, System Administration on August 30, 2014 at 11:25 pm
In a recent Chit Chat Across the Pond segment on episode 484 of the Nosillacast Mac Podcast myself and Allison walked through the process of creating an automator action for generating secure memorable passwords with the XKPasswd 2 perl module (we basically walked through the steps in this blog post). During that discussion Allison mentioned it would nice if Automator could play a sound when it was finished so you could know when automator was done generating the password without installing a third-party notification app like Growl.
At the time I didn’t know of a way to do that, but now I do, and it’s really quite straightforward thanks to the OS X terminal command afplay which will play an audio file without opening any sort of GUI.
To actually play a sound we’ll only need two automator actions, one to get the file we want to play, and one to play it, but, depending on what the workflow is for, you may need four. The reason for the complication is that if we are not careful we could end up replacing the output of the workflow with a link to the sound we just played!
In the case of the XKPasswd action myself an Allison talked about last week there was no output as such because the action wrote the password to the clipboard, but that’s probably the exception rather than the rule. I’m going to demonstrate the robust way of doing things, but bear in mind that if you don’t care about the output you can leave out the first and last steps.
The way we are going to preserve the output is by saving it to a variable, playing our sound, then loading the original output back from the variable when we’re done.
Step 1 – Save the Output to a Variable
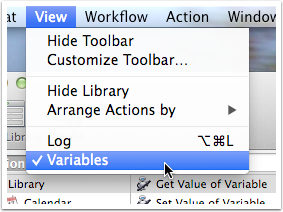
Because we’ll be working with variables, be sure the variables tab is showing at the bottom of the workflow. If not, enable it by making sure there is a checkmark next to Variables in the View menu.
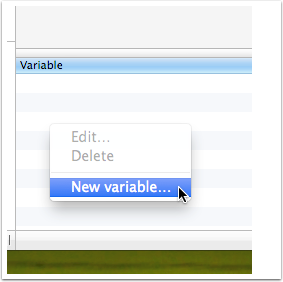
Before we can use a variable we should create one (you can do it from within an action, but the UI can get a bit hinky doing it that way). To create a variable right-click anywhere in the variables section and choose New Variable ….
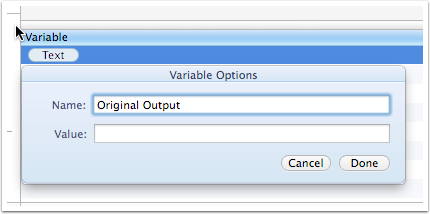
Give your new variable a name (I’m using the logical Original Output), and give it a blank value:
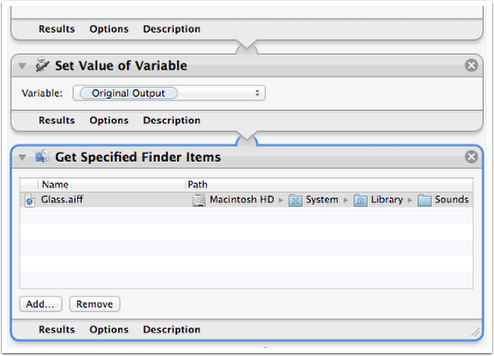
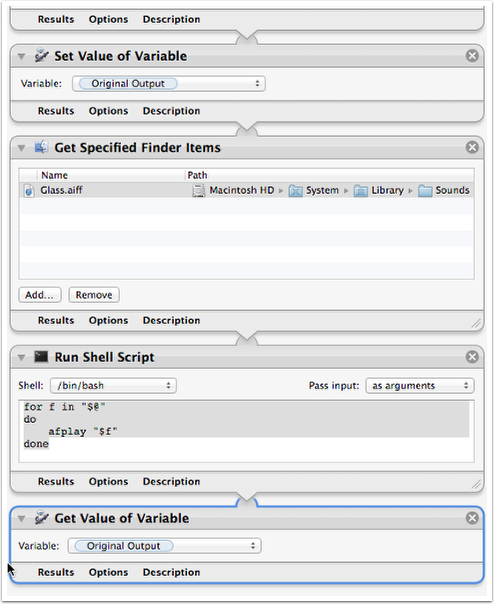
We are now ready to save the original output of the action to the variable. Do this by adding a Set Value of Variable action to the end of the workflow, and choosing your newly crated variable from the drop down within the action:

Step 2 – Get a Reference to the Audio File to Play
Next we need to get a reference to the audio file (or files for that matter) we wish to play. To load the file into the workflow drag and drop a Get Specified Finder Items action onto the end of the workflow, then select the file (or files) you wish to play by clicking Add and navigating to them (or dragging and dropping them onto the action).
You could play any file of your choosing, but you probably want one of the standard system audio sounds which you’ll find in /System/Library/Sounds (or Macintosh HD → System → Sounds). I like Glass.aiff, so that’s what I’ve selected:

Step 3 – Play the File
To play the file we’ll use the afplay terminal command. Start by dragging and dropping a Run Shell Script action into the end of the workflow, and leave the Shell drop down within it to the default of /bin/bash, and set the Pass Input drop down to as arguments:
Leave the default code in place, but replace the word echo with afplay.
This should result in code that looks like:
for f in "$@"
do
	afplay "$f"
done
Step 4 – Put the Original Output Back
Finally, assuming we care about the workflow output, put the original output back by dragging and dropping a Get Value of Variable action onto the end of the workflow, and selecting the variable we created during the first step from the drop down menu inside the action:
And that’s all there is to it!
[…] 2) I found a way to make Automator play a sound: https://www.bartbusschots.ie/s/2014/08/30/play-a-sound-in-automator/ […]
Hi there, and thank you for your post.
I get an error after the Shell script runs.
The error is the following:
Error: AudioFileOpen failed(‘type?’) (1)
But even so the sound is played and then the error happens.
Any idea how to solve that?
OS X 10.10
I managed that adding a if command like that
if [ “$f” = “/System/Library/Sounds/Pop.aiff” ]
Cheers
[…] to the googles as one does. Imagine my delight when the very first hit I got on my query was to bartb.ie/… and a post he wrote on August 30, 2014 entitled “Play a Sound in Automator”. I […]
[…] 2) I found a way to make Automator play a sound: https://www.bartbusschots.ie/s/2014/08/30/play-a-sound-in-automator/ […]