The Author – Bart Busschots
Creative Commons
Unless otherwise stated, the content on this site is licensed under Creative Commons Attribution, Noncommercial, No Derivative Works 3.0 License


Sep
30
OS X Service for Markdown Link Creation
Filed Under Computers & Tech, Software Development on September 30, 2014 | Leave a Comment
At the request of listeners I’m going to be publishing a big list of links with future Let’s Talk Apple shows. The logical format for me to create those notes in is Markdown – it’s plain text, and quick and easy for me to add new items and re-arrange them into logical groupings. for the most part markdown has little to no overhead, but when it comes to links there is a little work. What I wanted was a way of automatically taking a URL, and turning it into a markdown link where the text for the link is the site the story is from with /… after it.
When all is done I want to turn a url like http://www.macobserver.com/tmo/article/every-important-link-from-apples-9-9-event-on-one-page into a link that looks like: www.macobserver.com/…. In other words, I need to take the URL above as input, and turn it into the following Markdown code:
[www.macobserver.com/...](http://www.macobserver.com/tmo/article/every-important-link-from-apples-9-9-event-on-one-page)
My reason for choosing this format is that I want to give obvious credit to the sources of the stories, but not waste screen real-estate on long URLs.
Perl’s URI module can interpret URLs, and easily extract the host part of the URL, OS X Services can take selected text as input and replace it with processed output, Automator can create OS X Services, and Automator can execute Perl code. By putting all these pieces together I was able to solve my problem in just 20 minutes with a few clicks and a few lines of code.
You can just download the service with the link below, or you can read on to see how it’s done.
Download OS X Service …
Aug
16
Creating an XKPasswd 2 OS X Service with Automator
Filed Under System Administration, Computers & Tech on August 16, 2014 | 5 Comments
It’s going to take me a few months to re-write the www.xkpasswd.net site so it uses the new XKPasswd 2 perl module. In the mean-time, thanks to the magic of Automator an OSX Services, Mac users can integrate XKPasswd 2 right into their OS with out very much effort at all.
This blog post is intended as a follow-on post to my earlier XKPasswd 2 beginners guide. This post assumes you have followed the installation instructions in the beginner’s guide to install the XKPasswd 2 module, that you followed along with that post and created a script that generates passwords in a format of your choice, and that you have tested that script to be sure it works. In this post I’ll be using the final example script from the beginner’s guide as my pre-written script.
Jul
26
OS X Service – Word Count (and More)
Filed Under My Projects, Computers & Tech, Software Development on July 26, 2013 | 9 Comments
Inspired by a recent episode of The Mac Cast I decided to see if I could come up with a simple way of getting a word count of a PDF on OS X using only tools that come standard with the OS.
Because of OS X’s Unix underpinnings, all Macs have access to the Unix wc command which calculates word counts on given input. OS X also has a handy built in Terminal command to access the contents of the clipboard (pbpaste). This leads to an obvious simple manual solution:
- Open the PDF in Preview
- Select All Text
- Copy to clipboard
- Run the Terminal command:
pbpaste | wc -w
This is a bit cumbersome though, so I went on to create a simple OS X Service to calculate the word count of any selectable text in any app (the fact that this is even possible, let alone easy, is why I love OS X).
For those of you just looking for a copy of the Service, you can download it here:

To install the service simply extract the automator file from the ZIP archive and copy it into either the Library/Services folder in your home directory, or the system-wide service folder /Library/Services.
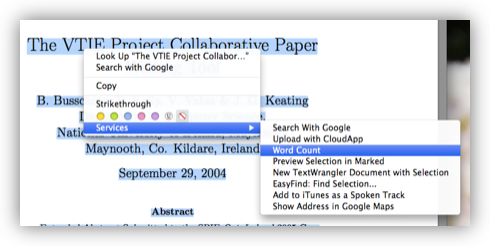
Once the Service is installed you can use it in almost any OS X app (specifically in any app written using the standard Cocoa libraries) by selecting some text, right-clicking on it, and selecting the Word Count service:
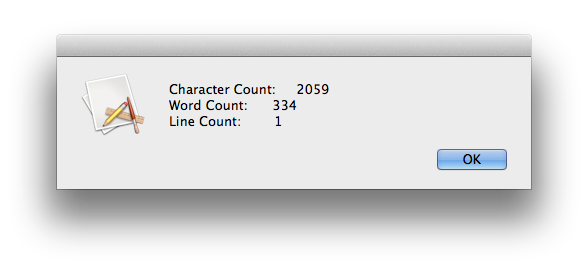
When done the results will look something like this:
Those of you who want to see how easy this Service was to write, read on and I’ll walk you through it.
Dec
29
OS X Service for Stripping Geotags from JPEG Images
Filed Under Software Development, Computers & Tech, Photography, My Projects on December 29, 2012 | 1 Comment
Back in 2011 I wrote a blog post explaining how to create an OS X Service for stripping keywords from image files. In this post we’ll use the same technique to create a Service for stripping geotags from JPEG images.
As with the keyword stripping service, there are two prerequisites for this action, one is required, one is optional. You absolutely MUST have install EXIFTool installed, and it would be good if you also had Growl installed, but it’s not essential.
Jan
16
Why I Love Automater & Services in OS X 10.6 SnowLeopard
Filed Under Software Development, Computers & Tech on January 16, 2010 | 5 Comments
Since I first started using OS X at version 10.3 I’ve always felt that the services menu had great potential but badly needed some fit and polish to make it actually live up to that promise. It has been so bad that it is basically forgotten, and almost no one remebers that it even exists. In every application in OS X there is a menu item under the apps’s main menu (the one in bold with the same name as the app) called Services, that’s what I’m talking about. When it comes to the services menu both Tiger and Leopard were major disappointments because they didn’t bring any real improvement to the neglected services menu. SnowLeopard on the other hand is a totally different story. Similarly, when Automator first came out I thought it had great promise, but that it was a very 1.0 kind of offering, again, in need of some fit and polish to allow it live up to its obvious potential. SnowLeopard provides a lot of that fit and polish, and really brings Automator forward significantly. And what’s better, Apple have combined the fit and finish in these two apparently unrelated products together, to provide some exceptionally powerful functionality.