The Author – Bart Busschots
Creative Commons
Unless otherwise stated, the content on this site is licensed under Creative Commons Attribution, Noncommercial, No Derivative Works 3.0 License


Aug
4
Making an XKpasswd Automator Action
Filed Under Computers & Tech, Software Development, My Projects on August 4, 2012 at 4:33 pm
 A few weeks ago on the Chit Chat Across the Pond segment of the Nosillacast, I mentioned that I had an OS X service set up to generate a random password using my XKpasswd Perl module and copy it to the clipboard. Listeners enquired as to how they would go about doing that, so as promised, here’s a quick tutorial.
Obviously this tutorial is for Mac OS X users only, because OS-wide Services and Automator are OS X features. The screenshots are taken on 10.8 Mountain Lion, but this same technique definitely also works on OSX 10.7 Lion, and probably even on 10.6 Snow Leopard. This tutorial also assumes that you have downloaded the XKpasswd module, and saved it somewhere on your computer, along with either the sample dictionary file included with the module or one of your own making, and that you know where on your computer those files have been saved. In other words, you need to have XKpasswd.pm and a text file with one word per line somewhere on your hard drive. In my sample code I’m going to assume you’ve installed the Perl module to the suggested location, /usr/local/xkpasswd/XKpasswd.pm, and that you have customised the sample dictionary a little (more secure that way), and saved it to /usr/local/xkpasswd/dict.txt.
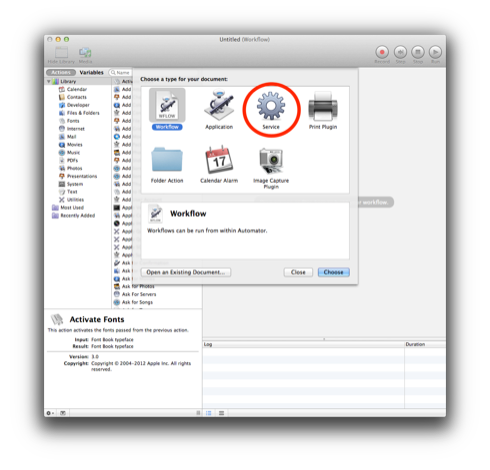
Lets get started by opening up the Automator app (Applications→Automator), and creating a new file. Automator will ask you what type of document you want to create, choose Service.
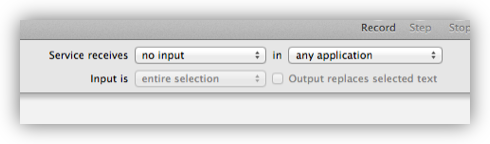
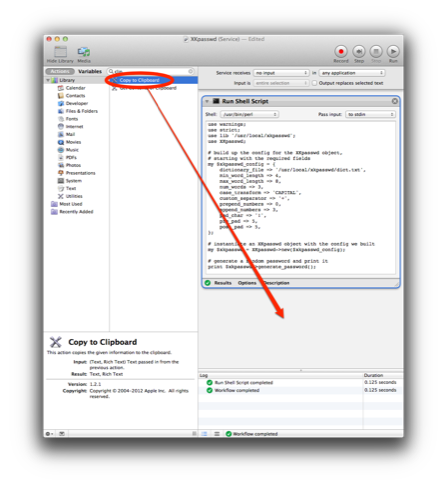
At the top of this new blank document there are some options which control the input the service will expect, and which apps the service will be available in. Since we are generating the password from scratch, there is no input required at all, and we want this service to be available everywhere, so set the Service receives drop-down to no input, and leave the in drop down at the default any application as shown below:
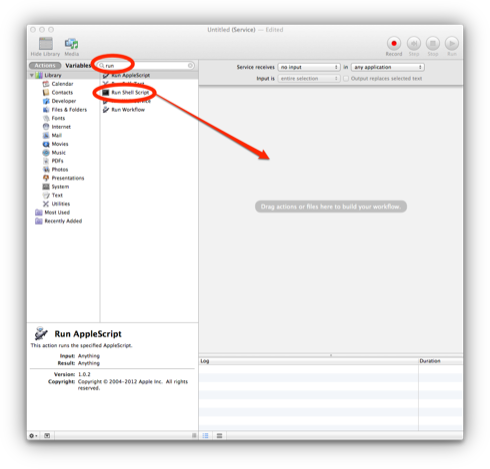
Next we need to add a Run Shell Script action to the service. The easiest way to find this action in the list of actions is to type ‘run’ in the search box. When you find it, drag and drop it into the service.
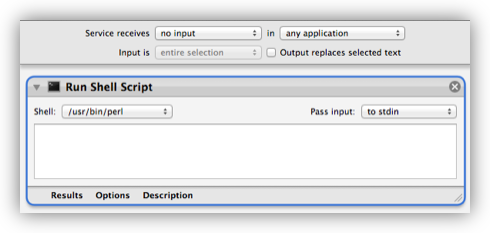
In this new action, we need to change the Shell from the default value /bin/bash, to /usr/bin/perl, and then delete the default code that is added to the text box. We will be starting with a blank slate. (Since we are taking no input, we can ignore the Pass Input drop down completely this time.) By Default the text box in the action is very small, so you’ll probably want to enlarge it by grabbing the ‘handle’ on the bottom right corner and dragging it down a bit. Better still, you could open a programming editor like the fantastic and cheap Smultron, write your code there, and then copy and paste it back into automator when you’re done.
Now we have to write the Perl code. I’m going to follow my own advice and use Smultron. Why? Because that way I get syntax highlighting which makes typos much easier to spot. It will also make the script easier to debug if you’re having problems, by making it easy to run the Perl code in the Terminal. If you don’t have Smultron or a similar coding editor, you can use TextEdit provided you use it in Plain Text mode (Format->Make Plain Text).
In Smultron (or TextEdit), start by creating a new document, and saving it somewhere on your hard drive with the extension .pl, I’m going to call my script xkpasswdService.pl and save it in ~/Documents/temp.
We’re now ready to start writing some Perl code. If you’ve never programmed before, don’t worry, but pay very close attention, programming is a precise art, ', ", and ` are different symbols with different meanings, and capitalisation matters, And is not the same as and, and so on. You’re probably best off copying and and pasting the final code further down in this article and then tweaking it for your needs, rather than trying to write it all yourself from scratch. Alternatively, I’ve included the code a file called xkpasswdService.pl in the downloadable ZIP archive linked near the bottom of the article. Although I want you to copy and paste the code (from either this article or the file in the archive), I’m going to build up the code piece by pice so I can explain each section clearly.
Lets start the script with some good practice. If you learn nothing more about Perl today than these first two lines, you’ll have learned a lot. You CAN write Perl without them, but you’re just making life harder for yourself, especially as your scripts get larger and more complex. Think about writing Perl without strict and warnings as being like tightrope walking without a safety net – best avoided 🙂
use warnings;
use strict;
Next, we need to include the XKpasswd module. This is not a part of standard Perl, so we first need to tell Perl which folder the .pm file is in, only then we can include it. To tell Perl where to look, we use the use lib directive, and to actually use the module, we use the use directive. If you’ve installed XKpasswd.pm in a location other than /usr/local/xkpasswd/ you’ll need to adjust this line accordingly.
use lib '/usr/local/xkpasswd';
use XKpasswd;
The next step is to build up a variable with the configuration details to be used by the XKpasswd module while generating passwords. We’re going to use a type of variable called a hashref, and we’re going to call it $xkpasswd_config (in Perl all ‘scalar’ variable names begin with a $ symbol). A hashref is simply a good data structure for storing and passing around key-value pairs in Perl. In the case, the keys will the configuration options we would like the module to use when generating the passwords. I’m going to build up this variable in steps, but you don’t have to do that, you could do it all in one go. The reason I’m doing it in steps is to split the options that are compulsory from the ones that are optional. It’s important to note at this stage that in Perl, any line beginning with a # symbol is ignored by the Perl interpreter, and so does not make up part of the program. These lines are called comments, and are there purely for the benefit of humans, they are there to help us understand what the code is doing.
Aside – there’s an old programming joke that code comments are like sex, even bad comments are better than none at all 😉
# build up the config for the XKpasswd object,
# starting with the required fields
my $xkpasswd_config = {
    dictionary_file => '/usr/local/xkpasswd/dict.txt',
    min_word_length => 4,
    max_word_length => 8,
};
The dictionary_file option specifies the location of the dictionary file the XKpasswd module should use when generating the passwords. If you’ve saved your dictionary file somewhere else, you’ll have to adjust this line accordingly. The min_word_length and max_word_length options specify the minimum and maximum length of the words from the specified dictionary that should be used when building the password. The way it works is that the dictionary is read in once, and all words not within the range specified by these two values (inclusively) will be ignored and not loaded by the module. Also note that the module will throw an error if it does not load at least 1000 matching words from your dictionary file (this is to ensure your random passwords really are random, or, in nerd speak, that they have sufficient entropy).
Next we start adding any further optional options we desire. All these options can be left out, and the module will just use default values for you. I’m only going to show some of the commonly used ones here, for a full list of supported options see the extensive comment starting at line 36 of XKpasswd.pm, or the sample file (example.pl) distributed with the module.
First, lets decide how many words we’d like our password to be built from, and what, if any, case transformations we’d like to see applied to those words. The valid values for the case transformation are NONE (leave the words as they appear in the dictionary file), CAPITAL (capitalises the first letter of every word), UPPER (convert all words to entirely upper case), LOWER (convert all words to entirely lower case), ALTERNATE (convert each alternate word to all upper case, then all lower case, then all upper case and so on), and finally, RANDOM (randomly convert each word to all upper or all lower case). If the option is not specified at all, the module defaults to applying no case transformations. Note that we must surround the value in the capitalisation variable with so-called single quote symbols.
# choose how many words to use, and
# how they should be capitalised
$xkpasswd_config->{num_words} = 3;
$xkpasswd_config->{case_transform} = 'CAPITAL';
Second, lets decide what character we will use to separate the words that will make up the bulk of the generated passwords. We can specify a single character, or, the special values RANDOM, for a randomly chosen character each time a password is generated, or NONE if we don’t want any separator character to be used. BTW – if this option is not specified, the module defaults to using a random character. In this case I’m going to use the character +. Note that, again, we have to surround the value for the separator option with single quote characters.
# specify the character to use to separate
# the parts of the password
$xkpasswd_config->{custom_separator} = '+';
Thirdly, lets specify how many random digits to include before and after the words that make up our password. The numbers before and after don’t have to be the same, and if you don’t want any digits, you can set the values to 0. I’m going to add no random digits before the words, and three after. The default is three before and three after.
# specify the number of random digits to add
# before and after the words in the password
$xkpasswd_config->{prepend_numbers} = 0;
$xkpasswd_config->{append_numbers} = 3;
Finally, lets configure the padding of the password. The XKpasswd module can pad out your password to a bigger size by adding one or more symbols before and/or after the words and digits that make up your password. By default a random symbol is chosen, and three copies of that symbol are added to the front and back of the password. In this example lets change that behaviour to using 5 exclamation marks at the beginning and the end of our passwords.
# specfify how the password should be padded
$xkpasswd_config->{pad_char} = '!';
$xkpasswd_config->{pre_pad} = 5;
$xkpasswd_config->{post_pad} = 5;
Putting it all together, at this stage our code should look like this:
use warnings;
use strict;
use lib '/usr/local/xkpasswd';
use XKpasswd;

# build up the config for the XKpasswd object,
# starting with the required fields
my $xkpasswd_config = {
    dictionary_file => '/usr/local/xkpasswd/dict.txt',
    min_word_length => 4,
    max_word_length => 8,
};

# choose how many words to use, and
# how they should be capitalised
$xkpasswd_config->{num_words} = 3;
$xkpasswd_config->{case_transform} = 'CAPITAL';

# specify the character to use to separate
# the parts of the password
$xkpasswd_config->{custom_separator} = '+';

# specify the number of random digits to add
# before and after the words in the password
$xkpasswd_config->{prepend_numbers} = 0;
$xkpasswd_config->{append_numbers} = 3;

# specfify how the password should be padded
$xkpasswd_config->{pad_char} = '!';
$xkpasswd_config->{pre_pad} = 5;
$xkpasswd_config->{post_pad} = 5;
However, we could compress it a little by making all the declarations in one go. This will make the code shorter, but the details comments will have to be sacrificed. It won’t make any functional difference to how the code works though, so you can leave it as-is if you prefer. I’m going to shorten it a little, because I find that easier to read and edit.
use warnings;
use strict;
use lib '/usr/local/xkpasswd';
use XKpasswd;

# build up the config for the XKpasswd object,
# starting with the required fields
my $xkpasswd_config = {
    dictionary_file => '/usr/local/xkpasswd/dict.txt',
    min_word_length => 4,
    max_word_length => 8,
    num_words => 3,
    case_transform => 'CAPITAL',
    custom_separator => '+',
    prepend_numbers => 0,
    append_numbers => 3,
    pad_char => '!',
    pre_pad => 5,
    post_pad => 5,
};
We are now ready to create an XKpasswd object, which can then be used to generate passwords as specified by the config we’ve assembled.
# instantiate an XKpasswd object with the above config
my $xkpasswd = XKpasswd->new($xkpasswd_config);
Finally, with the object created, we can generate a password, and print it. The way the Run Shell Script Automator Action works is that what ever the script prints out is used as the output of the action and passed on as the input to the next Action in the workflow. Note that we are using the word print in a software sense, not a hardware sense. We’re talking about printing to the standard output stream, not a piece of paper.
# generate a random password and print it
print $xkpasswd->generate_password();
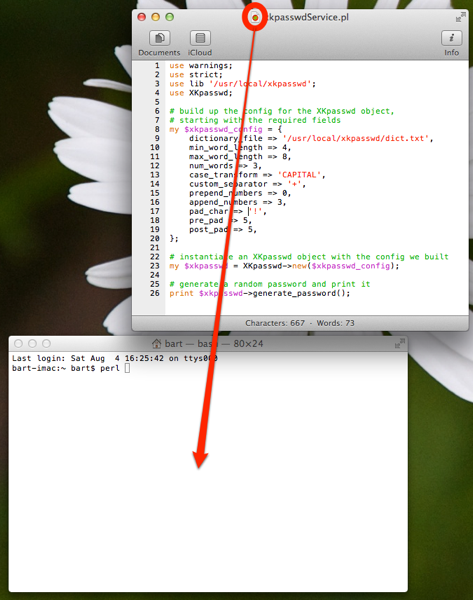
Our final assembled code now looks like this:
use warnings;
use strict;
use lib '/usr/local/xkpasswd';
use XKpasswd;

# build up the config for the XKpasswd object,
# starting with the required fields
my $xkpasswd_config = {
    dictionary_file => '/usr/local/xkpasswd/dict.txt',
    min_word_length => 4,
    max_word_length => 8,
    num_words => 3,
    case_transform => 'CAPITAL',
    custom_separator => '+',
    prepend_numbers => 0,
    append_numbers => 3,
    pad_char => '!',
    pre_pad => 5,
    post_pad => 5,
};

# instantiate an XKpasswd object with the config we built
my $xkpasswd = XKpasswd->new($xkpasswd_config);

# generate a random password and print it
print $xkpasswd->generate_password();
Before copying and pasting this code into the Run Shell Script Action back in Automator, we should test it. To do that we’re going to make use of the so-called proxy icons (the little icons next to the file name in the window’s title bar) native OS X documenting editing apps like TextEdit and Smultron provide. Before trying to test your code, be sure to save your document! Start by opening a terminal window (Applications→Utilities→Terminal) and typing the word perl with a single space after it (DO NOT HIT ENTER YET) into the Terminal window. Then, drag and drop the proxy icon at the top of your TextEdit/Smultron window onto your Terminal window, this should copy the full path to your Perl script into the Terminal.
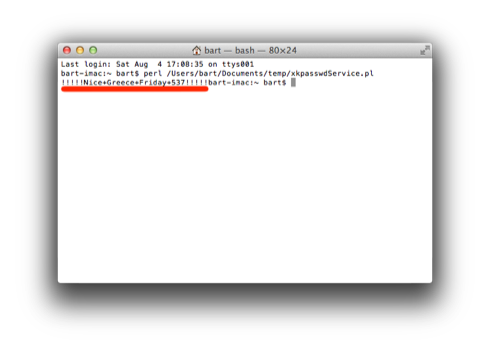
Once the path is in your Terminal window, you can go ahead and hit enter. If there are no errors in your code, a random password should be printed, and then you should get a fresh prompt directly after it on the same line (this is because we are not including a newline character when printing the password to keep automator happy). It should look something like this (I’ve underlined the password in red):
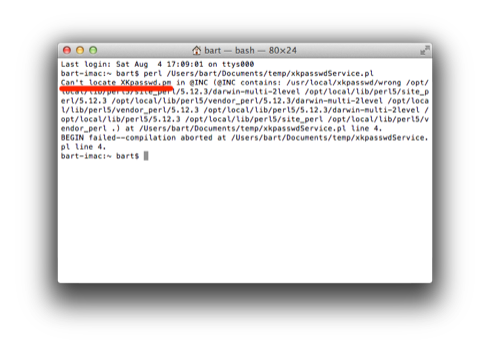
The two most likely errors you might encounter would be caused by getting one of the two paths wrong. If you get the include path for the XKpasswd module wrong you’ll see an error starting with Can't locate XKpasswd.pm in @INC (I’ve underlined the important part of the error in the screenshot below).
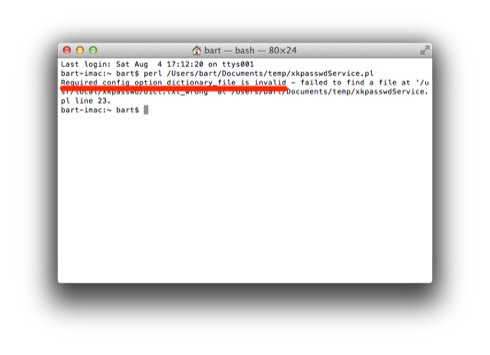
If, on the other hand, you made a mistake with the path to the dictionary file you’ll see an error that starts with Required config option dictionary_file is invalid (again, I’ve underlined the important part of the error in the screenshot below).
Aside – if you didn’t know about proxy icons, they’re one of OS X’s coolest power features – want to email someone a document you have open, just drag and drop the proxy icon onto the mail.app icon in your dock, want to go to a folder you have open in the Finder in the Terminal, just type cd followed by a space into the Terminal window, drag and drop the proxy icon from the Finder window onto the Terminal window, and hit enter, want to copy a document you have open to a thumb drive, just drag and drop the proxy icon onto the icon for the thumb drive on the desktop, or onto a Finder window showing the contents of the thumb drive etc..
When you’re happy that the script is working, you can copy and paste the code into the Run Shell Script Action back in Automator.
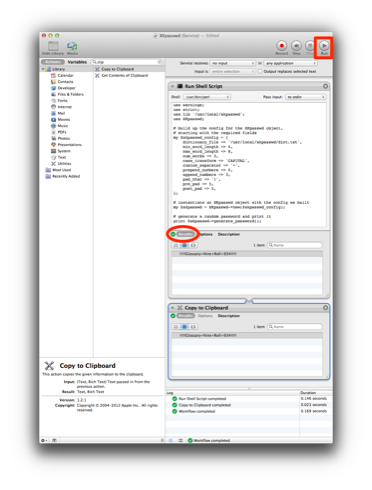
Next we need to add an Automator Action into our workflow to copy the value passed to it into the clipboard. Unsurprisingly, this action is called Copy to Clipboard. Again, the easiest way to find it is to search for it, and when you have found it you need to drag and drop it into your workflow below the Run Shell Script.
At this stage your action should look something like the screenshot below, and you can test it by clicking on the Run button in the toolbar on the top right of the Automator window. You can see the contents being returned by each action if you click the Results button on the bottom of the Actions. If all is well, a green tick should show next to each Action. If there’s an error, the details will be in the log, which will appear at the bottom of the window.
At this stage, you can save the Service, and start using it. However, I like to add an action to show a Growl notification when the password is ready. Particularly the first time you use a Service, it can take a few seconds to load and run, so it’s very handy to see some form of visual feedback when the password is ready for you in the clipboard. Obviously this will only work if you have Growl installed on your Mac. Sadly, as of OS X 10.8.0 there is no Automator action to send a message to the new Notification Centre in OS X Mountain Lion, which strikes me as an annoying oversight by Apple.
The downloadable ZIP below contains two copies of the service, one with Growl, and one without. To install them, just copy them to your ~/Library/Services folder. If you’re using Lion or Mountain Lion you can get to your Library folder by holding down the Option key when you click the Go menu in the Finder, and then selecting the Library option which appears.

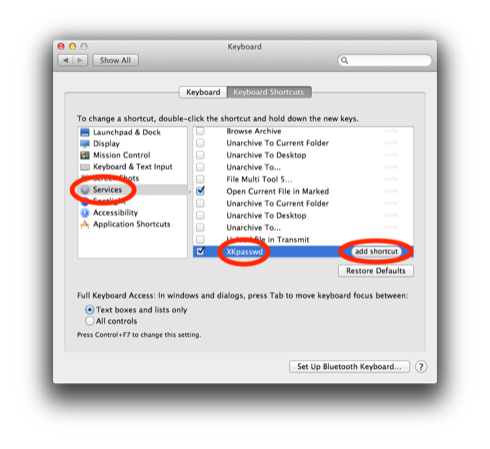
Finally, if you’d like to add a keyboard shortcut for your new Service, you can do this using the Keyboard Shortcuts tab in the Keyboard applet in System Preferences. In here you’ll need to select Services in the left panel, and then scroll until you find your new XKpasswd service listed (probably at the bottom) in the right pane, select it, click the add shortcut button that appears, and then enter your chosen shortcut (I use ctrl+x).
[…] Updated the web interface: http://www.xkpasswd.net OS X Automator action Tutorial: http://www.bartbusschots.ie/blog/?p=2357 Link to this post! By TheTechLounge on August 7, 2012 / The Tech Lounge Show […]
[…] Bart mentioned he had developed an Automator-based Service to generate passwords locally on his Mac, directly […]