The Author – Bart Busschots
Creative Commons
Unless otherwise stated, the content on this site is licensed under Creative Commons Attribution, Noncommercial, No Derivative Works 3.0 License


Aug
12
Photo of the Week 77 – Ennis Friary
Filed Under Photography on August 12, 2009 | 1 Comment
This is my 67th Photo of the Week, yet it is only the second monochrome image to make it into the series. I think this is because I absolutely adore colour, and feel rather out of my depth when colour gets extracted from the equation. It took me hours to process this shot the first time, then I got some feed back from people on a few flickr groups, and then it took me another hour or so to have another go and come up with something I not just liked, but liked a lot. Most of the time I only revert to monochrome as a fall-back, but I’m going to try change that, and spend more time experimenting with monochrome precisely because I’m not comfortable with it.
Returning to this image, I reverted to monochrome here because I didn’t have a choice. I had once chance to get a short visit to the priory, so I had to make do with what ever I got – which was mostly rain! At the very end I got a few shots in good sun, but I didn’t have the opportunity to re-shoot this shot in sun because of time pressures. So, what I got was an image with a blown out sky, a flat looking stone building, and almost no colours to speak of. I was either going to bin it, or go monochrome. Determined not to waste the shot, I went for the monochrome option – deciding texture was going to be what I needed to concentrate on – in particular, I wanted to recover details in the sky, and enhance the details in the stonework of the building.
Since I’d shot in RAW I started by tone-mapping the image to recover detail in the sky, and also to enhance details in walls. Then I converted to monochrome using the monochrome mixer in Aperture, before using Aperture’s dodge & burn plug-in to correct some side effects of the tone-mapping and to pick out the spire of the church a little better. After seeking and getting some opinions from others I also used some pretty dramatic levels adjustments to really push up the contrast and really make those textures jump out.
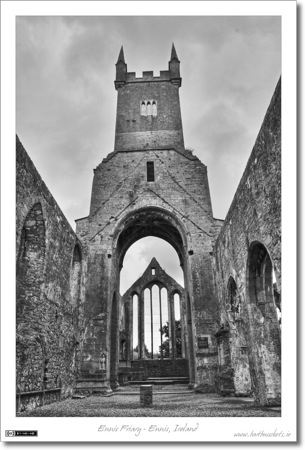
- Camera: Nikon D40
- Lens: Nikon DX AFS 18-55mm (D40 kit lens)
- Exposure: 1/400 sec
- Focal Length: 18mm
- Focal Ratio: f/8
- ISO: 400
- Camera Mode: Aperture Priority
- Processing: Generated by tonemapping a single RAW file in Photomatix Pro, then converting to monochrome in Aperture, dodging & burning in Aperture, as well as applying some other tweaks in Aperture.
Jul
25
What’s the Story with Tonemapping?
Filed Under Photography on July 25, 2009 | Leave a Comment
I’ve become very fond of tonemapping as a photographic technique, and have mentioned it quite a few times in the descriptions of the photos I pick for my Photo of the Week blog posts. The more people see my tonemapped photos, and the more I mention tonemapping on Flickr, the more questions I get about it, so, instead of repeating myself over and over again, I figured I may was well just write an article about it that I can then link people to.
Lets start with some background, particularly with the concept of the dynamic range of a scene. You hear the term a lot, but I get a feeling a lot of people are not sure what it means. The simplest way I can describe it is as the difference between the brightest objects in the scene, and the darkest objects in the scene. Our eyes have quite a large dynamic range, at mid-day on a sunny day we can see both the things illuminated by the sun, and the things in shadow at the same time. Try that with a camera, and you’ll soon find that cameras have a much smaller dynamic range than our eyes. You’ll either end up with no detail in the shaded bits, or no detail in the bright bits, but try as you might, you won’t capture both! This is not a new problem, although it has gotten worse. Film has a bigger dynamic range than the JPEG images that come out of our digital cameras, but even film has a signifficatly smaller dynamic range than our eyes.
Jul
4
Photo of the Week 71 & 72 – A Cavan Sunset
Filed Under Photography on July 4, 2009 | 4 Comments
I’ve found myself one week behind yet again, so, for what seems like the millionth time, I’m doing a double-post this weekend. As always with these multiple posts, I’m choosing two related photos, in this case, VERY related photos, they were both taken within a few minutes of each other of the very same subject! The reason I’ve chosen to do these together is because they show two approaches to the same situation.
When you shoot a sunset the dynamic range is exceptionally high. You are shooting into the sun, and at the same time, the ground is getting dark, so, you have a very bright subject, with very dark surroundings. The range between the brightest and darkest range of the scene is just too big for a camera to take in. This leaves you with a choice between two approaches, both of which can make for fantastic photos.
As a complete geek, my first reaction is to throw technology at the problem. Although the technology I threw at the problem is quite modern (HDR photography), the idea is not new. In the past people would use graduated filters to solve the same problem. With a graduated filter the top of the filter blocks quite a lot of light, the bottom, none. You can get filters that have very abrupt graduations where half the filter is dark, the other half completely transparent with a very short transition between the two regions, or you can have filters that go smoothly from dark to light over the entire length of the filter. Different situations will call for different filters, but the aim is the same, get both the bright bits and the dark bits properly exposed despite the large difference in brightness between them (i.e. the large dynamic range). I don’t own any filters, so that’s not what I did. Instead, I used a technique called Tonemapping on a RAW file. The result is that you can see detail in both the bright sky and the dark landscape in this shot, which is the first of my two photos for this week:
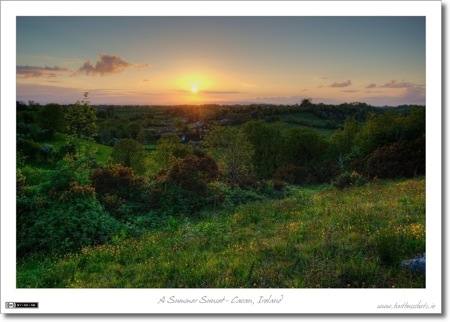
- Camera: Nikon D40
- Lens: Nikon DX AFS 18-55mm (D40 kit lens)
- Exposure: 1/320 sec
- Focal Length: 18mm
- Focal Ratio: f/8
- ISO: 200
- Camera Mode: Aperture Priority
- Exposure Bias: -1.0EV
- Processing: Generated by tonemapping a single RAW file in Photomatix Pro.
So that’s an example of taking the first option for dealing with a high dynamic range, use technology to get around it. So what’s the second option? Don’t fight it, accept it, and use it! If you can’t get everything exposed properly, don’t even try, instead, intentionally only expose for one element. With a sunset that one element is the sky, and then you intentionally throw the rest into silhouette. You intentionally take away all exposure in your foreground! This can result in a lot of black space in your image, so you often have to crop pretty hard to make this work well. An example of this is the second image I’ve chosen for this week:
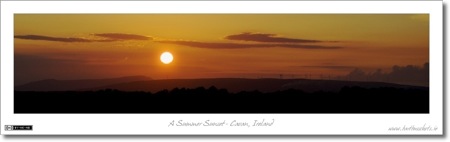
- Camera: Nikon D40
- Lens: Nikon DX AFS 18-55mm (D40 kit lens)
- Exposure: 1/640 sec
- Focal Length: 55mm
- Focal Ratio: f/8
- ISO: 200
- Camera Mode: Aperture Priority
- Exposure Bias: -2.0EV
Apr
7
Photo of the Week 59 – Last Train from Galway
Filed Under Photography on April 7, 2009 | Leave a Comment
Following on from last week I’ve chosen another image generated by tonemapping a single RAW file. This is an example of a shot that’s not possible with traditional HDR techniques because the train is moving. Normally HDRs are built by combining multiple separate exposures, but since the train is moving, it would appear in a different place in each exposure, resulting in a great big mess!
I took this shot while I was in Galway for a few days for a conference. The weather was mostly terrible, and there were very few trains per day, but I managed to find a moment when the weather was good, I was free from conference duties, and there was a train due none-the-less. The sky also really co-operated, putting on a spectacular show.
The train is the last InterCity service of the day from Galway to Dublin-Heuston. In this case it was made up of a single six-car Diesel Multiple Unit (DMU) set. Irish Rail only have a few of these Class 22031 DMUs, which are the big brothers of the much more common Class 22001 three-car DMUs that run many InterCity services. I quite like these modern looking trains, though I do miss the old days when InterCity services were made of up regular railway coaches pulled by locomotives. I prefer the sound of the big powerful locomotives, though I think the locals prefer these near-silent DMUs 🙂
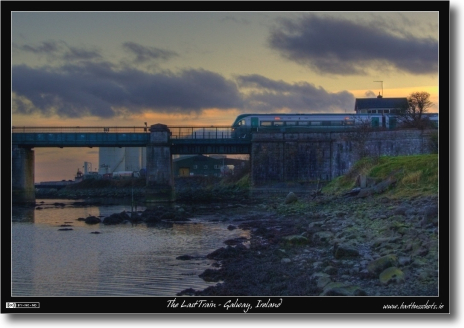
- Camera: Nikon D40
- Lens: Nikon DX AFS 18-55mm (D40 kit lens)
- Exposure: 1/160 sec
- Focal Length: 48mm
- Focal Ratio: F8
- ISO: 400
- Camera Mode: Aperture Priority
- Post Processing: Single RAW file tonemapped with Photomatix Pro
Mar
29
Photo of the Week 58 – Connolly’s Folly at Dusk
Filed Under Photography on March 29, 2009 | 2 Comments
A somewhat controversial technique I’m very fond of is tonemapping single RAW files. Tonemapping is more normally applied to a High Dynamic Range (HDR) image generated by combining multiple shots of the same scene at different exposures. A RAW file contains much less information than an HDR image, but it still contains enough to allow tonemapping to bring out hidden detail quite effectively, though only to about plus or minus a stop and a half. I find this is a really effective way of processing sunset and dusk shots like this one.
I took this shot from just outside the derelict graveyard at Donaghmore next to Pike’s Bridge along the Royal Canal between Maynooth and Leixlip. The obelisk you can see against the dramatic dusk sky is the top of Connolly’s Folly.
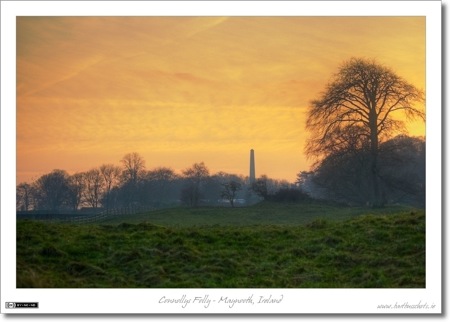
- Camera: Nikon D40
- Lens: Nikon DX AFS 55-200mm
- Exposure: 1/320 sec
- Focal Length: 75mm
- Focal Ratio: F4.5
- ISO: 200
- Camera Mode: Aperture Priority
- Post Processing: Single RAW file tonemapped with Photomatix Pro
Feb
18
Photo of the Week 52 – Fire & Ice
Filed Under Photography on February 18, 2009 | 5 Comments
It’s hard to believe I’ve been doing these weekly posts for a year now! I’m so glad this idea worked out, it’s really helped my keep blogging and keep taking photos.
This shot was taken in St. Joseph’s Square on the St. Patrick’s College Campus (AKA NUI Maynooth South Campus) in Maynooth, Ireland. It was taken later the same day as the photo I used for Photo of the Week 50. After it stopped snowing we got a really dramatic sunset over the freshly whitened landscape. It was an amazing sight to behold. The shot was taken from the middle of St. Joseph’s Square looking west towards St. Patrick’s House, and shows two of the campus’s best known landmarks, the President’s Arch (the door between the two towers), and the Gunne Chapel (AKA the College Chapel).
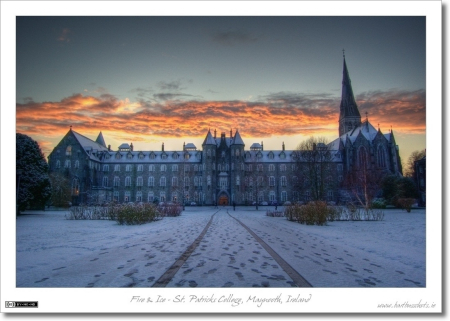
- Camera: Nikon D40
- Lens: Nikon DX AFS 18-55mm (D40 kit lens)
- Exposure: 1/160 sec
- Focal Length: 18mm
- Focal Ratio: F8
- ISO: 800
- Camera Mode: Aperture Priority
- Processing: This image was generated from a single RAW file converted to a pseudo-HDR image and then tone-mapped with Photomatix Pro. You can see the un-tone-mapped version here.
Jan
6
Photo of the Week 46 – A Winter Night in Maynooth
Filed Under Photography on January 6, 2009 | Leave a Comment
I shot this photo last December, but since it’s so insanely cold tonight I figured this would be an appropriate time to share it as a Photo of the Week. In summer this same grass is full of people sitting out enjoying the sun chatting or studying or playing Frisbee, but now, in winter, it’s pretty much deserted except for the occasional very determined dog-walker. This area of St. Patrick’s College in Maynooth is referred to as ‘the Graff’, and the building is St. Mary’s House. You can also see the spire of the college chapel, the Gunne Chapel, in the background.
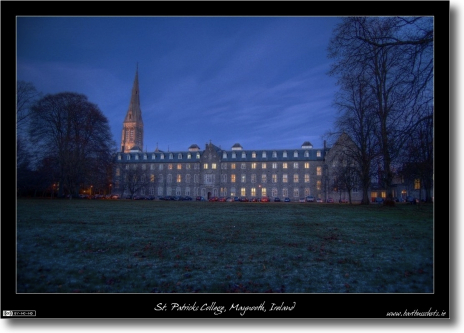
This image is composed of four images separated by 1 stop combined into an HDR image and tone-mapped with Photomatix Pro.
- Camera: Nikon D40
- Lens: Nikon DX AFS 18-55mm (D40 kit lens)
- Focal Length: 18mm
- Focal Ratio: F3.5
- ISO: 400
- Camera Mode: Aperture Priority
Nov
29
Photomatix Pro – First Impressions
Filed Under Photography, Computers & Tech on November 29, 2008 | 4 Comments
 Anyone who’s been following this blog for a while will know that I’ve been experimenting with HDR for most of this year. I started off with the cheapest solution I could find so that I could be sure I really wanted to go down this road before spending a lot of money on more professional software. It can’t be denied that I got some good results with the process I’ve been using until now, but I was never completely happy with the results. In particular the level of haloing was really starting to annoy me. Today I bit the bullet and spent $99 (about €80) on the stand-alone version of Photomatix Pro from HDR Soft. The reason I went for the standalone version is that I don’t have photoshop and am not planning to buy it any time soon (probably never as long as it costs extortionate amounts of money). I haven’t had much time to play with it yet but I though I’d share some of my initial thoughts and results.