The Author – Bart Busschots
Creative Commons
Unless otherwise stated, the content on this site is licensed under Creative Commons Attribution, Noncommercial, No Derivative Works 3.0 License


Dec
22
TTT Part 26 of n – DHCP
Filed Under System Administration, Computers & Tech on December 22, 2014 | 2 Comments
In part 23 of n we took a big-picture look at how TCP/IP networking works. As a quick reminder, the most important points were:
- Our computer networks use a stack of protocols known as TCP/IP
- We think of the stack of protocols as being broken into four layers:
- The Link Layer – lets computers that are on the same network send single packets of data to each other
- The Internet Layer – Lets computers on different networks send single packets of data to each other
- The Transport Layer – lets computers send meaningful streams of data between each other
- The Application Layer – where all the networked apps we use live
In the previous instalment we looked at how IP subnet works. The key takeaway was that a computer needs a minimum of three settings correctly configured to be able to participate in an IP network: an IP address, a subnet mask, and a default gateway (the IP address of the router providing access outside the subnet). We also looked at how to read those three settings from your Mac using the GUI and the Terminal. Finally, we noted that historically, those settings had to manually configured, but that today, almost all computers acquire those settings automatically. In this instalment we’ll look at the protocol that makes that possible, the Dynamic Host Configuration Protocol, or DHCP.
Dec
7
TTT Part 25 of n – IP Subnets
Filed Under System Administration, Computers & Tech on December 7, 2014 | 9 Comments
In part 23 of n we took a big-picture look at how TCP/IP networking works. As a quick reminder, the most important points were:
- Our computer networks use a stack of protocols known as TCP/IP
- We think of the stack of protocols as being broken into four layers:
- The Link Layer – lets computers that are on the same network send single packets of data to each other
- The Internet Layer – Lets computers on different networks send single packets of data to each other
- The Transport Layer – lets computers send meaningful streams of data between each other
- The Application Layer – where all the networked apps we use live
In the previous instalment we focused on the lowest of the four layers, the link layer, and looked at how ethernet and ARP work. In this instalment we’ll move one layer up the stack and take a closer look at the IP protocol. A concept absolutely central to IP’s operation is that of related groups of IP addresses known as IP Subnetworks or just subnets. This is the concept we’ll be focusing on in this instalment.
Nov
23
TTT Part 24 of n – Ethernet & ARP
Filed Under System Administration, Computers & Tech on November 23, 2014 | 4 Comments
In the previous instalment we took a big-picture look at how TCP/IP networking works. As a quick reminder, the most important points were:
- Networking is complicated!
- Our computer networks use a stack of protocols known as TCP/IP
- We think of the stack of protocols as being broken into four layers:
- The Link Layer – lets computers that are on the same network send single packets of data to each other
- The Internet Layer – Lets computers on different networks send single packets of data to each other
- The Transport Layer – lets computers send meaningful streams of data between each other
- The Application Layer – where all the networked apps we use live
In this instalment we’ll take a quick look at the lowest of these four layers – the Link Layer. Specifically, we’ll look at MAC addresses, the difference between hubs, switches, and routers, and the ARP protocol.
Oct
25
TTT Part 23 of n – Networking Intro
Filed Under System Administration, Computers & Tech on October 25, 2014 | 11 Comments
This instalment is the first in what will probably be quite a long mini-series on computer networking. Before we can look at the terminal commands that allow us to interact with the network, we need to gain an understanding of how computer networking works. This is a complex topic, ad there’s a lot to take in. The individual pieces don’t make sense without keeping the big-picture in mind, and yet the big picture doesn’t gel together until you start to understand the detail. Bearing that in mind, this instalment starts the series with a big-picture overview. We’ll flesh this overview out over the instalments that follow, adding in the detail that will hopefully make the whole thing click for you. Ultimately, it’s actually a very elegant design, but that elegance may not be immediately obvious!
Oct
24
“Behind People’s Backs”
Filed Under Security, Computers & Tech on October 24, 2014 | 2 Comments
I’m fed up with people being dishonest about the new search feature in Yosemite. You can have reasonable discussions about the pros and cons of this feature, but for goodness sake enough with the fact-free hyperbole.
I’ve lost count of how many people insist Apple is sending this information back to Apple “behind people’s backs”. Sorry, but that is a fact-free assertion. The screenshot below shows the search feature in question:
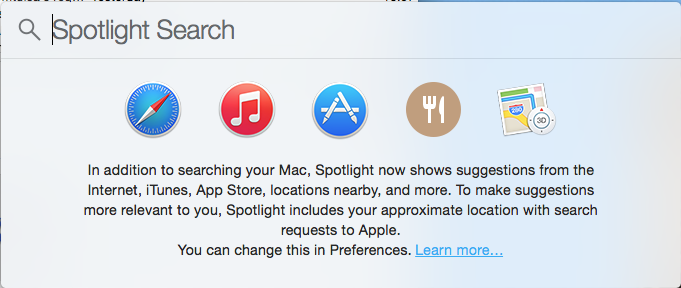
Here it is again with the important aspects highlighted:
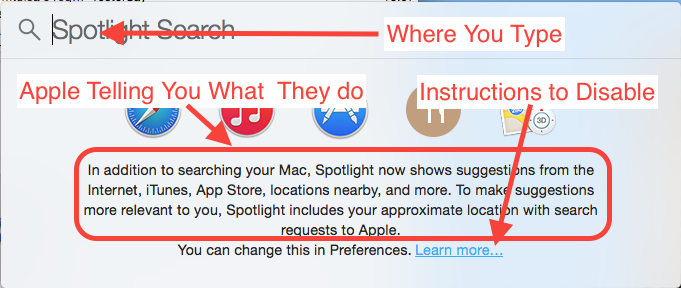
If that’s “behind people’s backs” then I’m the pope!
Something I will agree with critics on is that I think that link to instructions should be a button or checkbox to disable the feature. A link to instructions is nice, a button would be perfect!
This data is not being sent for no reason, it’s being sent to offer people a richer search experience, and Apple were actually playing catchup in this regard. Here’s what Microsoft say Windows 8.1 does:
By default, the Search charm searches the apps, files, and settings on your PC and OneDrive, plus the web.
The real question is whether or not Apple have thought about our privacy when implementing this feature, and whether or not they have designed the feature well. Here is what Apple say they do:
We are absolutely committed to protecting our users’ privacy and have built privacy right into our products. For Spotlight Suggestions we minimize the amount of information sent to Apple. Apple doesn’t retain IP addresses from users’ devices. Spotlight blurs the location on the device so it never sends an exact location to Apple. Spotlight doesn’t use a persistent identifier, so a user’s search history can’t be created by Apple or anyone else. Apple devices only use a temporary anonymous session ID for a 15-minute period before the ID is discarded.
We also worked closely with Microsoft to protect our users’ privacy. Apple forwards only commonly searched terms and only city-level location information to Bing. Microsoft does not store search queries or receive users’ IP addresses.
You can also easily opt out of Spotlight Suggestions, Bing or Location Services for Spotlight.
So, your searches are not tied to your Apple ID or any other persistent ID, instead, your device creates a new random identifier every 15 minutes, so your searches are anonymous, and most importantly, they can’t be profiled because the IDs are ephemeral. The fact that the device fuzzes the location before sending it on is also very good. The fact that IP details are not logged is also good. Finally, the fact that only a sub-set of the request is sent on to Bing is great.
I do not believe Apple would blatantly lie to users. For a start, as a publicly traded company that would almost certainly be criminal, but even leaving that aside, it would be spectacularly damaging for Apple to be caught lying about stuff like this.
Bottom line, Apple have been very open about this, Apple have implemented this feature with privacy in mind, and this feature is not unique to Apple OSes. Finally, if you want to opt-out, you can.
If this really is such a scandal, why is Windows 8.1 not coming under the same fire? *cough* link bait *cough*
Oct
10
TTT Part 22 of n – Tips & Tricks
Filed Under System Administration, Computers & Tech on October 10, 2014 | 2 Comments
This instalment is a little breather between the fairly heavy instalments on searching, and the upcoming set of instalments on networking. We’ll start with a look at some tips and tricks for getting the most out of BASH, and then transition to some tips and tricks for getting the most out of the OS X Terminal app.
Sep
30
OS X Service for Markdown Link Creation
Filed Under Software Development, Computers & Tech on September 30, 2014 | Leave a Comment
At the request of listeners I’m going to be publishing a big list of links with future Let’s Talk Apple shows. The logical format for me to create those notes in is Markdown – it’s plain text, and quick and easy for me to add new items and re-arrange them into logical groupings. for the most part markdown has little to no overhead, but when it comes to links there is a little work. What I wanted was a way of automatically taking a URL, and turning it into a markdown link where the text for the link is the site the story is from with /… after it.
When all is done I want to turn a url like http://www.macobserver.com/tmo/article/every-important-link-from-apples-9-9-event-on-one-page into a link that looks like: www.macobserver.com/…. In other words, I need to take the URL above as input, and turn it into the following Markdown code:
[www.macobserver.com/...](http://www.macobserver.com/tmo/article/every-important-link-from-apples-9-9-event-on-one-page)
My reason for choosing this format is that I want to give obvious credit to the sources of the stories, but not waste screen real-estate on long URLs.
Perl’s URI module can interpret URLs, and easily extract the host part of the URL, OS X Services can take selected text as input and replace it with processed output, Automator can create OS X Services, and Automator can execute Perl code. By putting all these pieces together I was able to solve my problem in just 20 minutes with a few clicks and a few lines of code.
You can just download the service with the link below, or you can read on to see how it’s done.
Download OS X Service …
Sep
26
TTT Part 21 of n – More Searching
Filed Under Computers & Tech, System Administration on September 26, 2014 | 1 Comment
This is the third and final instalment on searching. In the first instalment we learned how to search for text within files and streams using egrep. In the second we learned to search for files based on all sorts of criteria with the find command. In this final instalment we’ll start by looking at one last feature of find, its a ability to execute commands on the files it finds. Then we’ll end by looking at an OS X-only alternative to find that makes use of the Spotlight search index to really speed up searches.
Sep
7
TTT Part 20 of n – File Searches
Filed Under System Administration, Computers & Tech on September 7, 2014 | 2 Comments
In the previous previous instalment we looked at using egrep to search for a particular piece of text in a stream or file. egrep is often a great tool for finding a file you are looking for, but only if the file is a plain text file, and only if you are searching for that file based on its content. What if you want to search for files based on other criteria, like the last time the file was edited, or the name of the file, or the size of the file, or the type of the file etc.? For that you need a different command, for that you need find.
Aug
30
Play a Sound in Automator
Filed Under System Administration, Software Development, Computers & Tech on August 30, 2014 | 5 Comments
In a recent Chit Chat Across the Pond segment on episode 484 of the Nosillacast Mac Podcast myself and Allison walked through the process of creating an automator action for generating secure memorable passwords with the XKPasswd 2 perl module (we basically walked through the steps in this blog post). During that discussion Allison mentioned it would nice if Automator could play a sound when it was finished so you could know when automator was done generating the password without installing a third-party notification app like Growl.
At the time I didn’t know of a way to do that, but now I do, and it’s really quite straightforward thanks to the OS X terminal command afplay which will play an audio file without opening any sort of GUI.