The Author – Bart Busschots
Creative Commons
Unless otherwise stated, the content on this site is licensed under Creative Commons Attribution, Noncommercial, No Derivative Works 3.0 License


Jul
5
TTT Part 35 of n – HTTP Commands
Filed Under Computers & Tech, System Administration on July 5, 2015 | 6 Comments
The previous instalment we introduced the HTTP protocol. In this instalment we’ll look at three terminal commands which make use of the HTTP protocol.
We’ll start by browsing from the terminal, and then move on to a pair of very similar commands for making HTTP requests from the terminal. These two commands can do many things, but we’ll focus on two specific use-cases, downloading files, and viewing HTTP headers.
Apr
25
TTT Part 33 of n – SSH ‘Bookmarks’
Filed Under Computers & Tech, Security, System Administration on April 25, 2015 | 3 Comments
This is the final SSH instalment. So far we’ve learned how to securely execute terminal commands on remote computers, how to securely copy files across the network using SSH, how to add both security and convenience to both those operations with SSH key pairs, and how to tunnel just about anything through SSH. In this final instalment we’ll look two approaches for creating SSH bookmarks, SSH config files, and SSH GUIs.
Apr
6
TTT Part 32 of n – SSH Tunnelling
Filed Under Computers & Tech, Security, System Administration on April 6, 2015 | 3 Comments
This is the fourth SSH instalment. So far we’ve learned how to securely execute terminal commands on remote computers, how to securely copy files across the network using SSH, and how to add both security and convenience to both those operations with SSH key pairs.
As we saw in the previous instalment, SSH’s ability to provide a secure connection between two computers can be used in many different ways. In this instalment we’ll learn about three more ways to encapsulate other network traffic within an SSH connection, adding encryption to that traffic.
Running commands and copying files are the kinds of things most people do, so the three SSH instalments to date have been quite generally applicable. That is not the case for this instalment. The three SSH features we’ll be discussing are all very useful to those who need them, but only a minority will have a use for any one of these features. However, even if you don’t need these features today, I would argue that it’s good to know these features exist, because they could well solve a problem you’ll have in the future.
There will be illustrations of the uses for these technologies, but not commands you type into your terminal to play along at home. That makes this an unusual instalment, but I hope you will still find it worthwhile.
Apr
4
TTT Part 31 of n – SSH File Transfers
Filed Under Computers & Tech, System Administration on April 4, 2015 | 5 Comments
In Part 29 of n we learned how to use SSH to execute commands on a remote computer. In the previous instalment we learned how to add security and convenience to SSH connections using SSH key-pairs.
The most important thing SSH provides is an encrypted connection between two computers. As we’ve seen, that encrypted connection can be used to securely issue terminal commands to a remote computer, but that same secured channel can also be used to secure other network connections between computers. In this instalment we’ll look at three different ways of securely copying files between computers through an SSH connection, and in the next instalment we’ll look at tunnelling just about any network connection through an SSH connection.
Mar
29
TTT Part 30 of n – SSHing More Securely
Filed Under Computers & Tech, Security, System Administration on March 29, 2015 | 7 Comments
In the previous instalment we saw how we can use SSH to execute a single command on a remote computer, or, to get a command shell on a remote computer. We also saw how SSH uses host keys to protect us from man-in-the-middle (MITM) attacks.
In this instalment we’re going to look at how we can improve both SSH security and convenience with SSH keys.
Feb
14
TTT Part 29 of n – Intro to SSH
Filed Under Computers & Tech, Security, System Administration on February 14, 2015 | 8 Comments
In the previous six instalments we looked in detail at how TCP/IP networks tick. In these instalments we worked our way up from the bottom of the four-layer TCP/IP network model to the top, finishing off with a look at two protocols in the Application Layer at the top of the stack. Those two protocols, DHCP & DNS exist in the top layer, but are different to most other top layer protools in that they can reasonably be described as forming part of the infrastructure of the internet. The email and web protocols may site within the same network layer, but they still rely on DNS to function.
For the remainder of the networking section in this series we’ve moving away from infrastructure-like protocols, and focusing on the user-facing Application Layer protocols. The first of these we’ll be looking at is the Secure Shell, or SSH. This protocol is one of the absolute work-horses of the internet, and a vital tool for all Linux, Unix, and OS X sysadmins.
At it’s simplest level SSH allows you to execute commands on a remote computer, but because it was designed around the concept of a secure tunnel between two systems, SSH has expanded to allow all kinds of advanced features. The least-generous description of this could be that SSH has become a kind of sysadmins fridgeoven. But I don’t buy that, I prefer the alternative interpretation – it simply makes sense not to re-invent the wheel, and to allow as much information as possible to flow throw the secure connection SSH provides between the two end-points.
Today we’re just going to start with the basics, but in future instalments we’ll move on to the more advanced features.
Jan
30
TTT Part 28 of n – Network Troubleshooting
Filed Under Computers & Tech, System Administration on January 30, 2015 | 3 Comments
In part 23 of n we took a big-picture look at how TCP/IP networking works. As a quick reminder, the most important points were:
- Our computer networks use a stack of protocols known as TCP/IP
- We think of the stack of protocols as being broken into four layers:
- The Link Layer – lets computers that are on the same network send single packets of data to each other
- The Internet Layer – Lets computers on different networks send single packets of data to each other
- The Transport Layer – lets computers send meaningful streams of data between each other
- The Application Layer – where all the networked apps we use live
Since that big-picture introduction we’ve looked at the first three layers in detail, and we’ve also looked at two layer-4 protocols that function as part of the network infrastructure – DHCP for the automatic discovery of network settings, and DNS for mapping domain names to IP addresses. Later in the series we will move on to look at some more layer 4 protocols, but before we do I want to consolidate what we’ve learned so-far into a strategy for debugging network problems. In short – how to get from a vague complaint like “the internet is broken” to a specific problem that can be addressed.
Jan
10
TTT Part 27 of n – DNS
Filed Under Computers & Tech, System Administration on January 10, 2015 | 2 Comments
In part 23 of n we took a big-picture look at how TCP/IP networking works. As a quick reminder, the most important points were:
- Our computer networks use a stack of protocols known as TCP/IP
- We think of the stack of protocols as being broken into four layers:
- The Link Layer – lets computers that are on the same network send single packets of data to each other
- The Internet Layer – Lets computers on different networks send single packets of data to each other
- The Transport Layer – lets computers send meaningful streams of data between each other
- The Application Layer – where all the networked apps we use live
- Logically, data travels across the layers – HTTP to HTTP, TCP to TCP, IP to IP, ethernet to ethernet, but physically, data travels up and down the stack, one layer to another, only moving from one device to another when it gets to the Link Layer at the very bottom of the stack.
We have now looked in detail at Layer 1 and Layer 2, and have looked at how DHCP allows our computers to automatically configure their TCP/IP network stack. In this instalment we’re going to look at a Layer 4 protocol that is essential to our use of the internet – DNS.
At layers 2 and 3 all addressing is by IP address, yet just about every networked app we use totally insulates us from that fact. Our computers think in terms of IP addresses, but we think in terms of domain names. The Domain Name System (DNS) exists to bridge this gap, allowing domain names to be converted to IP addresses, and IP addresses to domain names.
Listen Along: Taming the Terminal Podcast Episodes 27a & 27b
The Hosts File
In the early days of the internet the conversion between human readable host names for computers, and IP addresses was stored within each computer in a single file – /etc/hosts. This meant that names were not in any way authoritative. I could give what ever name I wanted to an IP address and save that mapping into my /etc/hosts file, and you could give the same IP address a completely different name and save that mapping in your /etc/hosts file.
Organisations could choose to centrally manage /etc/hosts file by keeping an authoritative copy on a file server and having a script copy that file to every computer within the organisation overnight, but it really was up to each organisation to decide how they would manage host name to IP address mappings.
While DNS superseded the hosts file, it did not replace it. The hosts file still exists in Linux, Unix, OS X, and even Windows! On a POSIX OS like OS X you can view the content of the file with the command:
cat /etc/hosts
This file is given a higher priority than DNS by your operating system, so any name to IP mappings you add to this file will override the official mappings from DNS. This can be very useful. It can be used as a crude form of website blocking, if you map a website you don’t want your kids to use to a non-existent IP address, or to the loopback address (127.0.0.1), then that site will be inaccessible. Another great use for the hosts file is to test a new website before you make it live. Finally, you can also use the hosts file to add memorable names to computers on your own home network. It’s a much simpler approach than running your own private DNS infrastructure.
The hosts file is a plain text file with a very simplistic format. Each line must start with an IP address followed by one or more names separated by blank space. If I wanted to add two aliases to my home router, I could add a line like:
192.168.10.1 myrouter myrouter.localdomain
I would now be able to access the web interface for my router at https://myrouter and https://myrouter.localdomain.
It’s also helpful to note that lines starting with a # are interpreted as comment lines, and ignored by the OS. If you’re going to use the hosts file extensively, it’s a good idea to comment your changes so you know why you did what you did when you look back at the file a few months or years hence!
Finally, be aware that the file is owned by root, so you need to use sudo to gain root privileges to edit the file, e.g.:
sudo vi /etc/hosts
sudo pico /etc/hosts
The Domain Name System
The DNS spec was released in 1983, and the first Unix DNS server was written in 1984. Although the spec has been added to in the intervening years, the fundamental design remains un-changed.
The DNS Philosophy
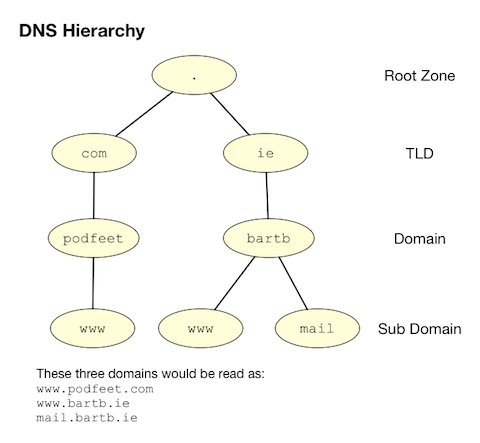
Before DNS computers had simple hostnames, but DNS took things to the next level by introducing the concept of a hierarchy of names. In DNS speak a group of related names are known as a zone, but most people refer to them as domains.
The hierarchy of domain names is anchored at the top by the so-called root zone, which has the one-letter name . (almost universally omitted when domain namess are written). Below the root you will find the so-called TLDs or Top Level Domains like .com, .net, .org, and so on. As well as generic TLDs like those examples, there are also country-specific TLDs, like .ie for Ireland, .be for Belgium, .fr for France, and so forth. Some countries have also chosen to break their TLDs up into multiple sub-TLDs, a practice that seems particularly common among former British colonies! E.g. in Australia commercial sites are .com.au while educational sites are .edu.au. A particularly cryptic one is .ac.uk, which is the TLD for UK educational institutions (the ac stands for Academic Community).
Institutions and the general public can buy the rights to use domain names one level down from TLDs. Allison Sheridan for example has the rights to podfeet.com, and I have the rights to bartb.ie. Once you own a domain you can then break it down any way you like, adding as many or as few subdomains as desired. www.podfeet.com is a subdomain of podfeet.com which is a subdomain of the generic TLD .com which is a subdomain of the root (.). Technically, www.podfeet.com should be written as www.podfeet.com., but as a species we’ve decided that the DNS root zone should be implied rather than explicitly added to domain names, and we’ve written our software with that implicit assumption. You are entirely free to add the final dot back in though, it is part of the spec after all!
The best way to think of DNS names is as a tree, as illustrated in the diagram below. But, rather than reading the tree from root to leaf, we always read it backwards, from leaf to root.
DNS Records
Many people describe DNS as being like the internet’s phone book, because like a phone book, it turns names into numbers. That’s not a bad analogy, but it’s overly simplistic. A phone book contains only one type of record, phone numbers, but the DNS system contains records of many different types. The list below is not exhaustive, but covers the records you’re most likely to encounter:
- A DNS A record maps a domain name to an IPv4 IP address – the most common kind of DNS record
- Some day DNS AAAA records may replace A records as the most common – they map domain names to IPv6 addresses.
- A DNS CNAME (Canonical Name) record maps a domain name to another domain name. Think of CNAME records as DNS aliases. E.g. If you out-source your email service to a third party but don’t want to give people a URL with another company’s domain name in it, you could set up a CNAME record to alias
webmail.yourdomain.comtowebmail.serviceprovider.com. - DNS MX records, or Mail eXchanger records specify the domain name of the mail server that accepts email for a given domain.
- DNS PTR records are used by the reverse-DNS system to map a domain name to an IP address (think of them as the inverse of A records).
- DNS NS records map a domain name to the domain name of the a server that is authoritative for that domain (domains usually have 2 or 3 NS records)
- DNS TXT records, or text records, are used to map a domain name to an arbitrary piece of text. A common usage for TXT records is to prove domain ownership. Certificate authorities and cloud service providers often force people applying for a certificate or a service to prove they own a domain name by asking that they set a given TXT record on the domain.
- DNS SRV records, or service records, are used to map service to a given domain name, port number, and protocol. Microsoft Windows licensing and Microsoft Active Directory make extensive use of SRV records for service auto discovery. E.g., a DNS SRV record is used by Windows desktop computers in large organisations with centrally managed multi-user licenses to figure out what server they should contact to license themselves.
A AAAA
CNAME
MX
PTR
NS
TXT
SRV
If this series were targeted at corporate sysadmins we’d focus heavily on A, AAAA, PRT & SRV records. If it were targeted at webmasters we’d focus on A, CNAME, NS and TXT records. But, as this series is targeted at home users, we’re only really interested in A, CNAME & MX records.
DNS Servers
An important subtlty in the operation of DNS is that there are two very distinct types of DNS servers that fulfil to entirely different roles. Hence, talking about a DNS Sever without any more specificity is meaningless, and only likely to lead to confusion. To save everyone’s sanity you should never use the term DNS Server, instead, always refer to either Authoritative DNS Servers, or DNS Resolvers.
Authoritative DNS Servers
Authoritative DNS servers are responsible for hosting the DNS records for a domain. Each domain has to be served by at least one authoritative server, and almost all domains have two or more authoritative servers. Large organisations like corporations and Universities often run their own authoritative servers, but the general public generally pay a domain registrar to provide authoritative DNS servers for their domains. E.g. I pay Register365 to host the DNS zone for bartb.ie on their cluster of authoritative DNS servers, and Allison pays Hover to host the DNS zone for podfeet.com on their cluster of authoritative DNS servers.
Most of us rely on our domain registrars to perform two functions for us – register the domain, and host the DNS zone on their authoritative servers. It is entirely possible to separate those two functions. Sometimes it makes more sense to have the company that hosts your website host your DNS zone on their authoritative DNS servers. The fact that these two roles are separable causes a lot of confusion.
What really happens is that your registrar manages the NS records for your domain, and you can then point those NS records at their authoritative DNS servers, or any other authoritative DNS servers of your choice, perhaps those belonging to your hosting company.
Unless you own your own domain, you probably don’t need to know about authoritative DNS servers.
If you do own your own domain, you are probably administering it through an online control panel with your domain registrar or hosting provider. You should be able to access an interface that looks something like the one in the screenshot below (from Hover.com) where you can see all the DNS records set on your domain, edit them, and add new ones.
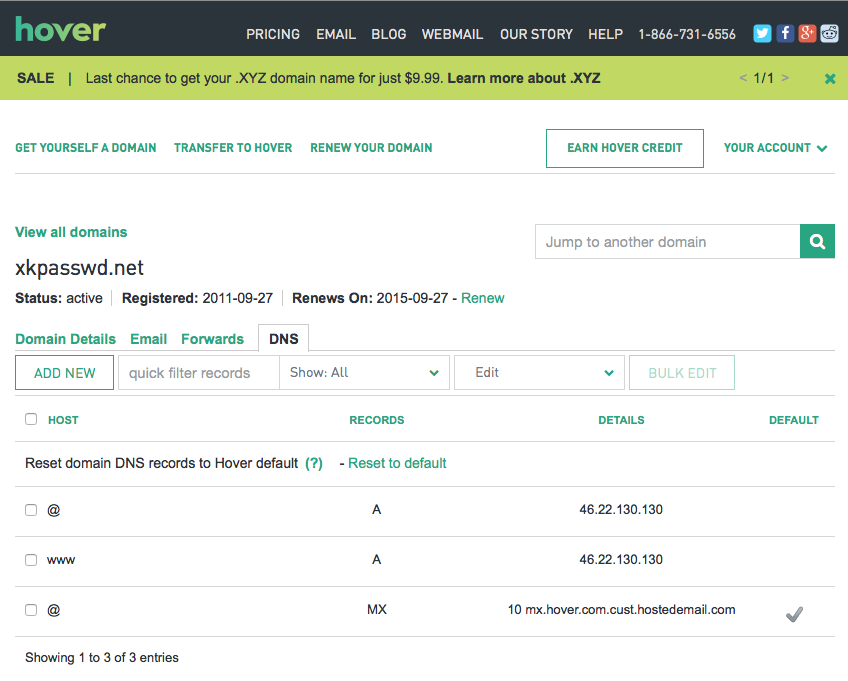
What you can see in the screenshot above is that there are just three DNS records in the xkpasswd.net zone, two A records (one for xkpasswd.net, and one for www.xkpasswd.net), and an MX record. You’ll notice that one of the A records and the MX record use the shortcut symbol @ to represent ‘this domain’. In other words, in this example, where ever you see @, replace it with xkpasswd.net. The @ symbol is used in this way in many DNS control panels, and indeed many many DNS configuration files.
DNS Resolvers
DNS Resolvers do the actual work of looking up the DNS records for a given domain name, be that A records and CNAME records for turning domain names into IP addresses, or MX records for figuring out what mail server email for a given domain should be sent to. DNS resolvers query the authoritative DNS servers to perform these lookup.
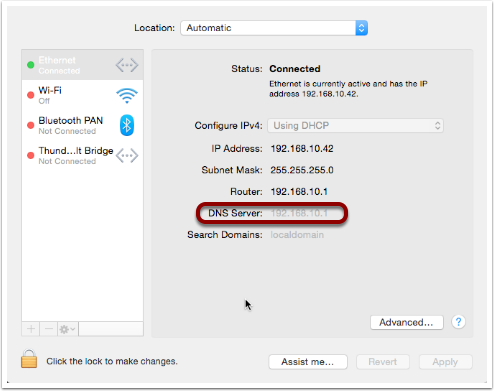
When DHCP pushes a name server setting to your computer, it is specifying which DNS Resolver your computer should use. When you look at the Name Server setting in the Network System Preference Pane, you will see what DNS Resolver your computer is configured to use.
On most Linux and Unix OSes, DNS resolution is controlled using the configuration file /etc/resolv.conf. This file is present in OS X, but is used as a way for the OS to expose the settings to scripts and command line utilities rather than as a way of controlling DNS configuration. The file on OS X is in the identical format to the ones on Linus and Unix. You can have a look at this file with the command:
cat /etc/resolv.conf
Types of DNS Resolver
A true DNS resolver works its way from the DNS root servers out to the requested domain name one step at a time. For example, for a DNS resolver to convert www.bartb.ie to an IP address it must follow the following steps:
- Query one of the root DNS servers for the A record for
www.bartb.ie.(the list of DNS root servers is hardcoded into the resolver’s configuration) - The root DNS sever will respond that it doesn’t know the answer to that query, but that it does know the authoritative name servers responsible for the
.ie.zone. In other words, the first query returns a list of NS records for the.iedomain. - The resolver then asks one of the authoritative DNS servers for
.ieif it has an A record forwww.bartb.ie. - The
.ieauthoritative server responds that it doesn’t, but that it does know the authoritative servers for thebart.ie.zone. The server returns the list of NS records forbartb.ieto the resolver. - The resolver then asks one of the authoritative servers for the
bartb.ie.zone if it has an A record forwww.bartb.ie. - This is my authoritative DNS server, and I have properly configured it, so it does indeed know the answer, and returns the IP address for
www.bartb.ieto the resolver.
The second type of DNS resolver is a so-called stub-resolver. Stub resolvers don’t do the hard work of resolution themselves, instead, they forward the request to another resolver and wait to be told the answer.
Our operating systems contain stub resolvers and our home routers contain stub resolvers. Our ISPs provide true resolvers, as do some third-party organisations like Google and OpenDNS.
If we imagine the typical home network, what happens when you type an address into the URL bar of your browser is that your browser ask you OS for the IP address that matches the URL you just entered. Your OS passes that request on to it’s internal stub resolver. The stub resolver in your OS passes the query on to the name server DHCP told it to use (almost certainly your home router). Your home router also contains a stub resolver, so it in turn passes the request on to the name server it was configured to use by the DHCP packet it received from your ISP. Finally, your ISP’s resolver does the actual resolving and replies to your router with the answer which replies to the stub resolver in your OS which replies to your browser.
When you take into account the redirections by the stub resolvers as well as the actual resolution, you find that six separate DNS requests were needed to convert www.bartb.ie to 46.22.130.125:
- Browser to stub resolver in OS
- Stub resolver in OS to stub resolver in router
- Stub resolver in router to true resolver in ISP
- True resolver in ISP to root DNS server
- True resolver in ISP to
.ieAuthoritative DNS server - True resolver in ISP to
bartb.ieAuthoritative DNS server in Register365
DNS Caching
If every DNS query generated this much activity the load on the root DNS servers would be astronomical, the load on the authoritative servers for the TLDs would be massive too, and even the load on authoritative servers for regular domains like bartb.ie would be large.
To make DNS practical, caching is built into the protocol’s design. DNS caching is not an afterthought, it was designed in from the start.
Every response to a DNS query by an authoritative server contains a piece of metadata called a TTL. This stands for Time to Live, and is expressed as a number of seconds. The TTL tells resolvers how long the result may be cached for.
All DNS resolvers, including stub resolvers, can cache results. This means that in reality, only a small percentage of the queries your ISP’s true resolver receives need to be resolved from first principles. All the common sites like www.google.com will be in the cache, so the resolver can reply without doing any work. Similarly, the stub resolver in your home router can also cache results, so if anyone in your house has been to podfeet.com recently, the stub resolver can answer directly from the cache without ever contacting your ISP’s resolver. The stub resolvers within our OSes can also cache results, so if you visit the same domain in two different browsers, you only need to contact your home router once. Finally, browsers can also cache responses, so as you browse from page to page within a given site, your browser doesn’t keep asking the stub resolver built into your OS the same question over and over again.
Between your browser’s cache, your OS’s cache, your router’s cache and your ISP’s cache, only a tiny percentage of queries result in work for the root DNS servers or the authoritative DNS servers.
Also – it’s not just positive results that get cached – if a domain name is found not to exist, that non-existence is also cached.
This multi-layered caching makes DNS very efficient, but it comes at a price, changes made on the authoritative servers do not propagate instantaneously. They only become visible when all the caches between the user and the authoritative server have expired and the data is refreshed.
The DNS Protocol
DNS is a layer 4 protocol that sits on top of UDP. Each query consists of a single packet, as does each reply. This use of single packets makes DNS very efficient, but it limits the amount of data that can be contained in a reply, and, it means that requests and replies can get silently dropped, because UDP does not guarantee delivery of every packet. Because of this DNS resolvers sometimes have to re-try their requests after a certain timeout value.
Authoritative servers and DNS resolvers listen on UDP port 53.
DNS Commands
Windows users must use the old nslookup command to resolve domain names:
nslookup domain.name
This command is still present in most Unix and Linux variants, including OS X, but is marked as deprecated on some modern distributions.
POSIX users, including Mac users, should probably get out of the habit of using nslookup, and start relying on the host command for simple queries, and the dig command for complex queries instead.
The host command is superbly simple, it accepts one argument, the domain name to resolve, and prints out the corresponding IP address. If the domain has an MX record that value is printed out too, and if the answer had to be arrived at by following one or more CNAME aliases those intermediate steps are printed out as well. E.g.
bart-iMac2013:~ bart$ host www.bartb.ie
www.bartb.ie has address 46.22.130.125
bart-iMac2013:~ bart$ host www.podfeet.com
www.podfeet.com is an alias for podfeet.com.
podfeet.com has address 173.254.94.93
podfeet.com mail is handled by 10 aspmx.l.google.com.
podfeet.com mail is handled by 20 alt1.aspmx.l.google.com.
podfeet.com mail is handled by 30 alt2.aspmx.l.google.com.
podfeet.com mail is handled by 40 aspmx2.googlemail.com.
podfeet.com mail is handled by 50 aspmx3.googlemail.com.
bart-iMac2013:~ bart$
The dig command is the swiss-army knife of DNS. For a full list of its many features see:
man dig
The basic structure of the command is as follows:
dig [options] domain.name [record_type] [@server]
If you don’t specify a record type, an A record is assumed, and if you don’t specify a server, the OS’s specified resolver is used.
If you don’t specify any options you will see quite verbose output, showing both the DNS query sent, and the reply, if any. This can be quite confusing, which is why I suggest using the simpler host command for basic queries. E.g. the following shows the output when trying to resolve www.bartb.ie which exists, and wwww.bartb.ie which does not. There is so much output that at first glance you might think both queries had succeeded.
bart-iMac2013:~ bart$ dig www.bartb.ie

; <<>> DiG 9.8.3-P1 <<>> www.bartb.ie
;; global options: +cmd
;; Got answer:
;; ->>HEADER<<- opcode: QUERY, status: NOERROR, id: 32641
;; flags: qr rd ra; QUERY: 1, ANSWER: 1, AUTHORITY: 0, ADDITIONAL: 0

;; QUESTION SECTION:
;www.bartb.ie.			IN	A

;; ANSWER SECTION:
www.bartb.ie.		18643	IN	A	46.22.130.125

;; Query time: 0 msec
;; SERVER: 192.168.10.1#53(192.168.10.1)
;; WHEN: Tue Dec 30 19:08:41 2014
;; MSG SIZE  rcvd: 46

bart-iMac2013:~ bart$ dig wwww.bartb.ie

; <<>> DiG 9.8.3-P1 <<>> wwww.bartb.ie
;; global options: +cmd
;; Got answer:
;; ->>HEADER<<- opcode: QUERY, status: NXDOMAIN, id: 4581
;; flags: qr rd ra; QUERY: 1, ANSWER: 0, AUTHORITY: 1, ADDITIONAL: 0

;; QUESTION SECTION:
;wwww.bartb.ie.			IN	A

;; AUTHORITY SECTION:
bartb.ie.		1799	IN	SOA	ns0.reg365.net. support.reg365.net. 2013011301 28800 3600 604800 86400

;; Query time: 32 msec
;; SERVER: 192.168.10.1#53(192.168.10.1)
;; WHEN: Tue Dec 30 19:08:47 2014
;; MSG SIZE  rcvd: 89

bart-iMac2013:~ bart$
What you will notice is that in the first output there is some metadata followed by a number of distinct sections, and finally some more metadata.
You can tell the second query failed for two reasons. Firstly, in the metadata at the top the output the status of the query shown as NXDOMAIN (non-existent domain) rather than NOERROR. Secondly, there is no ANSWER section in the output.
Sometimes this detailed output is very useful, but often times it just gets in the way. You can suppress the extra information by using the +short option:
bart-iMac2013:~ bart$ dig +short www.bartb.ie
46.22.130.125
bart-iMac2013:~ bart$ dig +short wwww.bartb.ie
bart-iMac2013:~ bart$
You can request records other than A records by specifying the type of record you want after the domain name, e.g.:
bart-iMac2013:~ bart$ dig +short podfeet.com NS
ns02.domaincontrol.com.
ns01.domaincontrol.com.
bart-iMac2013:~ bart$ dig +short podfeet.com MX
10 aspmx.l.google.com.
20 alt1.aspmx.l.google.com.
30 alt2.aspmx.l.google.com.
40 aspmx2.googlemail.com.
50 aspmx3.googlemail.com.
bart-iMac2013:~ bart$ dig +short podfeet.com TXT
"google-site-verification=T6-e-TwfJb8L7TAR8TpR_qQlyzfIafm_a7Lm9cN97kI"
bart-iMac2013:~ bart$
You can also use dig to interrogate an authoritative server directly, or to use a resolver other than the one configured in the OS by adding a final argument starting with an @ symbol. The argument can be either the domain name for the server your want to query, or the IP address of the server. This can useful when trying to figure out whether or not a given DNS resolver is functioning, or, when testing changes made to authoritative servers without having to wait for all the caches to expire.
Below is an example of each use, first querying Google's free public resolver for the name server for bartb.ie, and then querying the authoritative server for bartb.ie for the A record for www.bartb.ie (I've left off the +short so you can see which servers were queried in the metadata at the bottom of the output):
bart-iMac2013:~ bart$ dig bartb.ie NS @8.8.8.8

; <<>> DiG 9.8.3-P1 <<>> bartb.ie NS @8.8.8.8
;; global options: +cmd
;; Got answer:
;; ->>HEADER<<- opcode: QUERY, status: NOERROR, id: 55395
;; flags: qr rd ra; QUERY: 1, ANSWER: 3, AUTHORITY: 0, ADDITIONAL: 0

;; QUESTION SECTION:
;bartb.ie.			IN	NS

;; ANSWER SECTION:
bartb.ie.		21185	IN	NS	ns1.reg365.net.
bartb.ie.		21185	IN	NS	ns0.reg365.net.
bartb.ie.		21185	IN	NS	ns2.reg365.net.

;; Query time: 12 msec
;; SERVER: 8.8.8.8#53(8.8.8.8)
;; WHEN: Tue Dec 30 19:23:38 2014
;; MSG SIZE  rcvd: 90

bart-iMac2013:~ bart$ dig www.bartb.ie @ns1.reg365.net

; <<>> DiG 9.8.3-P1 <<>> www.bartb.ie @ns1.reg365.net
;; global options: +cmd
;; Got answer:
;; ->>HEADER<<- opcode: QUERY, status: NOERROR, id: 36163
;; flags: qr aa rd; QUERY: 1, ANSWER: 1, AUTHORITY: 0, ADDITIONAL: 0
;; WARNING: recursion requested but not available

;; QUESTION SECTION:
;www.bartb.ie.			IN	A

;; ANSWER SECTION:
www.bartb.ie.		86400	IN	A	46.22.130.125

;; Query time: 24 msec
;; SERVER: 85.233.160.78#53(85.233.160.78)
;; WHEN: Tue Dec 30 19:24:03 2014
;; MSG SIZE  rcvd: 46

bart-iMac2013:~ bart$
Finally, the +trace command can be used to do a full top-down resolution of a given domain name in the same way that a resolver would if the result was not cached. To see what question is being asked at each stage of the trace, I like to add the +question option as well.
bart-iMac2013:~ bart$ dig +trace +question www.bartb.ie

; <<>> DiG 9.8.3-P1 <<>> +trace +question www.bartb.ie
;; global options: +cmd
;.				IN	NS
.			18794	IN	NS	m.root-servers.net.
.			18794	IN	NS	a.root-servers.net.
.			18794	IN	NS	c.root-servers.net.
.			18794	IN	NS	h.root-servers.net.
.			18794	IN	NS	i.root-servers.net.
.			18794	IN	NS	d.root-servers.net.
.			18794	IN	NS	g.root-servers.net.
.			18794	IN	NS	k.root-servers.net.
.			18794	IN	NS	e.root-servers.net.
.			18794	IN	NS	l.root-servers.net.
.			18794	IN	NS	f.root-servers.net.
.			18794	IN	NS	j.root-servers.net.
.			18794	IN	NS	b.root-servers.net.
;; Received 228 bytes from 192.168.10.1#53(192.168.10.1) in 16 ms

;www.bartb.ie.			IN	A
ie.			172800	IN	NS	a.ns.ie.
ie.			172800	IN	NS	b.ns.ie.
ie.			172800	IN	NS	c.ns.ie.
ie.			172800	IN	NS	d.ns.ie.
ie.			172800	IN	NS	e.ns.ie.
ie.			172800	IN	NS	f.ns.ie.
ie.			172800	IN	NS	g.ns.ie.
ie.			172800	IN	NS	h.ns.ie.
;; Received 485 bytes from 192.203.230.10#53(192.203.230.10) in 36 ms

;www.bartb.ie.			IN	A
bartb.ie.		172800	IN	NS	ns0.reg365.net.
bartb.ie.		172800	IN	NS	ns1.reg365.net.
bartb.ie.		172800	IN	NS	ns2.reg365.net.
;; Received 94 bytes from 77.72.72.44#53(77.72.72.44) in 14 ms

;www.bartb.ie.			IN	A
www.bartb.ie.		86400	IN	A	46.22.130.125
;; Received 46 bytes from 85.233.160.79#53(85.233.160.79) in 23 ms

bart-iMac2013:~ bart$
The first thing dig does is ask my stub resolver for a list of the root name servers. You see the output as a list of 13 NS records for the domain ..
Once dig knows the root name servers, it starts the actual resolution of www.bartb.ie, asking one of those 13 servers (192.203.230.10) if it has an A record for www.bartb.ie.
The root server doesn't respond with a direct answer to the question, but with a list of eight authoritative name servers for the .ie zone.
dig then asks one of the .ie name servers (77.72.72.44) if it has an A record for www.bartb.ie. It also doesn't answer the question, but responds with a list of three authoritative name servers for the bartb.ie zone.
Finally, dig asks one of the authoritative servers for bartb.ie (85.233.160.79) if it has an A record for www.bartb.ie. This server does know the answer, so it replies with that A record, specifying that www.bartb.ie is at 46.22.130.125.
The Security Elephant in the Room
As with so many of the older protocols we've discussed in this series, DNS was created at a time when security simply wasn't a consideration.
The source of the weakness is two-fold, firstly, DNS packets are not encrypted, and there is no tamper detection included in the protocol, so its trivially easy for any attackers who gets themselves into a man-in-the-middle position to re-write DNS responses to silently redirect people to malicious servers. If you were in a coffee shop and one of your fellow caffeine aficionados had absurd the lack of security in the ARP protocol to become a man-in-the-middle, they could alter the IP address your computer thinks any site, say paypal.com as an example, maps to. If they then set up their own server at the incorrect IP and make it look like PayPal's site, they could easily trick people into revealing their usernames and passwords.
Because of how UDP works, it is possible to send a UDP packet with a forged source address. Attackers can use this fact to bombard victims with fake DNS responses in the hope that the fake response is received before the real one. This fake response can contain any length of TTL, so attackers can have their malicious response cached for a very long time. This is known as DNS Cache Poisoning.
Cache poisoning is not as easy as it used to be because the source ports for DNS queries are now randomised. This means that a remote attacker needs to correctly guess the random port number for their fake packet to have any change of being accepted. Attackers can get around this by sending LOTS of false responses with different random port numbers, but the protection is not perfect. An attacker with enough determination and bandwidth can still poison a DNS cache. Also note that Man-in-the-middle (MITM) attackers see both the request and response packets, so they don't need to guess the port number, they can simply alter the valid response packet to say what they want it to say, so port randomisation provides no protection from MITM attacks.
The good news though is that there is a solution in the making. An extension to DNS called DNSSEC provides a solution by cryptographically signing DNS responses. This does not prevent an attacker from altering the response, or sending fake responses, but it does make it possible for the recipient to know the response is fake, and ignore it.
DNSSEC is quite slow to be rolled out, but it is starting to happen now.
Conclusions
W've seen how DNS converts human-readable domain names into computer-readable IP addresses. It is vital that our computers have access to a working DNS Resolver, because if they don't, the internet will be unusable.
From previous instalments we already know that for a computer to function properly on a TCP/IP network it must have three settings properly configured, an IP address, a netmask, and a default gateway. We can now add a fourth required setting, a DNS resolver, or name server.
In the next instalment we'll focus on tools for trouble-shooting network problems. We'll have seen many of the commands before, but we're look at them in more detail, and in context. The aim of the next instalment will be to build up a troubleshooting strategy that starts at the bottom of the network stack and works up through it methodically to locate the problem, allowing your to focus your efforts in the right place, and avoid wasting your time debugging things that are actually working just fine.
Dec
22
TTT Part 26 of n – DHCP
Filed Under Computers & Tech, System Administration on December 22, 2014 | 2 Comments
In part 23 of n we took a big-picture look at how TCP/IP networking works. As a quick reminder, the most important points were:
- Our computer networks use a stack of protocols known as TCP/IP
- We think of the stack of protocols as being broken into four layers:
- The Link Layer – lets computers that are on the same network send single packets of data to each other
- The Internet Layer – Lets computers on different networks send single packets of data to each other
- The Transport Layer – lets computers send meaningful streams of data between each other
- The Application Layer – where all the networked apps we use live
In the previous instalment we looked at how IP subnet works. The key takeaway was that a computer needs a minimum of three settings correctly configured to be able to participate in an IP network: an IP address, a subnet mask, and a default gateway (the IP address of the router providing access outside the subnet). We also looked at how to read those three settings from your Mac using the GUI and the Terminal. Finally, we noted that historically, those settings had to manually configured, but that today, almost all computers acquire those settings automatically. In this instalment we’ll look at the protocol that makes that possible, the Dynamic Host Configuration Protocol, or DHCP.
Dec
7
TTT Part 25 of n – IP Subnets
Filed Under Computers & Tech, System Administration on December 7, 2014 | 9 Comments
In part 23 of n we took a big-picture look at how TCP/IP networking works. As a quick reminder, the most important points were:
- Our computer networks use a stack of protocols known as TCP/IP
- We think of the stack of protocols as being broken into four layers:
- The Link Layer – lets computers that are on the same network send single packets of data to each other
- The Internet Layer – Lets computers on different networks send single packets of data to each other
- The Transport Layer – lets computers send meaningful streams of data between each other
- The Application Layer – where all the networked apps we use live
In the previous instalment we focused on the lowest of the four layers, the link layer, and looked at how ethernet and ARP work. In this instalment we’ll move one layer up the stack and take a closer look at the IP protocol. A concept absolutely central to IP’s operation is that of related groups of IP addresses known as IP Subnetworks or just subnets. This is the concept we’ll be focusing on in this instalment.