The Author – Bart Busschots
Creative Commons
Unless otherwise stated, the content on this site is licensed under Creative Commons Attribution, Noncommercial, No Derivative Works 3.0 License


Feb
26
Generating SSH Keys on Windows with PuTTYgen
Filed Under Computers & Tech, Security, System Administration on February 26, 2020 at 1:19 pm
In instalment 30 of the Taming the Terminal series I showed how SSH keys can be used to more securely and conveniently connect to servers. The instructions in that instalment are for Linux-like OSes (including MacOS) where the standard OpenSSH tools are available.
Windows doesn’t ship with OpenSSH (or indeed any SSH implementation), so Windows users who want to SSH need to install some kind of additional software. With Windows 10 there is the obvious option of installing the Windows Subsystem for Linux, but people may prefer a GUI experience. The obvious choice for Windows users is the venerable free and open source PuTTY suite of tools.
The PuTTY SSH client itself is easy to use, and if you install the full suite of apps via the MSI installer (available on their download page) you’ll also get a GUI for generating SSH keys named PuTTYgen.
To play along you’ll need an SSH server and account to connect to, and PuTTY and PuTTYgen installed on a Windows PC.
As explained in more detail in the Taming the Terminal instalment, SSH keys come in pairs. One half of the pair should never be shared and be protected, like you would a real-world key. This is referred to as the Private Key. The other half of the pair can be freely shared without any security implications. In fact, not only can it be shared, in order to use your key-pair it must be shared! This is referred to as the Public Key.
Generate an SSH Key Pair
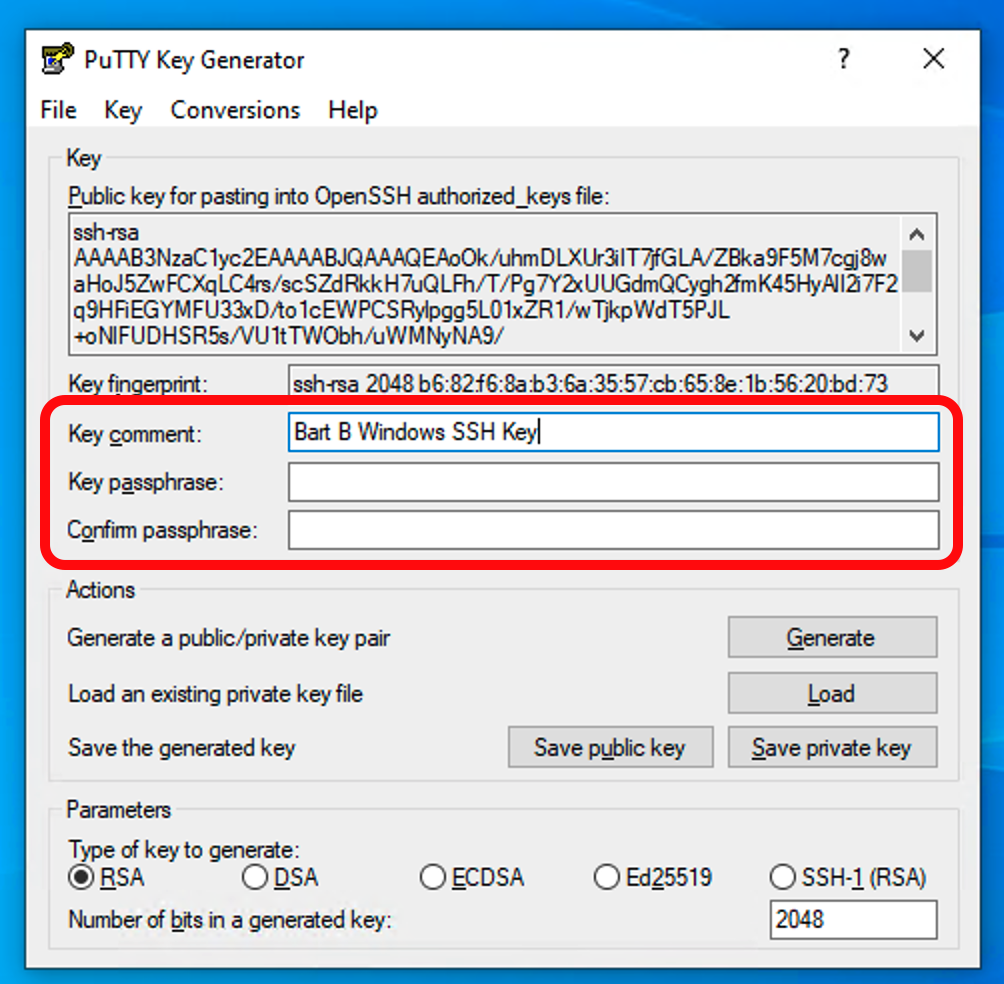
Launch the PuTTYgen app and click the Generate button:

Follow the instructions and create some randomness by moving your mouse over the blank area in the middle of the app’s UI.
Once the key is generated the UI will update and you’ll be presented with three editable text boxes in what was the blank area in the UI.
The first editable text box allows you to give you key a human-friendly label. Type a description of the key that will be meaningful to you into that box, maybe something like “Bart B Windows SSH Key”.
Unless you will be using the key in some kind of script, you should set a password on it. Don’t forget this password — without it the key-pair will be useless!
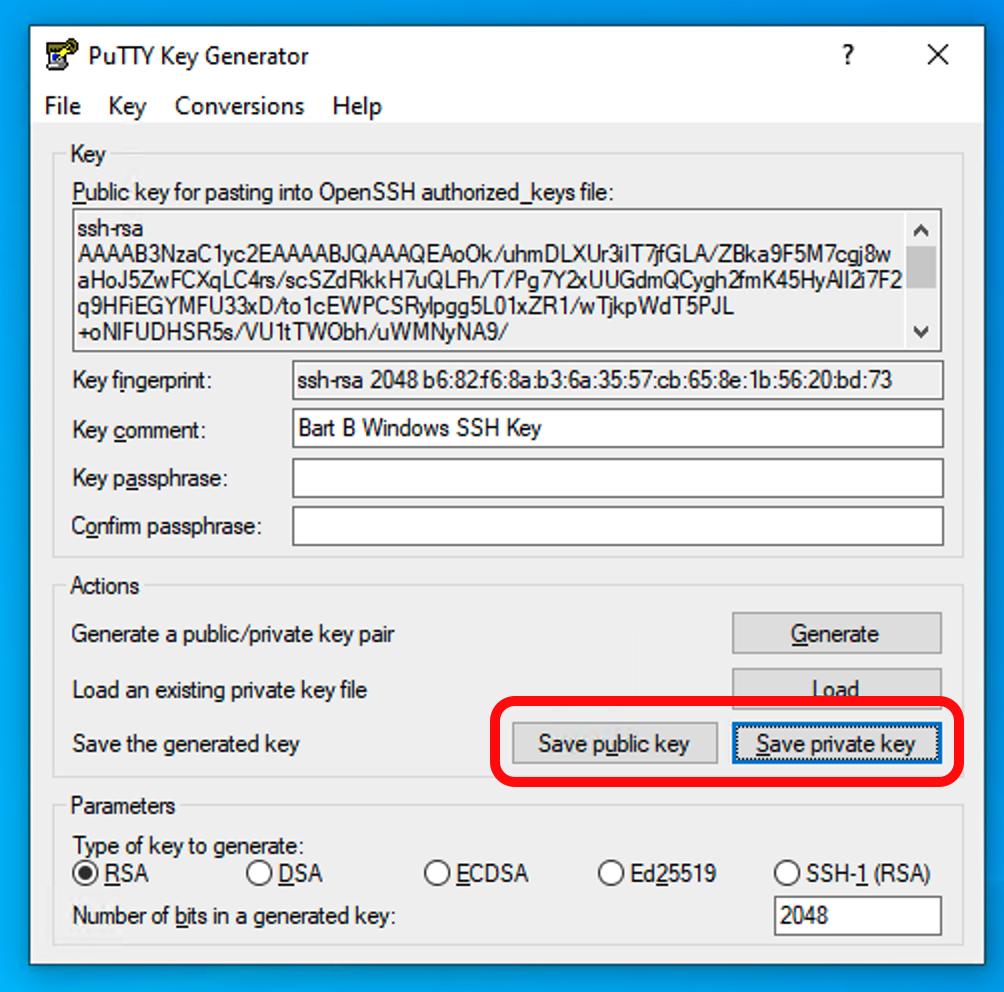
Next, use the Save public key and Save private key buttons to save the keys. I suggest naming them such that you can easily tell the difference between the public key, and the private key, e.g. BartBSSKKey-pub.txt & BartBSSHKey-priv.ppk.
The public key is a text file in the standard SSH format, it will look something like:
---- BEGIN SSH2 PUBLIC KEY ----
Comment: "Bart B Windows SSH Key"
AAAAB3NzaC1yc2EAAAABJQAAAQEAoOk/uhmDLXUr3iIT7jfGLA/ZBka9F5M7cgj8
waHoJ5ZwFCXqLC4rs/scSZdRkkH7uQLFh/T/Pg7Y2xUUGdmQCygh2fmK45HyAlI2
i7F2q9HFiEGYMFU33xD/to1cEWPCSRylpgg5L01xZR1/wTjkpWdT5PJL+oNlFUDH
SR5s/VU1tTWObh/uWMNyNA9/+gKPmWzSw2k3Uzg7ZWDo7dztIGrRk3USIqjIMHU1
XW4WRHEjhGxKrhhttatTDWTKhqrJzgjzNL5TwTUtCEsPGrm020Gkwb5eSnHXGgo5
0E7ngitA4SJxuJ2Iv27u47FxBdChG3gn8Uq2wMqNMYYspgXU/Q==
---- END SSH2 PUBLIC KEY ----
This is the file you’ll need to share with the person operating the servers you’ll be connecting to.
The private key on the other hand is in a special PuTTY-specific format. The format is human-readable, but it can’t be used by SSH clients other than PuTTY while in this form. Most conveniently, it contains both the private and public keys, so this is actually the only only file you need to keep safe, you can load it into PuTTYgen at any time and save out the public key again.
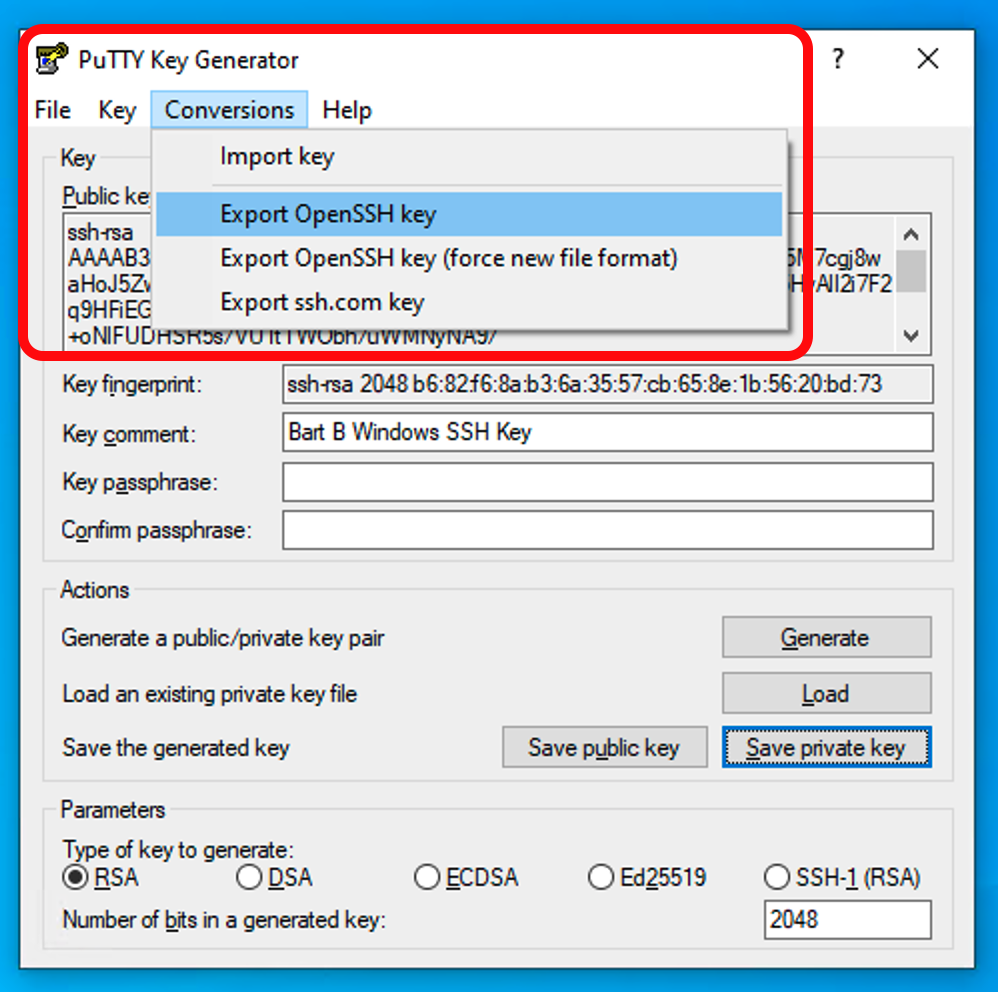
If you need a copy of the key in the standard OpenSSH format you can use PuTTYgen to do that using the Conversions menu.
Authorising Access
In order to use your new SSH key-pair the person administering the server you’ll be connecting to needs to add your public key into the ~/.ssh/authorized_keys file for the user you’ll be connecting to the server as.
Connecting to the Server with the Key
Once the admin running the server has installed your public key, and given you the server hostname to connect to and username to connect with, you have all the information you need to configure PuTTY to connect to the sever using your key-pair.
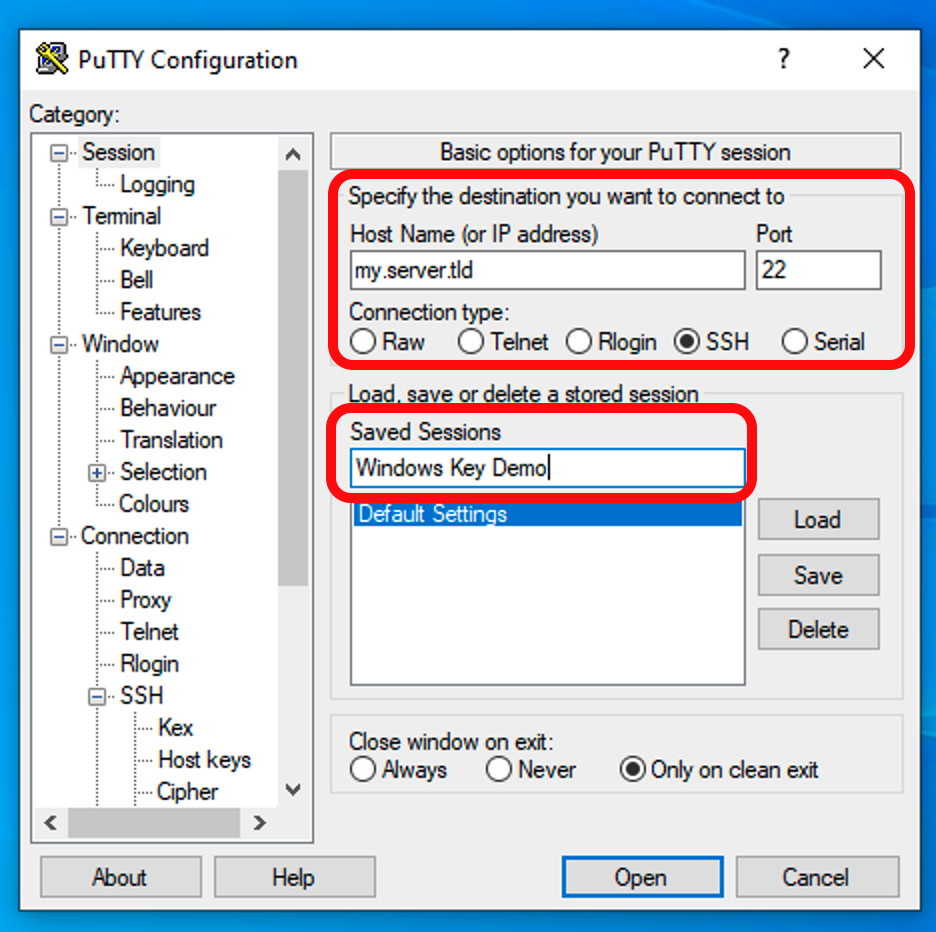
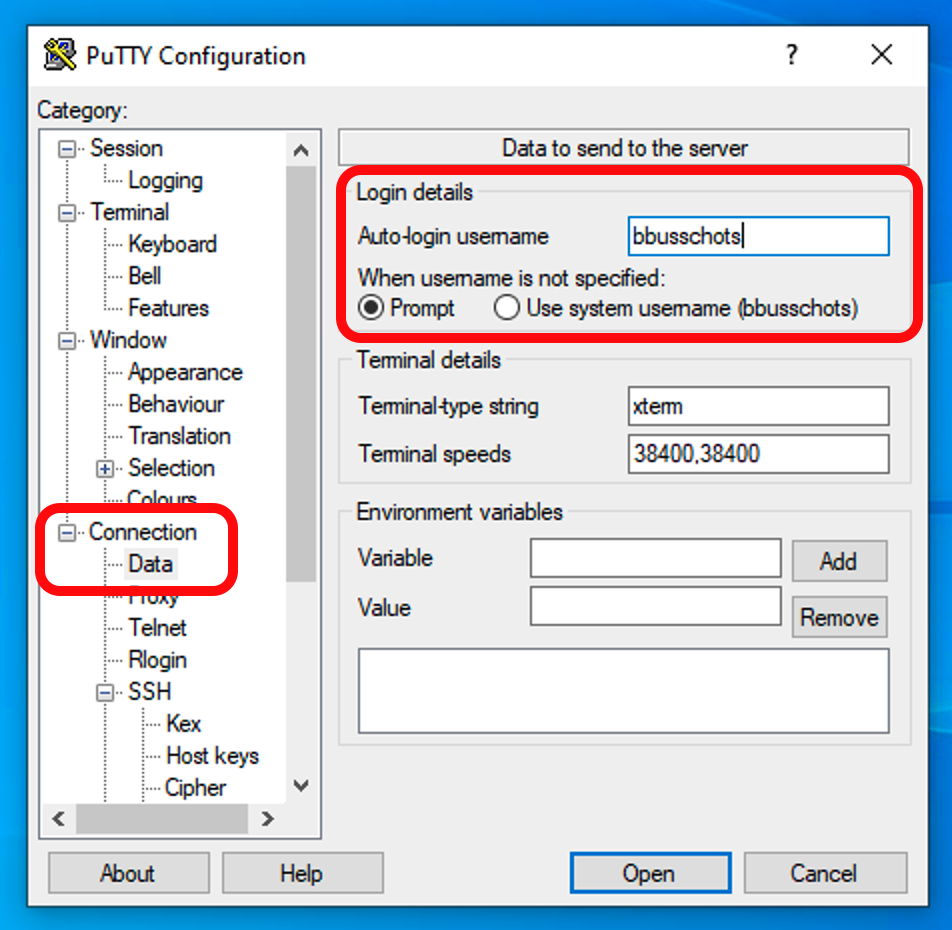
Start by opening PuTTY and entering the server name or IP in the Host Name (or IP Address) text box, and giving the session you’re in the process of creating a name in the Saved Settings area.
Next expand the Connection section in the left side-bar and choose the Data pane under that section. If the username you’ll be connecting to the server is the same as that you use to log in to Windows choose the Use system username option, otherwise, enter the username in the text box.
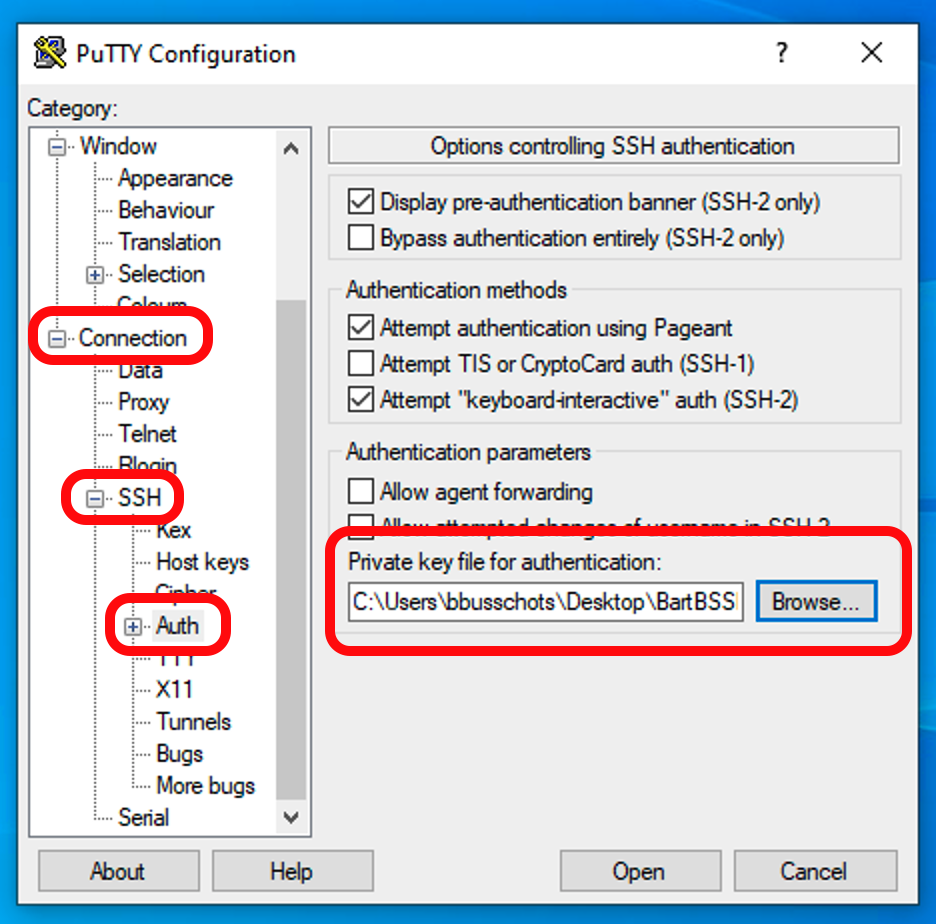
Next, expand the SSH section (also under Connection), and choose the Auth pane. Use the Browse button and choose your saved private key (in .ppk format).
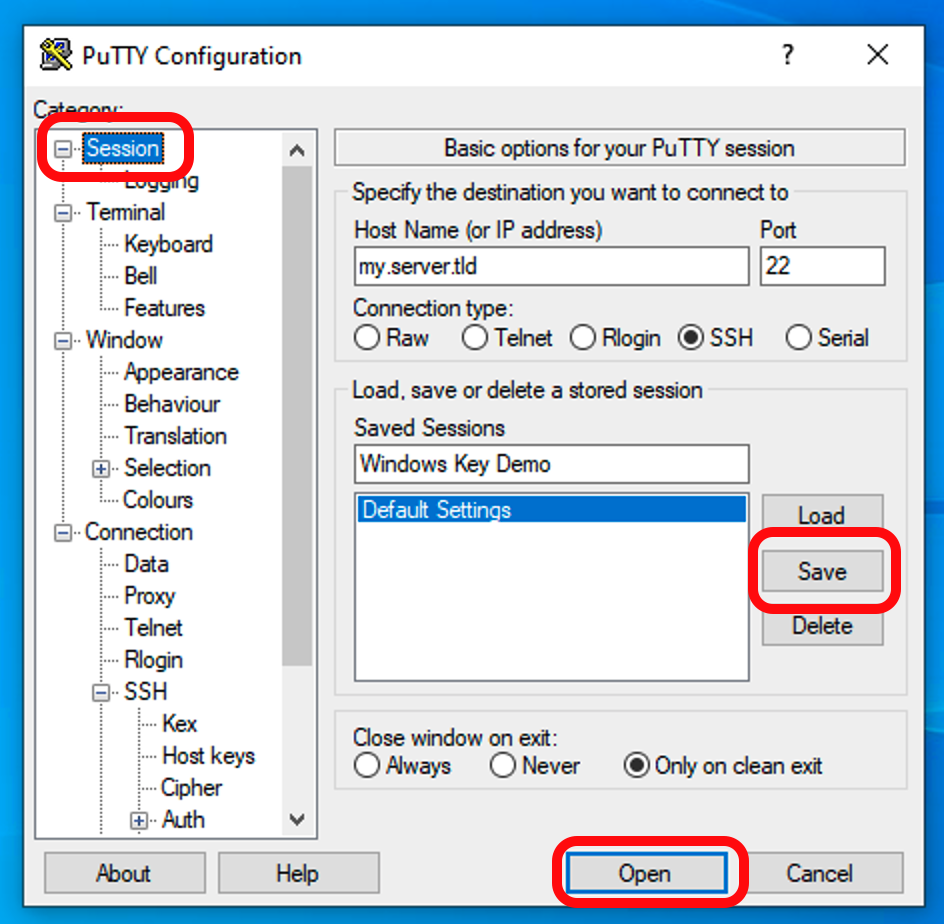
Finally, navigate back to the front pane by choosing Session from the very top of the left side bar and click the Save button to save your preset for future use.
Finally, you can now use the Open button to connect to the server. The next time you load PuTTY your session will be available in the list of saved session and can be loaded with the Load button.
[…] Update — February 20230: I blogged Instructions for generating an SSH key-pair on Windows using PuTTYgen. […]