The Author – Bart Busschots
Creative Commons
Unless otherwise stated, the content on this site is licensed under Creative Commons Attribution, Noncommercial, No Derivative Works 3.0 License


Jul
25
What’s the Story with Tonemapping?
Filed Under Photography on July 25, 2009 at 8:59 pm
I’ve become very fond of tonemapping as a photographic technique, and have mentioned it quite a few times in the descriptions of the photos I pick for my Photo of the Week blog posts. The more people see my tonemapped photos, and the more I mention tonemapping on Flickr, the more questions I get about it, so, instead of repeating myself over and over again, I figured I may was well just write an article about it that I can then link people to.
Lets start with some background, particularly with the concept of the dynamic range of a scene. You hear the term a lot, but I get a feeling a lot of people are not sure what it means. The simplest way I can describe it is as the difference between the brightest objects in the scene, and the darkest objects in the scene. Our eyes have quite a large dynamic range, at mid-day on a sunny day we can see both the things illuminated by the sun, and the things in shadow at the same time. Try that with a camera, and you’ll soon find that cameras have a much smaller dynamic range than our eyes. You’ll either end up with no detail in the shaded bits, or no detail in the bright bits, but try as you might, you won’t capture both! This is not a new problem, although it has gotten worse. Film has a bigger dynamic range than the JPEG images that come out of our digital cameras, but even film has a signifficatly smaller dynamic range than our eyes.
Trying to deal with this issue is nothing new. In the days of film one way to deal with it was to selectively develop some parts of the negative more or less aggressively than other parts, hence either brightening or darkening just the desired parts of the image. This process is referred to as ‘dodging and burning’, and although it started off as a physical and chemical process in the darkroom, many of today’s digital photo editing programs provide the ability to digitally dodge & burn images.
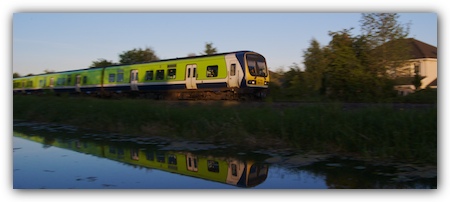
Dodging and burning works quite well one some kinds of images, and it’s something I do quite regularly. Below is an example to illustrate the point:
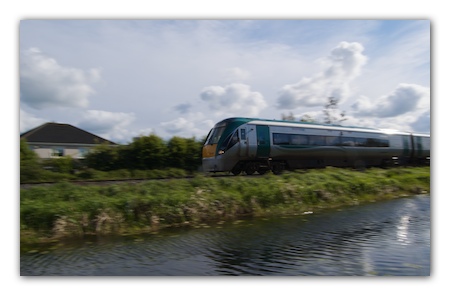
This is the shot before Dodging & Burning
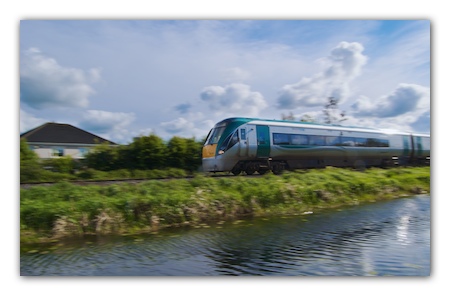
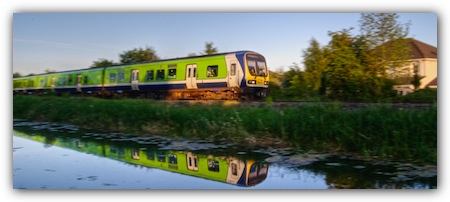
This is the shot after Dodging & Burning
All I did in this case was to darken the sky, and brighten everything else. In fact, the train got an extra brightening above and beyond what the rest of the ground ground got to make it stand out a little more. In this case, dodge & burn was very easy because the three regions (sky, ground, train) are well defined with nice simple boundaries between them. That’s often not the case, so in those situations, dodge & burn just isn’t practical. Also, there is a limit to how much you can dodge & burn and image before it starts looking very fake.
When you can’t dodge & burn you need to do something else, and that’s where tonemapping comes in. Tonemapping is an algorithm that allows the dynamic range of an image to be compressed. You start off with an image with a very high dynamic range, and then turn it into something with a normal dynamic range by darkening the bright bits and brightening the dark bits in an intelligent way.
So, in order to meaningfully tonemap you need a starting image file that has MORE dynamic range than can be represented in a JPEG. How can you get such an image? You can use HDR to combine an arbitrary number of images at different exposures into one single file that contains all that exposure data. Such an image will effectively have a dynamic range ranging from the darkest part of the shortest exposed image up to and including the lightest part of the longest exposed image. Using this technique you can get very extreme dynamic ranges. BUT, such HDR images are not easy to create, if ANYTHING in the scene moves between exposures you’ll get ghosting in the resulting HDR image. Try taking an outdoor shot where nothing at all moves. How often do you come across scenes where no trees, grass, clouds, or people are moving!?
This is where RAW files come in. Your digital camera can capture a larger dynamic range than a JPEG file can hold. A RAW image from a DSLR or high-end point-and-shoot camera is therefore an HDR image with a limited but none-the-less big enough dynamic range to tonemap. So, if you have a camera that shoots RAW you can use tonemapping to extend the dynamic range of the image a little. Not as much as if you shot a true HDR, but enough to make a real difference all-the-same. Unlike a true HDR image, a RAW file comes from a single exposure, so you can have moving objects in the shot, and even motion blur and fancy zoom effects if you like!
I’m going to give two examples from recent Photo of the week posts to illustrate the power of tonemapping single RAW images.
First, I’ll start with a sunset shot from a few weeks ago:
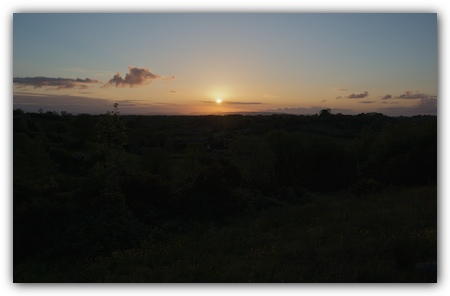
This is the shot before Tonemapping
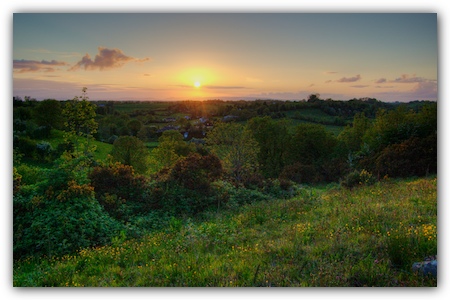
This is the shot after tonemapping
And secondly, here’s last week’s Photo of the Week:
This is the shot before Tonemapping
This is the shot after tonemapping
Hopefully these examples have demonstrated the power of tonemapping even images with a limited dynamic range like RAW files.
For the record, I do all my tonemapping with Photomatix Pro (the Mac version), and I would highly recommend it. It takes quite a bit of time to get comfortable in Photomatix though, there are a LOT of sliders to experiment with and get to know, and there is no substitute for experience and practice because every image is different. However, I can give some advice – firstly, 99% of the time, if you want a realistic looking image you need to set the light smoothing to ‘very high’, rather than the default of just ‘high’. Secondly, you almost always need to boost the colour saturation up from the default, and add some micro contrast. And finally, a small amount of gamma can often be a big help, but be careful with that slider, small adjustments have a big effect!