The Author – Bart Busschots
Creative Commons
Unless otherwise stated, the content on this site is licensed under Creative Commons Attribution, Noncommercial, No Derivative Works 3.0 License


Oct
18
How the Sausage is Made
Filed Under Photography on October 18, 2013 at 9:24 pm
Note: This blog post formed the basis for the Chit Chat Across the Pond segment on Episode 441 of the Nosillacast Podcast.
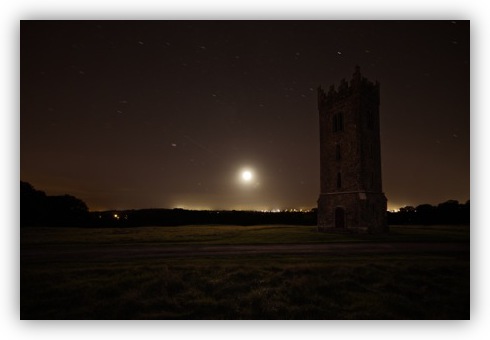
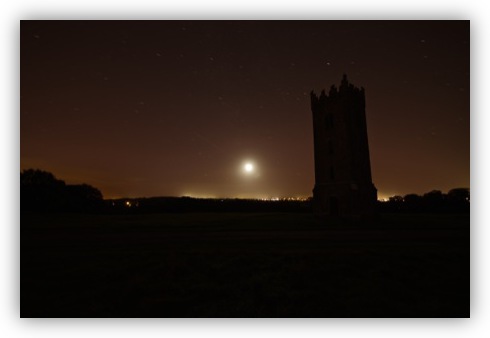
It’s very hard to tell from a finish photograph what went into making it, so I thought it might be interesting to follow a single photo (below) all the way from idea to finished product. The photo is of the International Space Station passing in front of the Moon, and the lovely tower in the foreground is Tyrconnell Tower in Carton Estate in Ireland.
The Idea
After lunch on the 10th of October an email popped into my inbox from an Irish astronomy club, highlighting a rare event, the ISS would pass between parts of Ireland and the Moon that evening at about 20:50. The email contained a link to a map showing the centre-line of the event, running from the outskirts of Dublin right down to the southwest of Ireland, and stating that the event would be visible 16km either side of the centre line. First question – did the centre line come anywhere near Maynooth? It did! I passed right through Newcastle, just two villages over! Was that less than 16km? A quick measure of the distance from Newcastle to Maynooth on Google Earth showed it was – the hunt was on!
Phase 1 – Preparation
First question – how high would the Moon be above the horizon at 20:50, and in what direction would it be? To answer that I fired up RedShift on my Mac (€16.99 on the Mac App Store), and dialled in the time:
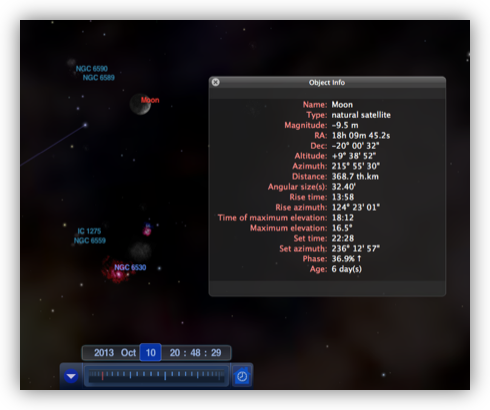
As you can see from the Screenshot above – the Moon would be very low in the sky, very low indeed – just 9 degrees altitude – that’s about the width of a fist at arms length above the horizon. The azimuth was 215 degrees, i.e. approximately southwest.
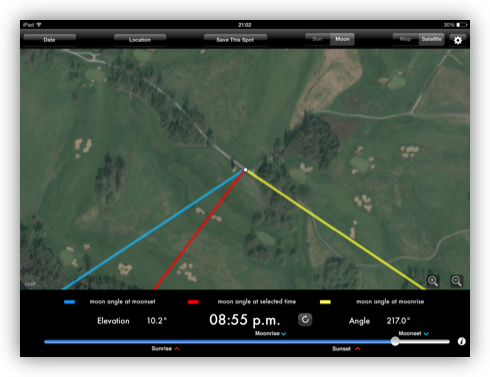
Because the altitude was so low, it was very important to choose a location with a totally un-obstructed southwesterly horizon. My tool of choice for finding locations like this is LightTrac – it overlays the direction to the Sun or Moon at any time of the day or night over a satellite view of the earth. It’s hard to see contours with LightTrac though, so it works best if you also have local knowledge. What I wanted was somewhere on high ground with a view to the southwest and something interesting to use a foreground.
After trying a few of my favourite locations, I soon found that the big hill in Carton Estate was the perfect location – it’s the highest point in the Maynooth area, and it has a clear horizon pretty much all the way from south to north. There is also a nice tower at the top, providing a nice foreground object.
With the location chosen, it was time to go to heavens-above.com, enter the coordinates for the chosen location, and print off a map of the ISS pass.
The final bit of preparation before leaving the house was to pack my camera bag. Since I’ve been doing a lot of satellite shooting the last while, I didn’t have to do much thinking about that. My packing list was simply:
- Camera (Nikon D5100)
- Wide angle lens (Sigma 10-20mm)
- Tripod
- IR Remote
- Bubble Level
- Red torch (to protect my night vision)
- White torch (in case I decided to do some light painting, or in case I dropped anything in the tall grass at night and needed to find it)
- iPhone (so I would have a handy stopwatch to time my exposure)
- Heavens-above printout
Before leaving on any shoot I like to set up my camera while I pack my bag, so the settings are as close to right at they can be when I arrive. This is twice as important on a night-time shoot because everything is trickier in the dark. My checklist for camera settings was:
- Mode = manual
- White Balance = sun (moonlight is just reflected sunlight)
- ISO = 400
- Aperture = lowest setting lens supports
- Shutter Speed = bulb
- Image Quality = RAW
- Focus = Manual
With all that prep work done, it was time to head out into the night, and hope the Irish weather played ball!
Phase 2 – Shooting the Shot
I always like to arrive at least 15 minutes early for this kind of shot – getting set up in the dark is slow, and it takes times to do the needed test exposures to figure out all the settings.
First things first – choose the spot to choose from, set up the tripod, and compose the shot. Then, dial focus to infinity and take a ‘quick’ 30 second test exposure with the settings that were pre-programmed before leaving the house. Zoom in to 100% and make sure the focus is right. If not, tweak, and test until right.
Withe shot composed and the focus dialled in, the next thing to determine is the ISO, aperture, and exposure time. In this case, the exposure time will be dictated by the length of time the ISS will take to go from becoming visible, to passing the Moon, to entering the earth’s shadow. The printout from Heaves-above has all the information needed to figure this out, and in this case the needed exposure would be about a minute and 45 seconds. To give myself wiggle room, I aimed for a 2 minute exposure.
When shooting at night the temptation is to go for the widest aperture and the highest ISO your camera can manage before noise becomes a problem. This is perfect for when you’re shooting stars against a dark sky, but can often work out very badly if you have a moon-lit or light-polluted sky. You may well have to turn down the ISO, and even dial back the aperture. The only way to find out for sure is to do a test shot of the needed length and see if it’s over-exposed. If it is, dial back the ISO, and try again. If you get down to the lowest ISO and the shot is still over-exposed, you have to start increasing the focal ratio.
Even if you only need 3 trial focus shots and 3 trial exposure shots you’ll still have spent almost 8 minutes just waiting for test exposures – s you see why it’s important to arrive at least 15 minutes early.
In this case, both the street lights of Maynooth and the Moon were causing problems, so the settings I ended up with were a 2 minute exposure (dictated by the ISS pass), an ISO of 100, and the lens wide open at f/4. Those settings left me with some spare so I could expose a little longer if I needed to (which is good because I ended up exposing for 144 seconds).
With the camera configured and everything tested, all that remained was to wait for the ISS to appear low on the horizon, and then to fire the shutter as soon as I saw it, and keep it open until the ISS vanished into the earth’s shadow. I estimated that I wouldn’t see the ISS until it was about 5 degrees up, but I spotted it sooner, and fired sooner, hence the need to keep exposing for 144 seconds.
Phase 3 – Post-Processing
Lets start with a look at the photo as it came out of the camera:
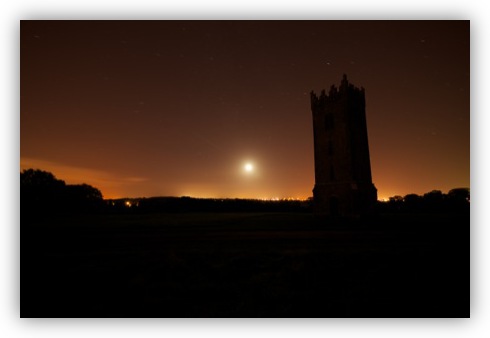
Things to note:
- The main ingredients desired all came out – the Moon, the ISS, and the tower were all captured successfully.
- There is a significant amount of light pollution that needs dealing with.
- The foreground is a complete silhouette, it would be nice to recover a little detail to make the shot appear more natural.
- The wide angle lens has distorted the tower significantly.
Since the sky is the most important part of the shot, my first step was to optimise that with some simple global adjustments in Aperture:
- Exposure was increased by about a third of a stop to brighten the stars (more brightening would have blown out the area around the Moon)
- Some definition was added to allow the stars and the ISS stand out from the background better (about 0.45)
- An s-shaped curves adjustment was added to darken the background of the sky, and emphasise the stars and ISS light trail a little more
- A colours adjustment was used to selectively darken and desaturate only the orange glow of the light pollution
The photo now looked a little better:
This first edit completely ignored the ground – to deal with that a whole other edit was done. Because the photo was shot in RAW, I knew there was a stop and a half more data in the file than could be seen, so I chose to use tonemapping to try coax out some of that hidden detail. To do that, a clean 16bit version of the image is needed. Photomatix has a RAW processor, but it’s not great, and it’s particularly poor at dealing with Nikon RAW files (.NEF files), so it’s always best to let Aperture do the RAW conversion, and to export the shot with all it’s data preserved as a 16bit TIFF (it MUST be 16 bits or the extra information will be lost).
The exact settings in photomatix will vary wildly from image to image, so there is no point in posting them. The key point is that in making the tone map I focused my attention only to the ground. I didn’t care what the tone map did to the sky, I just wanted to get the best out of the ground that I could. This was the result:
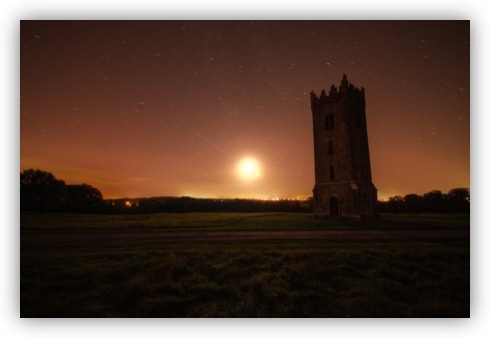
Notice that the sky is now much too bright, but that there is some nice detail in the foreground. Since this foreground was partially lit by light pollution, it has a dirty colour, but that can (and will) be fixed later. The big task now is to create a third version of our image that combines these two edits, so we get the best rendering of the sky with the best rendering of the ground.
Any photo editing app that supports layers and layer masks can be used to do this. I like to use Pixelmator (€26.99 in the Mac App Store). You need TIFF versions of both edits at this stage. Since the tonemapping is done, 8 bit TIFFs are fine now. In your favourite photo editing app, open one of the TIFFs, then add the other into that same image as a layer. When you have the two versions as stacked layers, add a layer mask to the top layer, and paint through either the land or the sky so that the best rendering of both become visible together. I find a graphic tablet helps a lot with this, and using a soft-eded brush so none of your strokes are too harsh. When done, export the resulting blended image back out as an 8bit TIFF.
We’re starting to get closer to the finished result now:

The biggest remaining problem now is the distortion caused by the wide angle lens. My tool of choice for fixing that is PTLens. I took my blended 8 bit TIFF and ran that through PTLens to produce the following:
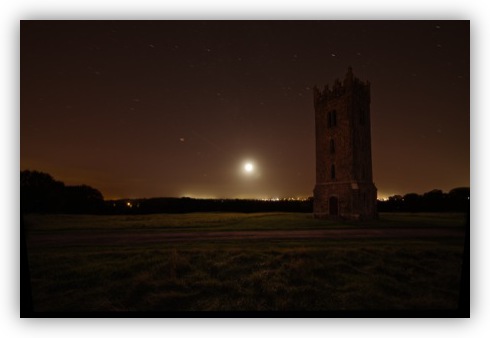
Notice that the tower now looks a lot more normal, but there are black bars on some sides of the image. The image is now ready to be imported back into Aperture for a final crop and tweak. I applied the following edits:
- Cropped the image to remove the black regions created by PTLens
- A minor boost in exposure (0.19 of a stop) with the brighter foreground the sky needed to be a little brighter to look right
- Another VERY subtle s-shaped curves adjustment to get the new foreground to look a little better
- Another colours adjustment keyed on the orange tone of the light pollution. The time the selective adjustment only darkened the orange tones a little (-15%), but desaturated them a lot (-40%). I had planned to brush this adjustment in to just the ground, but it actually improved the sky too, so I applied it to the entire image.
- Added a very subtle vignette to darken the edges.
And that’s the lot – after all that, this is the result:
[…] Episode #220 of the Mac Roundtable podcast is fun where we rant about iOS 7, Corky Heath teaches us how to reorder podcasts in iTunes 11, Claus Wolfe teaches us his native Germanic language Hessisch. Four quick reviews of some cool RadTech products: ACpower Compact USB Charger is only $14.95 over at RadTech.com, AutoPower in car USB Charger, RadSleevz, and Screensavrz. Mark Pouley reviews the Orange Chef iPad Stand and Sleeves from theorangechef.com. In Dumb Question Corner Professor Albert asks about upload and download speeds, and Terry Austin gives us a pro tip for Clarify. In Chit Chat Across the Pond Bart teaches us the steps he went through to create his amazing image of the International Space Station passing in front of the moon. […]
Great shot and really clear explanation.WTG !