The Author – Bart Busschots
Creative Commons
Unless otherwise stated, the content on this site is licensed under Creative Commons Attribution, Noncommercial, No Derivative Works 3.0 License


Jan
29
Tips for Photographing Stars With Basic Equipment
Filed Under Science & Astronomy, Photography on January 29, 2012 at 5:10 pm
 Hard-core astrophotography is very difficult, and requires quite a lot of quite expensive equipment, but, you can do surprisingly much with surprisingly little if you don’t set your expectations unrealistically high. The big problem with the night sky is that it moves. Well, strictly speaking it’s the earth that’s moving rather than the sky, but the point is, stars don’t appear to stand still. Normally when you have a subject that’s dim, you use a tripod and just leave the shutter open for as long as it takes, but since everything astronomical is always on the move, that doesn’t work! The way the pros get around this is with expensive mounts that track the movements of the heavens, opening up the possibility of long exposures. With that problem over-come the pros then run into a whole new set of problems with how noise builds up in sensors over long exposures, so they end up needing some quite advanced techniques and a lot of software and skill as well as the fancy hardware.
I don’t have any of the fancy gear, nor any of the fancy software, nor indeed, the skills needed to get good results out of the equipment I don’t have! But, I can still get a descent shot of a star field, and all I need is three things:
- A camera that will allow manual control of the aperture, shutter speed, ISO and white balance, exposure times of up to 30 seconds, and manual focusing or some form of focus lock
- a tripod
- A remote shutter release (or, as a work-around, a delayed shutter release mode)
I did also mention that you need realistic expectations, basically, what we’re aiming for here is shots of large sections of the sky. Think a nice shot of a constellation. If you have visions of detailed views of spiral galaxies in your head – get them out now – that’s for the pros with their fancy kit!
Getting Set Up
Start by mounting your camera on your tripod, and using the widest lens you have. Then put the camera into manual mode, set the white balance to daylight, and open up the aperture completely. We want the lowest number of mm of focal length we can get, and the lowest f number the camera+lens combination will allow. The next consideration is your ISO, you’ll be varying this as you shoot, but, you’ll want a reasonable starting point. If you have a lot of experience with your camera, and know how high you can go in low light before noise becomes a problem, use that setting, if not, start at a fairly low setting, say ISO 200 or so.
Next, set your camera to accept input from your remote shutter release. If you don’t have one, don’t panic. The reason a remote release is ideal is that you don’t want any camera shake when you first the shutter. You can achieve the same goal with a delayed shutter release mode. These modes are designed for taking group shots which include the photographer. The idea is that the photographer composes the shot, leaving some room for him or her self, then hits the shutter release, which doesn’t take the shot, but starts a countdown instead. The photographer then runs into position, and tries to smile before the timer runs out and the shutter finally fires. We don’t want to do any of those acrobatics, but, we do want there to be enough time between hitting the shutter button and the shutter firing for any vibrations we’ve introduced to dissipate. If your camera allows you to set the duration of the countdown, 5 seconds should be plenty.
The hard part is getting focus. The stars are effectively at infinity, so, if you have a very old lens, this is really easy, because old lenses have markings on them, telling you how many feet away you are focused, and, a special mark with the infinity symbol for infinite focus. If you have old lenses from before you got a DSLR that you never use anymore because they won’t auto-focus or meter on your DSLR, they’ll work perfectly here, since you need neither of those functions! If you have a modern camera with a modern lens, you’ll need to trick the camera into focusing at infinity somehow, and then disable auto-focus. If you are lucky enough to have a bright planet (or the Moon) in the sky, and if your autofocus is good enough, you can focus on that, and then lock the focus. If not, focus on something far away, like a distant house that has some lights on or something like that. If you have a Zoom lens, don’t change the zoom after you focus! If you can’t trick your auto-focus into focusing on something far away in the dark, then all is not lost, you just have a bit more work to do. You’ll need to focus by trial and error. Point the camera at the brightest star or planet in the sky, take an exposure of a second or so, then zoom into the preview all the way and see how small a circle the star makes on the screen. Then move the focus, take another shot, and zoom in again, if the star got smaller you’re heading in the right direction, if not, focus the other way! Keep doing this until you get the star as small as you can, then you’re focused!
One last thing I want to mention is that primes tend to be the best lenses for this kind of thing because they tend to be much brighter than zoom lenses (i.e. primes tend to go down to much lower f numbers than zooms). In fact, although I said to use your widest lens, if you have a very bright prime that’s less wide than your widest zoom, you’ll probably get your best results with the the prime lens. For example, I get much better results with my 30mm prime at f/1.4 than I do with my 18-55mm zoom at 18mm wide open at f/3.5! One caveat is that it’s much harder to focus at f/1.4 than at f/3.5!
Taking the Shot
The important thing to remember is that bits are free. Unlike shooting on film, it doesn’t cost more to shoot more! You want to capture as many different variations as you can in the field, then pick the best ones when you get home. You really don’t want to get home and realise that you really should have tried to use a higher ISO or a longer exposure.
We already know the stars move, but, there is an additional complication, how fast they move depends on how far away they are from their nearest pole. Stars close to the north and south celestial poles (i.e near Polaris or the Southern Cross) will move quite slowly, while stars near the celestial equator will move much faster. So, where in the sky the constellation you want to photograph is will determine the longest exposure you can get away with.
The other factor that affects how long you can expose for is the focal length of your lens. The more you zoom in, the faster the stars will move through your field of view, so the less exposure you’ll get away with. This is why I suggested using the widest lens you have, at least initially.
What I hope should be obvious by now is that there is no hard and fast advice on exposure times, you need to find them by trial and error. So, start off with a short exposure, then zoom in and see how round the stars are, keep exposing longer until you go too far, and you start to get noticeably stretched stars, then dial it back a bit. Remember the exposure time that you think is about as long as you can get away with.
The next thing to experiment with is your ISO settings. Start off shooting at a low ISO, and then start cranking it up until the noise gets too bad. Remember how high you feel comfortable going.
Finally, compose the shot you want, and start shooting with a low ISO, and bracket about 5 exposures, some below the ideal you remembered, and at least one over it. I tend to shoot at 1 , 2, 5, 8, 10, 12, 15, 20, 25, and 30 seconds. Then increase the ISO and repeat. Keep doing this until you’re at least one setting higher than what you thought was your ideal ISO. Personally, I tend to go a long way over my ideal, and shoot with the intention of using noise reduction software in post. My Nikon D5100 shoots cleanly up to 800ISO, but when I’m shooting star fields I shoot at 200, 400, 800, 1600, and 3200, and, sometimes, when I really want to try get at the dimmest things, even 6400.
If you’re getting good results with your widest lens, you can try to zoom in a little if you want (remembering to refocus). As you zoom in two factors will conspire against you. Firstly, the more you zoom in, the dimmer your image will get, and secondly, the more you zoom in, the shorter your exposure will have to become. So, you’ll be collecting less light for a shorter period, so don’t get carried away! When shooting Orion (near the celestial equator) at 18mm, I find I get my best images with about a 10 second exposure. In contrast, when I tried to use my 200mm zoom on the Orion Nebula, I found that anything over about a second was too much! At 18mm I was getting lovely images at ISO 800, but, zoomed in to 200mm with my exposure times limited to about a second, I had to go all the way up to ISO 6400 to get a usable image!
Thoughts on Composition
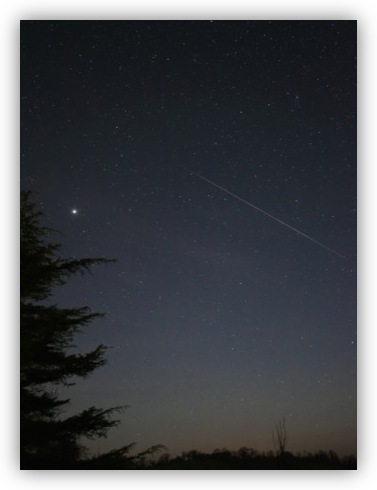
Remember, stars come out as small dots. A shot with nothing but a few small dots is unlikely to look particularly interesting! I find that to add interest you need to include something terrestrial in your composition. Skylines work well, as do silhouettes of trees or buildings. You don’t need to include a lot of the horizon, or a big silhouette, just enough to anchor the shot. In the example below, there is just a sliver of horizon, and just the edge of a tree, but it’s enough:
If you can time your shot so that the constellation you want to capture is low in the sky, then it’s much easier to find a pleasing composition, but there’s no way around the fact that it will involve quite a bit of leg work to get things lined up perfectly, and, when you do, you’ll have to work quickly because of course the stars are perpetually moving, so your composition is very much temporary!
If your subject is close to the horizon you can frame the entire subject, not just anchor the shot, as in the example below, where the trees frame the big dipper on three sides:

Post Processing
I don’t want to give you a prescription on what to do, instead I just to share a few thoughts.
Usually, the sky will be quite bright in your image, which kills the contrast with the stars, so, a curves adjustment where you take the shadows down a lot and the highlights up a bit often works well.
In our modern world, another issue you’re very likely to run into is light pollution. The nice thing about light pollution is that it’s got a very specific colour, Sodium Yellow! So, the way I deal with it is to use the colour brick in Aperture to select the colour, and selectively darken it as as much as I can, and then selectively desaturate it by about 50%. I find this reduces the light pollution to a tolerable level, and it can even add a little something to the image.
If you’re going to use higher ISOs, or, if you have an older camera that doesn’t shoot clean even at lower ISOs like 800 (like my old Nikon D40), then you’re just going to have to bite the bullet and buy a noise reduction app or plugin, and spend some time learning to use it. I use Topaz DeNoise because it’s reasonably priced, and good at what it does. One thing I will say about DeNoise is that there’s no point wasting your time with the presets, just use the sliders!
Something people often like to see in shots of stars is diffraction spikes (the points on stars). When you use a telescope to image the sky, the spikes are actually caused by the struts that hold the secondary mirror in place, and the arrangement of the struts will determine the number and layout of the spikes. If you want to achieve a similar effect in-camera, you can place a cross of thread over your lens hood. If that seems like too much work, you can also add the spikes afterwards in post, using a photoshop filter or plugin. A nice option is the recently released Topaz Star Effects plugin, which I used to add subtle spikes to the main stars in the image below:

[…] #350 Macworld 2012, Blindfolded!, Avatron, Nite Ize Gear Ties, ParaSync, Powis iCase, WPS Flaw in Wifi, Star Photography Tweet Macworld 2012 has come and gone, hear our experiences, how well Blindfolded! went, and hear interviews of vendors on the show floor. Avatron with Air Display on iOS in iTunes, Air Display in the Mac App Store, Air Sharing for iPhone in iTunes, Air Sharing universal for iPhone & iPad in iTunes, and Print Sharing in iTunes. Nite Ize brings us Gear Ties at REI, iPhone Connect Case Niteize.com Connect Case and Connect Case accessories: NiteIze.com Connect Case Accessories. Parat Solutions demonstrates the ParaSync to charge and sync 10 iPads (also models for 20 iPhones/iPods) at Paratsolutions.com. Powis iCase with 9 different positions at powiscase.com. The NosillaCastaways party was lots of fun at Macworld | iWorld, check out the photos on flickr.com/photos/nosillacast/sets/72157629089333159/ and Mark Pouley’s shots of just the Google Hangout we did with people who couldn’t come at flickr.com/photos/switchermark/sets/72157629087853459/. In Chit Chat Across the Pond Bart tells us about a dreadful flaw in WPS on most wifi routers (not in Apple Airports luckily). To look up your router to find out if it’s got the flaw and if turning off WPS will actually help, go to https://docs.google.com/spreadsheet/lv?key=0Ags-JmeLMFP2dFp2dkhJZGIxTTFkdFpEUDNSSHZEN3c. If yours has the flaw and you want to be daring, install a non-standard router OS like the ones listed here: wikipedia.org/wiki/List_of_wireless_router_firmware_projects. After that Bart lightens things up with his tutorial on how to take photographs of stars without fancy kit: bartb.ie/blog/?p=2226. […]
Just got done listening to the latest chit chat and thought of something that may be worth mentioning when shooting starry skies. Most DSLRs even on the low end have a mirror lock up function which will help reduce the chances of vibration especially if using the self timer. And somewhere in software there should be a long exposure noise reduction function which is pretty self explanatory.
I hope you find this useful and keep up the good work with Allison.
Thanks Josh – both great tips!
Bart.
[…] 29 Tips for Photographing Stars With Basic Equipment […]
Thanks for a great post, Bart, and for your great explanations during the Nosillacast segment.
It certainly is so much better doing astrophotography now with digital gear. I remember many times as a teenager shooting star pics with my film SLR and being limited to a fixed ISO per roll of film, then having to wait for processing to see the photos. A couple of times when I sent rolls of astropics off for processing they came back as processed negatives with no prints and a note attached saying that there was nothing on the film.
We’re spoilt down here in the Southern Hemisphere (Australia for me) with the galactic centre being visible throughout the nice still-air nights of winter, making for very rich star fields in our photos.
Hi Bart!
Thanks for this article. I’d love to be able to put this info to use, but I can’t even get a shot off with my Nikon d5100. It always says “Subject is too dark” and I can’t get a shot off in any mode. I tried on Bulb and 30 sec. Manual. But the M setting doesn’t allow for the flash to be turned off. What am I missing here?
Frustrated, but grateful for any help.
Thanks!
Robert
Hello again, Bart!
I went back through your article carefully and found the missing piece. I flipped the switch on the lens from AF to M. Evidently, while the image appeared to be in focus, the AF function needs enough light to determine if the flash is needed or not (as you cannot disable the flash in P, S, A or M through the menu.) Only after flipping this would the camera fire, even though the display still stated that the “Subject is too dark”.
Thanks again for the post!
Cheers!
Robert
The D5100 I have came with a cover for the viewfinder, I read somewhere it’s a good idea to cover the viewfinder when doing long exposure shots….
It’s been a year now so enough times past that we have learnt “stuff”
I’m getting a d5100 this week for all types of astrophotography and that brought me here. I gather that we know that you can only use a remote or you get the “not enough light”