The Author – Bart Busschots
Creative Commons
Unless otherwise stated, the content on this site is licensed under Creative Commons Attribution, Noncommercial, No Derivative Works 3.0 License


Aug
24
Photo of the Week 130 & 131 – Two New Muses
Filed Under Photography on August 24, 2010 | 2 Comments
For a long time now my two favourite subjects have been trains and butterflies, but this year I’ve started to be attracted by two related new muses. Butterflies are probably the most eye-catching insects in Ireland, but I think the largest are the Dragonflies and Damselflies that fill our summer skies. I’ve only been focusing on these guys for a few months, but I’ve already got some pictures I like enough to include here.
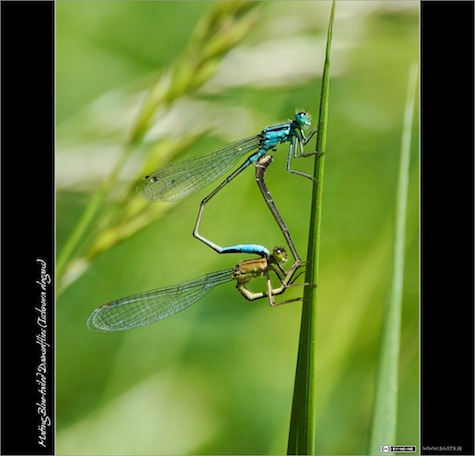
The first shot I’ve chosen shows a pair of Blue-tailed Damselflies (Ischnura elegans) making more Blue-tailed Damselflies. Two things to note here, firstly, Damselflies opt for a very unique position for mating, and the males and females have very different colours. Adult males of the different species generally look quite distinct (with a few exceptions), but many of the females of the different species look very similar, some species even have females of a few different colours, and to really confuse things, both males and females change colour as they mature. If you can’t recognise what species a Damselfly is, it’s probably a juvenile, or a female, or both. Butterflies are WAY easier to tell apart!
- Camera: Nikon D40
- Lens: Nikon DX AFS 55-200mm
- Exposure: 1/800 sec
- Focal Length: 200mm
- Focal Ratio: f/8
- ISO: 200
- Camera Mode: Aperture Priority
- Exposure Bias: -1.0ev
- Processing: tweaked a little using Aperture’s Dodge & Burn plugin
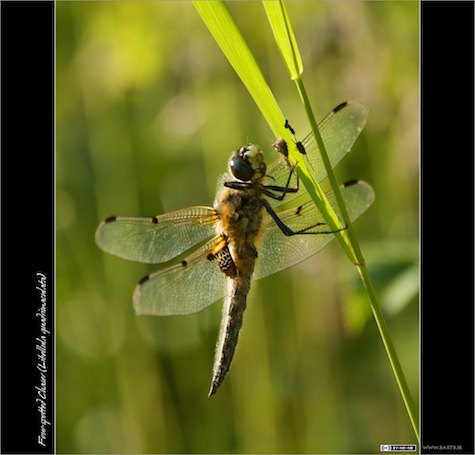
The second shot I chose is of the largest Dragonfly I’ve managed to capture so far, the Four-spotted Chaser (Libellula quadrimaculata). These guys are very territorial. They get their name because they chase away other Dragonflies that stray into their patch (and have 4 spots on each set of wings). They like to sit on perches that give them a good view of their territory, and will keep returning to their favourite perches over and over again. This makes them a joy to photograph, if you miss the perfect shot the first time around, just wait a bit, and you’ll get another chance! The fact that they like a perch with a good view also means you tend to be able to get shots with nice clutter-free backgrounds too.
I’ve also started to experiment a lot with back-lighting in the last few months. As this shot demonstrates, it can work nicely on insects which tend to have transparent or semi-transparent bits for the light to shine through.
- Camera: Nikon D40
- Lens: Nikon DX AFS 55-200mm
- Exposure: 1/400 sec
- Focal Length: 200mm
- Focal Ratio: f/8
- ISO: 400
- Camera Mode: Aperture Priority
- Exposure Bias: -1.0ev
- Processing: tweaked a little using Aperture’s Dodge & Burn plugin
Aug
9
Photo of the Week 129 – No. 186 Steaming West
Filed Under Photography on August 9, 2010 | 1 Comment
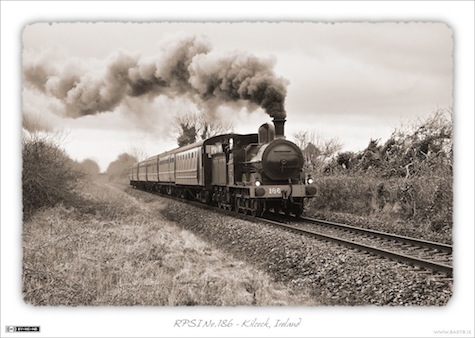
Since it’s been a while since I posted a railway shot in this Photo of the Week series, I thought I’d treat myself by posting my favourite steam shot of the year (so far). I chose this location precisely because it’s free from modern distractions. There are no modern houses, no electricity pylons, no modern signals, no modern electronics cabinets, in short, nothing to break the illusion of timelessness. OK – that’s not entirely true. Those of you with a very keen eye will notice the one unavoidable piece of modernity in this shot – the track itself – it’s continuous welded rail on concrete sleepers. You can rest assured that when No.186 was earning it’s keep for the Great Southern & Western Railway it wasn’t running on anything nearly as fancy, smooth, or comfortable! Still – very few people will find the modern track-work a distraction from the timeless beauty of a steam engine hard at work.
For those of you interested in such details, this is RPSI preserved steam loco number 186. She’s a class J15 0-6-0 former GS&WR loco, manufactured in Manchester in 1879, and retained in service until 1964. Here we see her on a cold, windy, and rather damp Easter Monday morning near Kilcock Co. Kildare, working the Easter Egg-spress from Dublin to Mullingar.
- Camera: Nikon D40
- Lens: Nikon DX AFS 55-200mm
- Exposure: 1/640 sec
- Focal Length: 55mm
- Focal Ratio: f/5.6
- ISO: 800
- Camera Mode: Full Manual
- Processing: This shot was first tweaked using the Topaz Adjust plugin in Photoshop Elements 8, then converted to monochrome using the Monochrome Mixer in aperture, and then give a subtle sepia tone using the Colour Monochrome brick in Aperture.
Aug
2
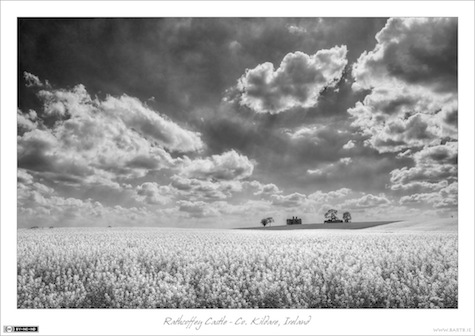
Photo of the Week 127 & 128 – Big Summer Skies
Filed Under Photography on August 2, 2010 | Leave a Comment
I’ve been on a bit of a break from Photography – a combination of injury and crap-tacular weather, so I have yet another catch-up post to do! As always when I do multiple posts, the two images are related, in this case, very related, being two different treatments of the same RAW image. This shot was taken on the same day as the last monochrome-colour combo I posted (Photo of the Week 111 & 112 – Summer in Rathcoffey), and from a spot only a few hundred feet from where that last shot was taken.
Yesterday I posted some of my thoughts on Photographic composition, and used that post as the basis for a conversation with Allison on episode 271 of the Nosillacast podcast. In that discussion we talked about the importance of getting layers into photographs of places to give a sense of depth, and in particular we talked about the importance of the foreground layer. As part of that discussion I drew attention to the fact that there are a huge amount of possible foregrounds for every background. You can usually move hundreds of feet without making much, if any, change to the background when you’ve shooting landscapes. This gives you a wide menu of foregrounds to choose from.
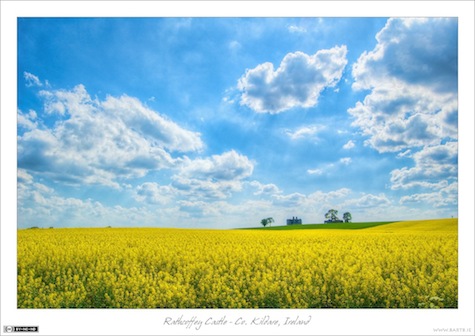
If you compare and contrast these photos with those from my Photo of the Week 111 & 112 post, you’ll get a good example of just how different a shot you can get by just changing the foreground. Both sets of photos have Rathcoffey Castle as the background, both have the field of flowering Rape Seed flowers as the mid-ground, and both have the same dramatic sky at the top of the frame, but both have very different foregrounds, framings, and compositions, resulting very different photographs.
These shots have a far simpler composition, with far fewer elements in the frame. It really is just the field, the castle, and the sky. The previous shot was about showing the many interesting things around the edges of the field, the beautiful old tree, the ancient Ring Fort, and of course the castle, so it was composed in such a way as to show all these things without cluttering the frame. The filed and the sky were in that shot too, but they were almost incidental. Here, we have much less in the frame, so both the sky and the big sweeping field are the stars of the show, with the castle adding some nice interest to the background, but not being the star of the show.
These two sets of shots were taken very close to each other. The first a little to the left of the Ring Fort, with the Ring Fort included, the other a little to the right of the Ring Fort with it excluded. The Ring Fort is literally just a few pixels off to the right of this shot, but because you don’t see it, you assume it’s not there, and that the field goes on for ever. As it happens it really is a very big field, but doesn’t come across half as well in the shot if you include it’s edges.
As with the previous photos, this pair was generated using the workflow I described on the Typical Shutterbug Podcast.
- Camera: Nikon D40
- Lens: Nikon DX AFS 18-55mm (D40 kit lens)
- Exposure: 1/1250 sec
- Focal Length: 18mm
- Focal Ratio: f/8
- ISO: 200
- Camera Mode: Aperture Priority
- Processing: single RAW image first tonemapped with Photomatix Pro, then tweaked with the Topaz Adjust 4 plugin in Photoshop Elements
- Camera: Nikon D40
- Lens: Nikon DX AFS 18-55mm (D40 kit lens)
- Exposure: 1/1250 sec
- Focal Length: 18mm
- Focal Ratio: f/8
- ISO: 200
- Camera Mode: Aperture Priority
- Processing: single RAW image first tonemapped with Photomatix Pro, then tweaked with the Topaz Adjust 4 plugin in Photoshop Elements, and finally converted to monochrome using the Channel Mixer in Apeture