The Author – Bart Busschots
Creative Commons
Unless otherwise stated, the content on this site is licensed under Creative Commons Attribution, Noncommercial, No Derivative Works 3.0 License


Dec
26
The Orton Effect – A Quick Tutorial
Filed Under Computers & Tech, Photography on December 26, 2009 at 5:48 pm
 The Orton Effect is an old effect that dates back to the film days and involved combining an in focus and an out of focus version of the same shot into a single image to give a dreamy effect where the shot is blurred yet has all it’s detail. You can read (a little) more about it on Wikipedia.
The reason I’m writing this tutorial now is that Christmas trees with their lights on make great subjects for the Orton Effect. It’s very hard to get a nice photo of the Christmas tree that does justice to the atmosphere of the scene, but the dreamy quality of an Orton image can really help.
Before you can apply the Orton Effect to an image of your tree, you obviously need to take a photo of your tree! To have a hope of getting a good sharp shot of something as dark as a Christmas Tree you’ll need a tripod. You should also shoot at your camera’s native ISO (usually the lowest ISO setting it has) to avoid getting noise in your image.
You should note that light-meters work great for typical scenes, but a lit Christmas-tree in a dark room is not a typical scene. Your light-meter will try to average the scene to 18% grey which is probably not going to look right. Similarly, your camera’s auto white balance feature is also likely to get very confused by such an unusual scene. For all these reasons, I’d suggest setting your camera to full manual mode and setting everything yourself. You are more intelligent than your camera! Also bear in mind that this scene is completely static, so it doesn’t matter if it takes you ages to get everything right, the tree will wait for you!
If you don’t know how to use manual mode to control your camera now would be a good time to learn. Get out that manual and take control of your camera! You can’t possibly hope to master photography if you are subservient to your camera! You just have to master your camera.
My suggested process for shooting a Christmas tree goes something like this:
- Set the Camera to Full Manual Mode
- Set the White Balance to Incandescent (usually a lightbulb icon)
- Set a low ISO, I use ISO 200
- Select a low but not too low Aperture – you want to let in a lot of light, but not reduce your depth of field to the point that bits of your tree will be out of focus! I used f/4.2
- If you have a remote shutter release, connect it and set the camera to use it, if not, set the camera to a delayed shutter mode – that will let you trigger the shutter by hand and still avoid camera shake
- Mount your camera on your tripod and compose the shot
- Cycle through a range of exposure settings till you get one that you think looks right. Bracket around that exposure just to be sure – you may change your mind when you see the shot on a big computer screen. Don’t be surprised if your exposure time are long – in my case the ideal exposure was 1.3 seconds.
Once you have an image to work with, you are ready to apply the Orton Effect. I’ve created my Orton Tutorial in two formats, a video screen cast, and a PDF. I’ve embedded the screencast below, and you can download the PDF here.
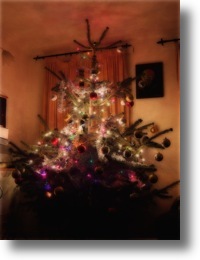
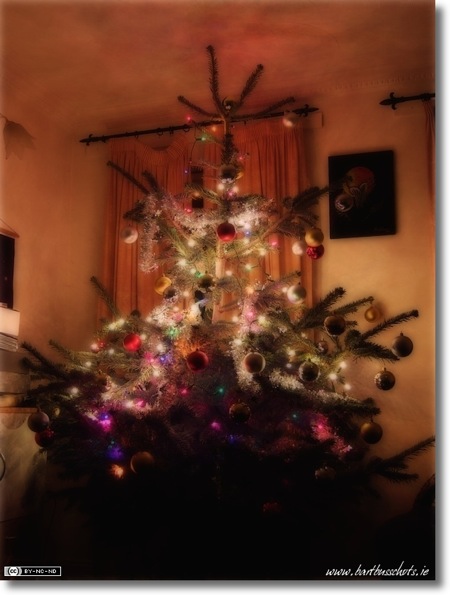
Finally, just to round things out, here are my before and after images:

Fantastic post Bart. Had not tried this and I plan to now.
Looks good Bart.
Good demonstration. I also use Aperture and Pixelmator and find your tutorials extremely useful. Any chance of more in 2010?
Thanks Folks!
James – I definitely plan to do more screencasts of the various techniques I’ve found useful – and since I’m a very keen Aperture user I’m sure the majority will revolve around Aperture.
Bart.
[…] #238 Camera Bags, Better Touch Tool, Canon HF S100, Orton Effect 27 December 2009 My impressions of hearing the NosillaCast hosted by Bart and Chit Chat Across the Pond with Lola Wong. Tamrac Adventure 9 vs. LowePro Micro Trekker 100 camera bags. Matt Hillyer of the Stealth Mac Podcast thestealthmac.com gives us an update on the Tom Tom iPhone application and a freeware utility called Better Touch Tool from blog.boastr.net for controlling the Magic Mouse. Rose from Hobart tells the tale of her new 27″ iMac. In Dumb Question Corner Gaz asks a question that’s too hard about emptying the trash, and John asks a perfect dumb question about how to deauthorize a Mac for iTunes after you’ve wiped it and sold it. Steve Sheridan gives a review of the Canon HF S100 HD Camcorder, how he chose it and his impressions of the camera. In Chit Chat Across the Pond Bart teaches us how to do the Orton effect on photos using any pixel image editor, a great way to make awesome photos of your Christmas tree (bartb.ie/blog/?p=1494) […]
Awesome photo Bart! Wow! Of course…now you have me jonesing (US for craving – or do you have that expression on your side of the pond too?) for more!
Well done Bart. This is a very cool effect. Dreamlike is a good description of the result. This appears to be the effect they use (in video) in ‘Star Trek: Generations’ when Picard is in the Nexus with his “dream” family. Everything he views including the Christmas tree has this Orton effect.
Great, easy tutorial, Bart. I’m enjoying your chats with Allison here in beautiful, but chilly, Ann Arbor, MI.
My cat, Rosemary, wanted to wish you and Allison a belated Happy Hanukkah, via the Orton effect:
http://www.scotious.com/HannukahBart.jpg
Please feel free to forward to Allison.
Thx. –Scotious
Thanks Pat! We definitely don’t use the phrase “Jonesing” here, but when you explain it it makes sense. We do have the related phrase here “Keeping up with the Joneses”.
Steve – I hadn’t thought of the Star Trek example, but you’re right, it does look like the Orton effect. Since it’s such a simple effect to apply I’d imagine it would work well in movies.
Scorious – thanks to you and Rosemary for the nice wishes! I’ve forwarded them on to Allison.
Bart.
Hey Scotious – what a great photo of your cat and the lights! Love the image. Btw, I grew up in Plymouth and Northville, and actually saw Nixon in a campaign speech in Ann Arbor when I was a little girl. thanks so much for sending.
[…] tones very well. If you’re interested in experimenting with the Orton Effect I posted a tutorial with screen cast a few weeks […]
Bart,
Thanks for pointing out this effect to me
I am keen photographer and run my own web (Irish florist) and this looks pretty cool.
Will try out,
Thanks