The Author – Bart Busschots
Creative Commons
Unless otherwise stated, the content on this site is licensed under Creative Commons Attribution, Noncommercial, No Derivative Works 3.0 License


Feb
18
Aperture Priority – Get More Out of Your DSLR
Filed Under Photography on February 18, 2008 at 11:43 pm
When I first got my Nikon D40 I left it on full automatic mode and basically let the camera choose everything except the zoom. I got some fantastic shots that way but I soon started to crave more control. DSLRs like the D40 give you a number of manual modes to choose from so it’s not an all-or-nothing choice where the camera either looks after everything or nothing. Instead you can choose for a half-way-house where you control the element that’s most important for you and leave some or all of the rest up to the camera. The two most common semi-automatic modes are S (shutter priority) and A (aperture priority). Since almost everything I shoot is animate and stationary I don’t have any great need for control over the shutter speed. However, for the kind of shots I do like to take I like to have control over the aperture. This is why my camera spends almost all it’s time in aperture priority (A) mode and almost all of the rest of the time in full manual mode when I do mad things like take pictures of stars.
Before going any further I want to take the opportunity to try to explain exactly what it is you’re controlling when you set the camera to A mode. At it’s most basic level the aperture is the transparent area of the lens through which light passes on its way to the film or senor. Any given lens has a given physical size which determines the maximum possible aperture for the lens. Cameras can use movable blades to reduce the effective aperture of the lens allowing you control over the aperture.
To complicate things somewhat photographers and cameras don’t measure aperture in millimetres or inches but instead as a ratio of the diameter of the aperture to the focal length of the lens. This is referred to as the focal ratio, F number, or just F. When you pick up a lens there will always be at least two pieces of information on the barrel, the focal length of the lens, and the minimum possible focal ratio (i.e. the F number when the lens is completely open with no blades blocking any light). In the case of a prime focus lens you’ll see something like this on the lens: 30mm 1:1.4. The number before the mm is the focal length in millimeters, and the number after the 1: (1.4 in this case) is the minimum focal ratio of the lens. On zoom lenses things get a little more complicated because the lens will have a range of focal lengths and a range of minimum focal ratios. For example, the kit lens that comes with the D40 has the following on it: 18-55mm 1:3.5-5.6. This means that when the lens us fully zoomed out it has a focal length of 18mm and a minimum focal ratio of F3.5, and when the lens is fully zoomed in it has a focal length of 55mm and a minimum focal ratio of F5.6.
To get good at SLR photography (digital or not) you need to understand the effect F numbers have on your image. The obvious thing to note is that the lower the F number is the wider the aperture is physically, so the more light that gets in. This is why lenses with low F numbers are often referred to as ‘bright’ lenses. Two obvious effects of low F numbers are that you can use shorter shutter speeds and that you can work in situations where there’s less light at your disposal. That’s why it’s possible to take pictures indoors without flash with my F1.4 lens but not with the standard kit lens that comes with the D40 which is only F3.5-5.6.
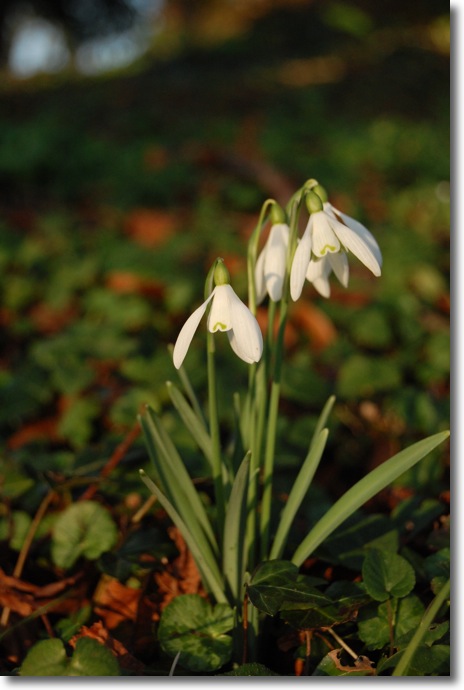
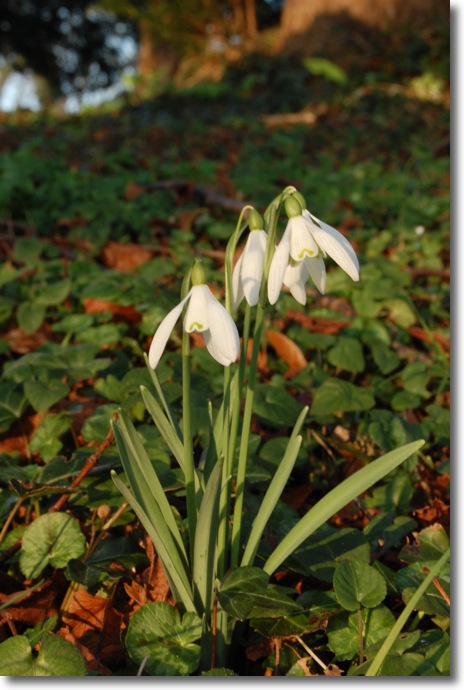
The less obvious effect of the focal ratio is the effect it has on the depth of field of your image. The smaller the physical hole the light can get through the deeper the depth of field of your image will be. In other words, the higher the F number the more of your scene is in focus. Conversely, when you use very low F numbers you get a very thin depth of field. Sometimes you want a thin depth of field and sometimes you don’t. When you’re shooting a landscape for example you want the whole scene to be in focus. However, when you’re shooting portraits you’d like to have only the subject in focus surrounded by a nice soft (out of focus) background. To illustrate this effect I took two images of the same flower at two different focal ratios. Both images were taken using the standard kit lens that comes with the Nikon D40 zoomed all the way to 55mm. The first image was taken with the lens wide open, i.e. at F5.6, the second image was taken with the lens stopped down down to F20. You can clearly see that the depth of field is much shallower in the first image compared to the second one.
As well as changing the artistic feel of an image the depth of field can also help draw attention to the subject of an image. The more distractions there are in the background the more important it is to keep the depth of field shallow so that the background doesn’t distract from the actual subject of your shot.
Once you take the plunge and put put your camera into Aperture Priority mode you can start to manually set far more than just the aperture. For example, I always set the white-balance manually. This is an absolute must for shooting indoors without flash, but it also makes a difference when shooting outdoors. I’ve found that relying on the automatic white-balance on very bright summer days or on winter afternoons when the sun remains low in the sky tends to lead to unnatural looking colours. By tweaking the white balance manually I can generally get images that look right without the need for any post-processing. This isn’t something you have to worry about when lining up each shot. You soon get used to what settings work in what situations and you generally only have to set it when you start shooting. I generally set it to what I think is right, take a test shot to verify that it’s OK, and then forget about it.
I also like to set my ISO manually so I can keep it as low as possible. The D40 does very well at 200 and 400 ISO but by 800 noise begins to creep in a little. The camera does go higher than that but I like to avoid those very high ISOs unless I have no choice.
Finally, I often find it helpful to use exposure compensation. When shooting in A mode the camera picks the exposure time for you but it doesn’t always get it right. When you’re not happy with the choice the camera makes you can use exposure compensation to to tweak the exposure until it’s just right. Like I said, most of the time the camera guesses right, but I’ve noticed that the D40 often gets it wrong when there’s a large range of brightnesses in the scene you’re trying to capture. If part of the image is overexposed then all detail in that region is lost and the overexposed region will ‘bleed’ into neighbouring pixels further spoiling the shot. When this happens you can try to improve things by reducing the exposure with the Exposure compensation. This doesn’t always work but when it does it makes a huge difference.
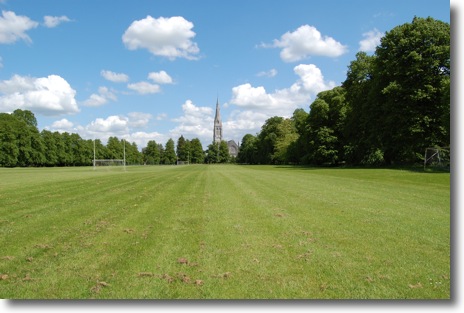
The times when exposure compensation is least likely to work is when it affects clouds in a bright sky. When you turn the exposure down enough to remove the overexposure on the sky the landscape often looks terribly underexposed. When this happens you just have to live with an overexposed sky. However, don’t worry too much about that because it’s usually not really noticeable there. For example, parts of the white clouds in the image below are overexposed but the image still looks fine.
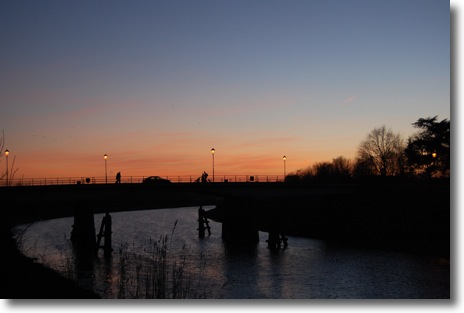
However, sometimes tweaking the exposure can really save an image. The Snowdrops in the examples for aperture settings above have exposure compensations of -0.67 and -0.33 respectively. Without these compensations the details in the petals of the snowdrops would be lost. Another time when you will need exposure compensation is when you want your images to be dark. For example, when you want to get a silhouette against the sunset you often have to force the camera not to expose long enough to get detail in the foreground objects. The example below was taken with an exposure compensation of -0.67.
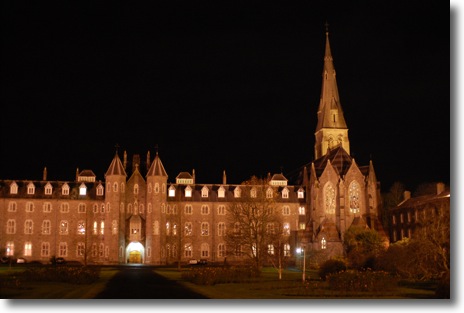
Finally, the time you really need exposure compensation is when you’re shooting at night. When there is are large dark areas in a shot the camera tries to compensate by increasing the exposure time. However, this will result in the bright areas being horrible overexposed, and lets face it, when you’re trying to capture a scene at night you WANT there to be a lot of dark areas in your shot! The example below has a massive exposure compensation of -1.67.
Bart,
Thanks for the tips! I will print this out and put it with my D40! I love this little camera so much!!! Keep the D40 tips coming.
Also, love your segments on the Nosillacast and especially on the Typical Mac User. I really like getting deep into UNIX.
Think Different
Here’s to the Carzy Ones…
Connor
sorry at the end of my last post that was “Here’s to the CRAZY ones…”
Connor
Thanks for the sharing. There are great tips 🙂