The Author – Bart Busschots
Creative Commons
Unless otherwise stated, the content on this site is licensed under Creative Commons Attribution, Noncommercial, No Derivative Works 3.0 License


Jul
20
Selective Colour With The GIMP
Filed Under Photography on July 20, 2008 at 6:41 pm
 This is how I do selective colour using the GIMP. I’m not claiming it’s the only way, or even the best way. I just know it works. This technique has a few powerful features though. Firstly it’s non-destructive, secondly it allows for partial de-saturation, thirdly it allows the channel mixer to be used to generate a very good black & white version of the image, thirdly, it allows for a controlled boost of the colour in the colour areas. This give you much more control, but it also makes the technique a little more complex than many other techniques you’ll find out there.
[tags]GIMP, Selective Colour, Tutorial, Image Processing, Photography[/tags]
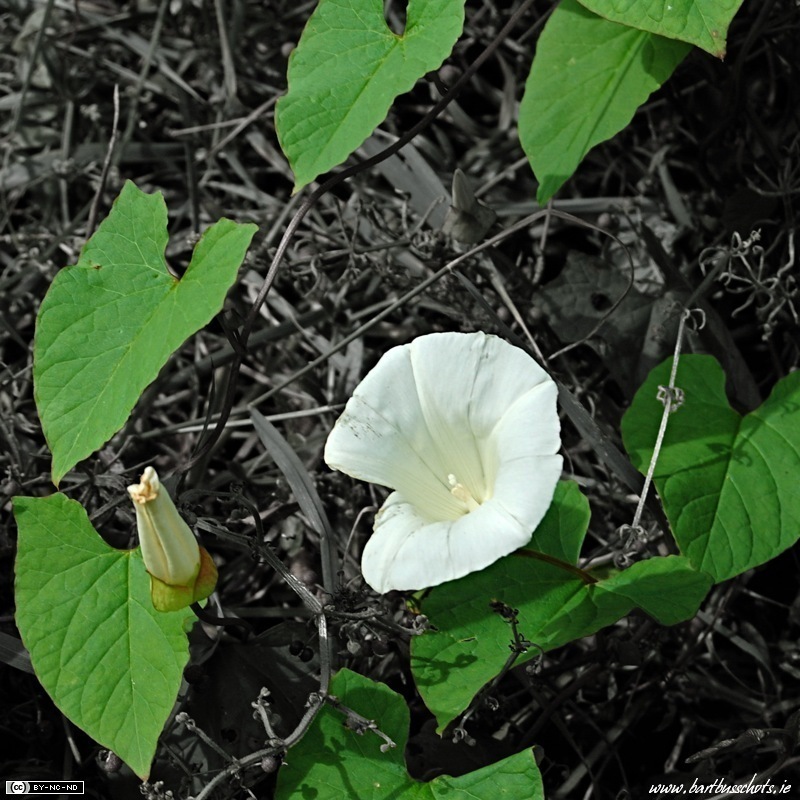
Without further ado, lets start with a look at the raw image I’ll be using for this demonstration. The aim of the exercise here is to keep the flower and the leaves in colour, while desaturating the background in order to better separate the subject from the background.
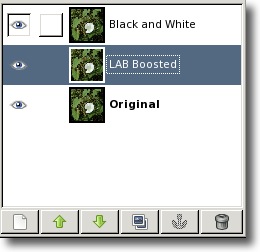
I’ll start by duplicating the background layer twice and then naming the layers as shown below. To duplicate a layer just right-click in it in the layers pallet and choose Duplicate Layer.
Next I’ll boost the colour of the middle layer. When that’s done the middle layer will probably be far too vibrant. Don’t worry about that, when all the layers have been set up I’ll be able to adjust this by setting the transparency on the middle layer. The reason I don’t want to do that at the start is that it will be easier to create our mask if the colour is extremely vibrant. I’ll boost the colour using the LAB Colour Boost technique.
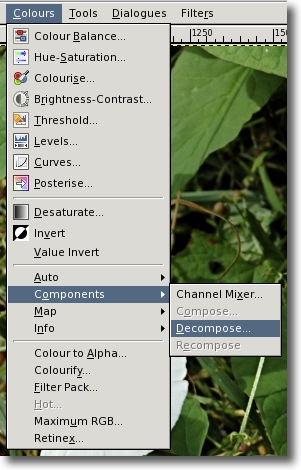
Before going any further ensure that the middle layer selected (the one called LAB Boosted) is selected. Next choose Colours -> Components -> Decompose ... as shown below:
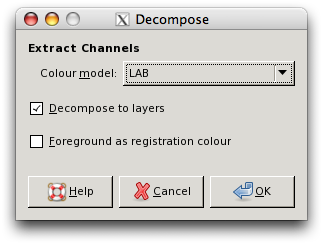
We want to decomposing to the LAB Colour Space and to layers, so the options need to be set like so:
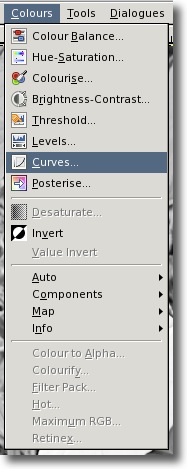
This will cause a new windows to pop up which contains three black and white layers representing the three colour components of the original image in the LAB colour space. We’ll manipulate the A and the B layers in this image and then re-compose the three layers into the single layer in the original image. Start by selecting the B layers and then selecting Colours -> Curves.
The top and bottom of the curve need to be moved in one square on the graph so that the curve looks like this:

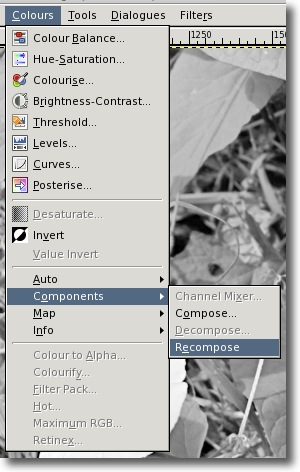
Now select the A layer and apply this same curve to that layer too. Now it’s time to re-compose these adjusted layers back into the middle layer in the original image. To do this choose Colours -> Components -> Recompose (on the window with the decomposed layers).
When this is done we can close the new window that opened with the three LAB component layers because we won’t need it again. There is no need to save it. At this stage the original image will look un-changed because there is a layer above the one we just edited. If you want to see the effect the LAB Colour Boost you can temporarily hide the top layer. Just make sure to un-hide it before continuing!
The next step is to convert the top layer to black & white. This can be done either by simply going to Colours -> Desaturate..., or by using the channel mixer. It’s much easier to use the desaturate menu, but this is precisely because it gives you very little control over the result. There are three options to try and you should probably try all three to see which you like best. Once you choose one you can un-do it and then choose another until you’re happy. Alternatively, if you really want fine control over the conversion to black & white, you can use the Channel Mixer which you’ll find at Colours -> Components -> Channel Mixer.... In the Channel mixer you need to make sure to click the Monochrome checkbox. You will generally get the best results if the values you have for the three channels add up to 100. When converting to black & white the aim is to concentrate on making the areas that will not be coloured look best, and to ignore the areas that will be coloured completely.
In this case I’ve chosen to desaturate based on Lightness using the simple desaturate menu. If found this to work well for what I wanted with this image, i.e. a fairly dark result with rather low contrast.
At this stage we have an image with three layers, the bottom layer is the un-touched original, the middle layer has been colour boosted, and the top layer has been converted to black and white. The next step is to turn this top layer into a mask, and to paint in the areas where we want the layers underneath to shine through, in other words, the areas we want to have in colour.
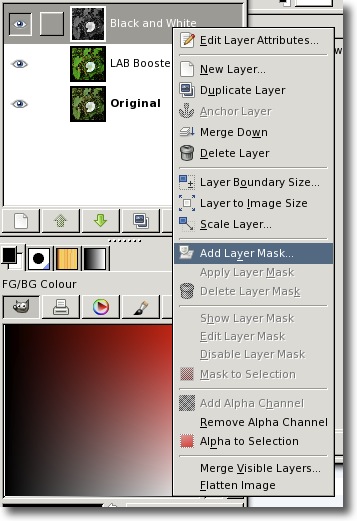
Start by making sure you have the top layer selected, and that the foreground colour is set to black, and the background colour to white. Then right-click on the top layer in the layers pallet and choose Add Layer Mask....
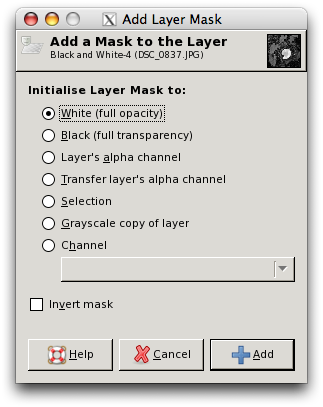
The mask needs to have the following settings, these should be the default settings, so you shouldn’t have to change anything here and just click Add.
Now select the Pencil and colour in the areas you want to be colour in black. Don’t use a brush, but feel free to colour in the edges and then flood-fill the middles of your colour regions. This is where a graphics tablet really comes in handy!
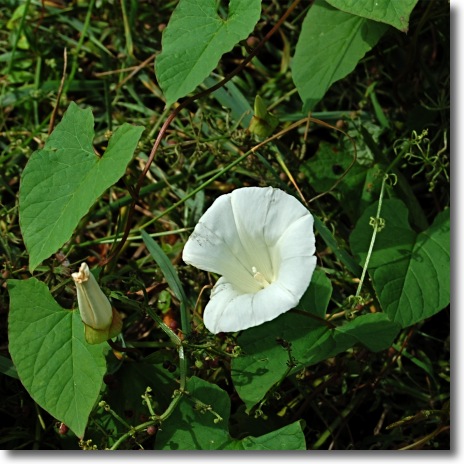
OK, so now lets see how far we’ve gotten, here’s the current state of play:
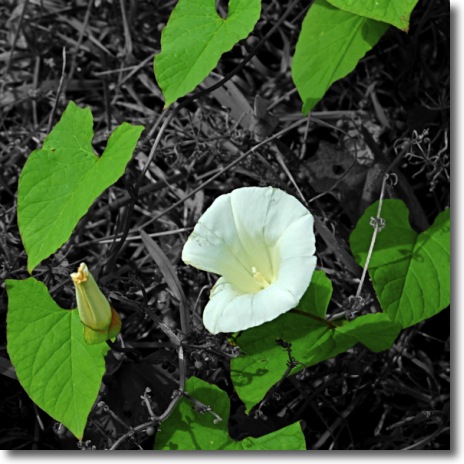
The colour areas are far too vivid, and the black and white areas are too desaturated. Both these things can be adjsuted by using the Opacity sliders for the top two layers in the layers pallet. I generally start by getting the colours right by adjusting the opacity of the middle layer, then I let a little colour back into the black and white areas by adjusting the slider for the top layer. In this case I set the top slider to 90% to allow in just 10% of colour to the background layer and set the middle slider to just 5% because the colour was far too vivid after the colour boost. This is unusual, normally this slider will work well at around 75%.
And that’s it, we’re done!