The Author – Bart Busschots
Creative Commons
Unless otherwise stated, the content on this site is licensed under Creative Commons Attribution, Noncommercial, No Derivative Works 3.0 License


Apr
16
My Tilt-Shift Instructions for GIMP
Filed Under Computers & Tech, Photography on April 16, 2008 at 8:18 pm
In my first article on simulating tilt-shift miniature faking with the GIMP I linked to instructions from Gimparoo!. Firstly, these instructions are no longer completely correct on the latest version of the GIMP because some of the menu sequences used have changed. Secondly, I’ve been looking at other sets of instructions on the web for doing this with PhotoShop and comparing them to the Gimparoo! instructions (particularly these instructions). What I’ve found is that the Gimparoo! instructions are not entirely complete so I’ve decided to write my own.
As usual I want to stress that I am not making any claims that these instructions are in any way definitive. There may well be WAY better ways of doing this. What I’m saying is that this is the best way I’ve found of doing it so far and that it works for me.
[tags]Tilt-shift Photography, Tilt-shift, photography, GIMP, miniature faking, photo editing[/tags]
First, lets look at my raw image. This is not an image of mine but one Allison Sheridan from the NosillaCast podcast was nice enough to allow me to use. She took it last summer while on holidays in Italy.
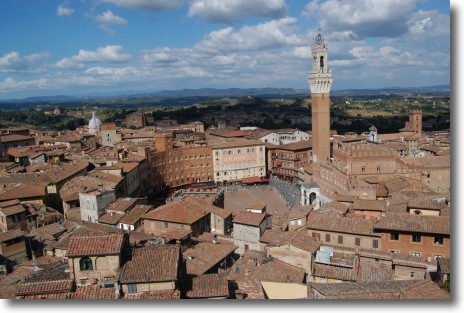
The first thing to note is that a dramatic cloudy sky is not good to have on a TSP shot. It will ruin the illusion! Also, you need to have a point of focus in the image where there is something interesting happening which will serve as the point where the artificially thin depth of field will be centred. For both those reasons I’m going to start by cropping the photo to an area centred around the church square. To do that just choose the selection tool, select the area you want to keep and then go to Image -> Crop to Selection.
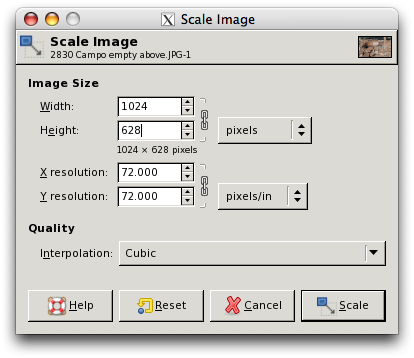
For the effect to work best we should scale the image to the size we want to use it at (I’m opting for a width of 1024px). To do that go to Image -> Scale Image ... and enter the width you want and click Scale. Apart from your chosen width or height all the rest of the controls can be left at their default settings.
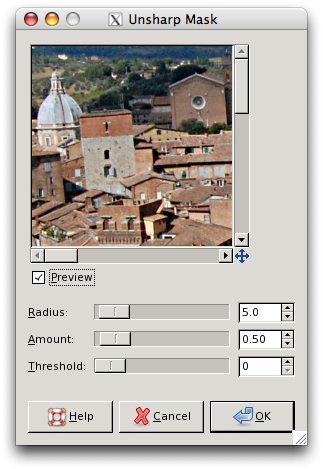
The sharper your image is at the point you’ll be using as your focus the better the effect will be. If your original image is a little soft I’d recommend applying an un-sharp mask by going to Filters -> Enhance -> Unsharp Mask .... Again, the defaults should be fine.
So lets see where that leaves us so far:

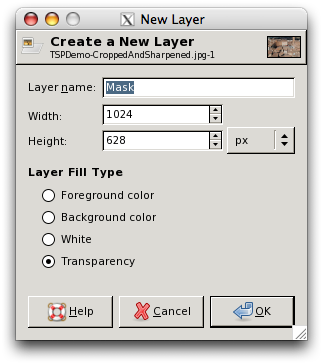
The next phase in the process is to apply the blurring that will artificially produce a shallow depth of field. To set this up we need to do a few things. We start by creating a new transparent blank layer called ‘Mask’ by choosing Layer -> New Layer .... The settings for this layer should look like this (the width and height will probably be different, leave them at their default values):
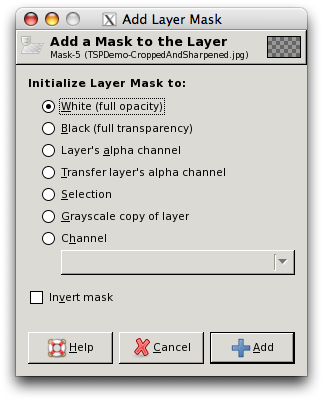
Next we need to set this layer up as a masking layer by right-clicking on the layer in the Layers Pallet and then choosing Add Layer Mask. (Before you do this you should make sure you have black set as the foreground colour and white as the background colour.)
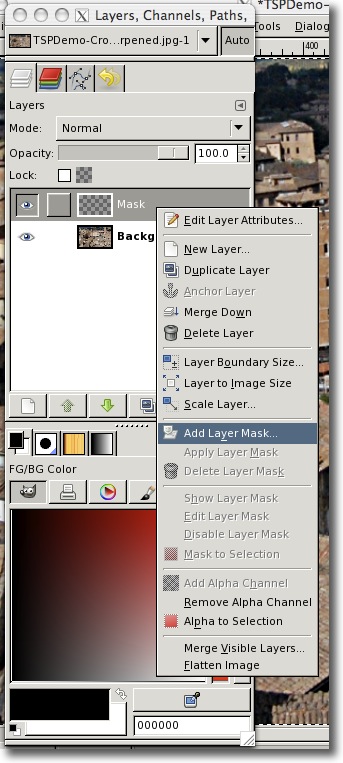
In the resulting dialogue box you need to select White (full opacity).
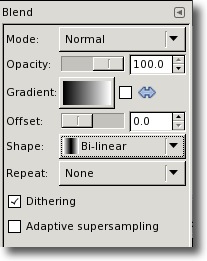
Next you need to select the blend (AKA gradient) tool and ensure it is set to the default gradient of FG to BG (RGB). Then you need to set the shape to Shape to Bi-linear. The blend tool details should look like the following if you have it configured correctly:
Before we go any further make sure you have the Mask layer selected as your current layer. Now it’s time to get creative! We need to choose our point of focus in the image and then drag a line from there with the blend tool straight upwards till the point where you’d like the deep out-of-focus region to start. You won’t see much happening on the screen. If you’re very observant you’ll notice that the gradient has now been drawn onto the thumbnail of the mask in the Layers Pallet:

Note that if the point you’ve chosen for the focus of the image is not on the level then you should not drag straight up but rather perpendicular to the slope of the ground at your focal point.
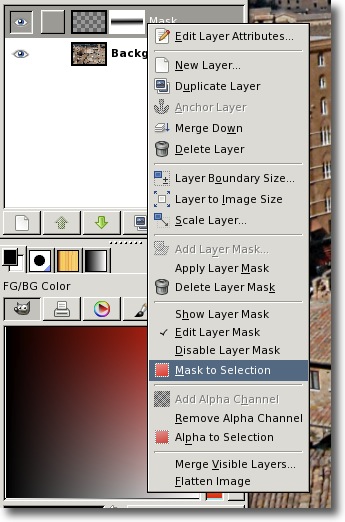
Now you need to turn this blend into a mask by right-clicking on the Mask layer and selecting Mask to Selection.
At this point you will finally get to see where your blurring will come on your image. If the selection hasn’t come where you want, undo the last two steps (Edit -> Undo) and try again until you’re happy.
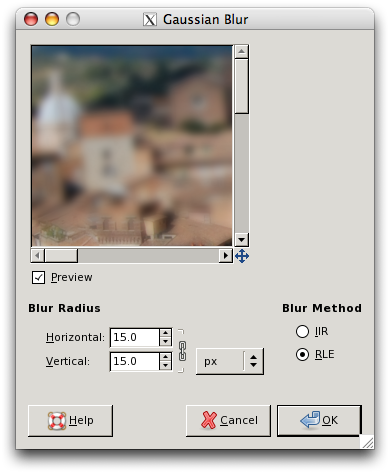
Now you need to select the Background layer before we can apply the blurring. To apply the blurring go to Filters -> Blur -> Gaussian Blur .... This will pop up a window where you get to configure the blur. Conventional wisdom seems to be that a Blur Radius of 15px works best.
Now we’re getting closer. Lets have a look at where we are now:

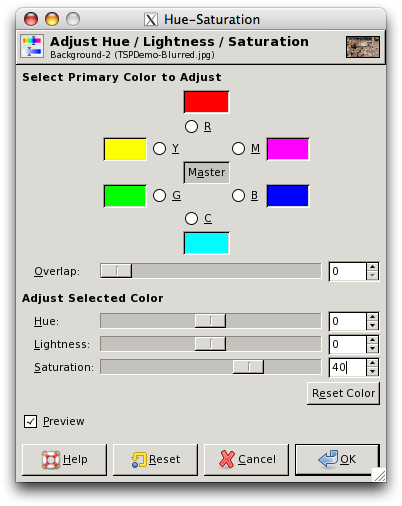
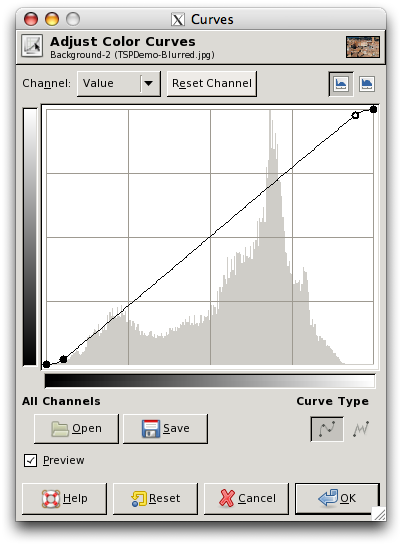
At this point we’re clearly getting close but we’re not quite there yet. There is one more step that we definitely have to take and one that may also be helpful. We definitely have to push up the colours to give the whole image a more surreal feel and it may also be helpful to tweak the curves a little to boost contrast.
To boost the colours we use the Hue-Saturation dialogue which can be found at Colors -> Hue-Saturation .... What we want to do here is to increase the Saturation. Accepted wisdom seems to be that a value in or around +40 should work best.
Finally, it might add a little to your image to boost the contrast slightly by going to Colors -> Curves ... and setting a slight S-curve to boost the highlights and darken the shadows. You’re looking for a curve something like this:
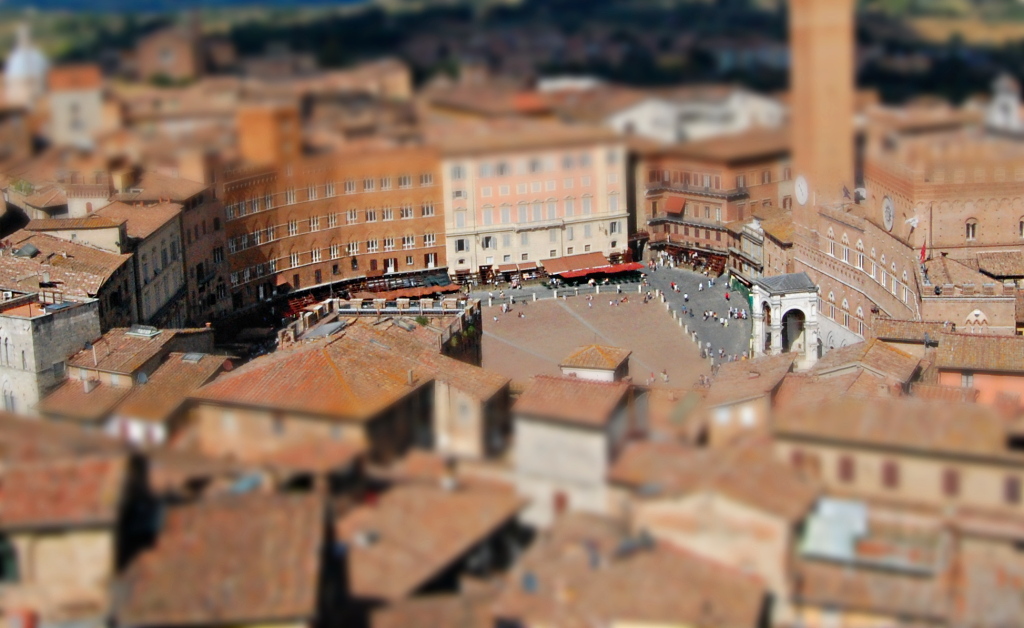
And that, ladies and gentlemen, is it! You can now save out your image and enjoy! Here’s the end result of my work on this image:
[…] My Tilt-Shift Instructions for GIMP […]
[…] My Tilt-Shift Instructions for GIMP […]
[…] My Tilt-Shift Instructions for GIMP […]
[…] and a fly off of GIMP (gimp.org) vs. Photoshop Elements (adobe.combartbusschots.ie/blog/?p=787 and bartbusschots.ie/blog/?p=774 respectively. cavesofice.org for tools that add layer masking to […]
[…] real photograph of a real life scene from up above and make it look like a scale model. Bart put a great tutorial on his website of how to create this illusion using the GIMP. I tried to follow them using Photoshop Elements but […]
Thank you for your website 😉
I made with photoshop backgrounds for myspace or youtube and ect..
my backgrounds:http://tinyurl.com/5ajonc
Hope you had a good day and thank you again!
Excellent tutorial, thanks for providing an updated set of instructions for the Gimp. I also recommend the Lens blur plugin found here:
http://wiki.gimp.org/gimp/Tutorials/InstallingFocusBlur
I think it gives a better result than the Gaussian blur (it does work in Windows).
[…] followed the tutorial found here, http://www.bartbusschots.ie/blog/?p=774 though I used the focus blur plugin (better results) rather than the Guassian […]
Thanks for sharing, it worked 😀
Thanks for the tutorial! I always wanted to try this. Here is my first attempt, posted to flickr. http://www.flickr.com/photos/i_shot_that/3619744055/
Regards!
Thanks for this tutorial. Just got back from Paris, and have a nice view from the effiel tower:
http://home.comcast.net/~lamikam/paris1.jpg
Thank you for putting this up with very detailed instructions! I sometimes have a hard time putting all of the steps together in other tutorials but this made it very easy for me. Here is my result: http://2sadeyes.deviantart.com/art/Mini-Downtown-Eugene-130124739
I mentioned this tutorial in the description:)
~Kylie
[…] Tutorial can be found here. Greek Island | 2009 | architecture, tutorials | Tags: architecture, photograph, tutorial | Comments (0) […]
[…] 15 December, 2009 Experiments in miniature faking Posted by nic under Life, Technology | Tags: cinque terre, France, Italy, langholm, miniature faking, photography, rome, Sweden, tilt shift | Leave a Comment I spent a little time over the weekend playing around with miniature faking: post-processing some of our photos (using GIMP of course) to simulate the shallow depth-of-field associated with close-up photography. Mostly, I followed the this tutorial. […]
This is the best tilt-shift tutorial I’ve seen so far, so thanks! :oD Most tutorials show how to add the depth-of-field illusion, but your tips on cropping and color help out a lot and really make the difference between a “wow” photo and a “umm.. did some noob try to do a tilt-shift effect?” photo, which is what most other tutorials yield…
Very cool! I need to try this out some time.
Awesome, this was really great.
Thanks for this. A very nice shot of Siena too.
BTW as with everything nothing is 100 % that way. A dramatic sky can be effective too! Heres one done with tiltshiftmaker ( I will now re-do with GIMP)
http://www.flickr.com/photos/pollobarca/5009490296/
Dolomites in Italy.
A question- can this technique in GIMP be applied as a batch ? I want to do a time lapse movie with this. But applying one at a time to 1000+ images
will be boring at the least.
All the best
paul
Hi Paul,
Glad the instructions were useful!
I know it is possible to batch process with the GIMP, so I imagine you could create a filter or a script or something to apply this effect to thousands of images, but I’ve never done it myself, so I’m afraid I can’t be much help there. If you do succeed, please post a link here, I’d really love to see the resulting video, I think it’ll be very cool!
Bart.
Easier way to do it: apply color effects first. Duplicate layer. Sharpen top. Blur bottom. White to black linear (or appropriate) gradient layer mask on top layer. Boom. For added effect, apply some vignetting or add a more vibrant blur to bottom layer by duplicating sharpened layer, bringing up brightness on blur, duplicate above blur, and lower opacity on duplicate.
Fantastic, thanks MarxM, that does look a lot simpler!
Bart.
[…] Diorama effect Gratis, met Gimp : KLIK __________________ Cheers, […]
[…] above, rather bland image was taken at the Saylorville Dam, just north of Des Moines, IA. I used this fake tilt shift method to produce the following two […]
Thanks very much for posting this – just followed the instructions and got a great result. However I’d like to point out a problem in your end result.
The angle of view is quite shallow so I would expect to see all of the face of the buildings at the back of the square in focus not just the bottom.. they’re equally distant away so it doesn’t make sense that they’re not in focus.
[…] Grenoble Tilt-Shift Image by Dave Peake Faux tilt-shift shot of Grenoble using the Gimp and this tutorial: http://www.bartbusschots.ie/blog/?p=774 […]