The Author – Bart Busschots
Creative Commons
Unless otherwise stated, the content on this site is licensed under Creative Commons Attribution, Noncommercial, No Derivative Works 3.0 License


Apr
19
Creating Partially-Coloured Black & White Images With the GIMP
Filed Under Photography on April 19, 2008 at 7:50 pm
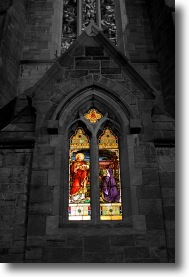 Sometimes it can be very interesting to take a colour image and convert all of it to black-and-white except for some carefully chosen areas. I just added a number of images processed in this way to the collection of wallpapers in my gallery.
The only reason you would want to do this is for artistic effect. You can use the technique to draw people’s attention to specific parts of an image, or to accentuate a particular colour your interested in. You are really only limited by your imagination when it comes to applying this technique.
You’ll be happy to know that the technique for doing this is a lot simpler than the technique for tilt-shifting images I described recently.
[tags]Photography, GIMP, tutorial, partially-coloured black & white[/tags]
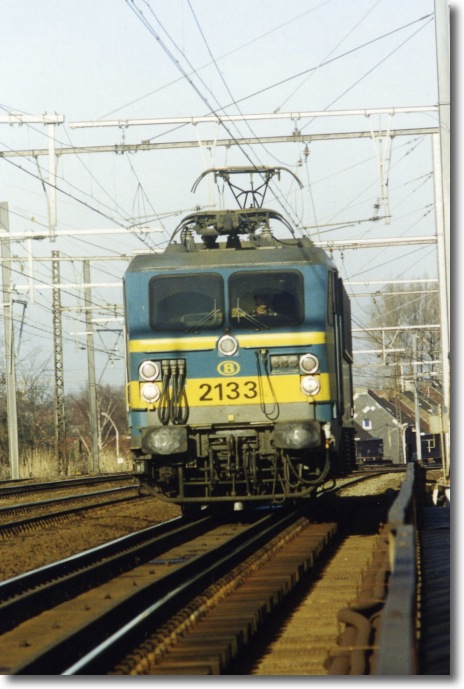
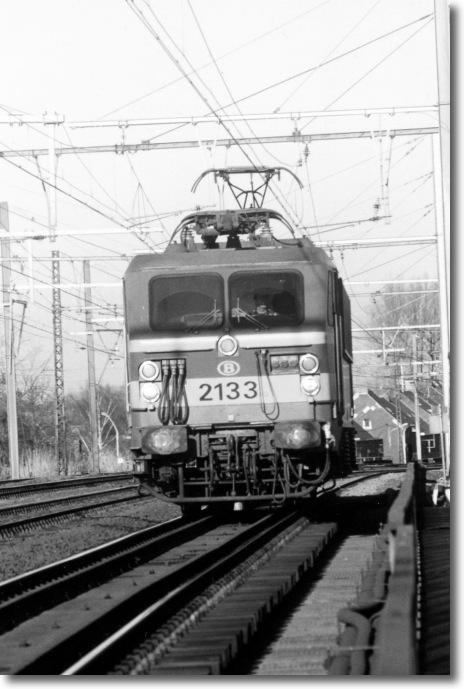
The best way to learn is by example I always say so I’m going to take the following raw image and convert everything to black & white except for the train locomotive.
We start by right-clicking on the background layer in the Layers Pallet and selecting Duplicate Layer from the contextual menu. I then double-click the newly created layer to re-name it to “B & W”, that’s purely optional.
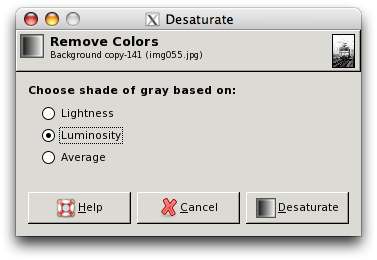
Now we need to convert this new layer to black and white. You do this by going to Colors -> Desaturate .... This will generate a new dialogue which gives you three choices for how you de-saturate the image. There is no right choice in general. Different images will look better with different conversions. Your only real opotion here is trial and error. Having said that, I have found that Average works better more of the time. For this image I’m using Luminance. When you’re judging which conversion looks best you should mentally ignore the parts you’re going to colour back in later and concentrate on the parts of the image that will remain black & white.
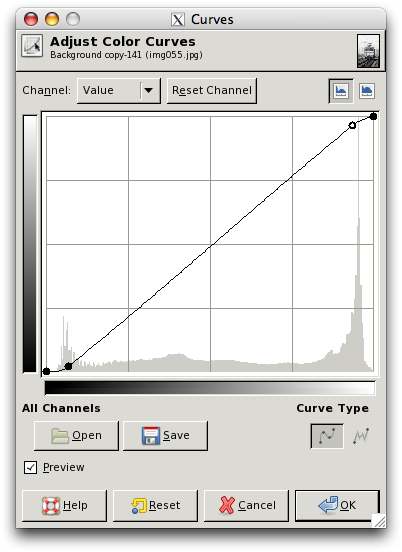
If you’re not completely happy with the way the image looks in black & white you can tweak it using the curves dialogue box (Colors -> Curves ...). In general you’re most likely to want to boost the contrast a little so an s-curve like one I’m using in this case is probably what you’ll need.
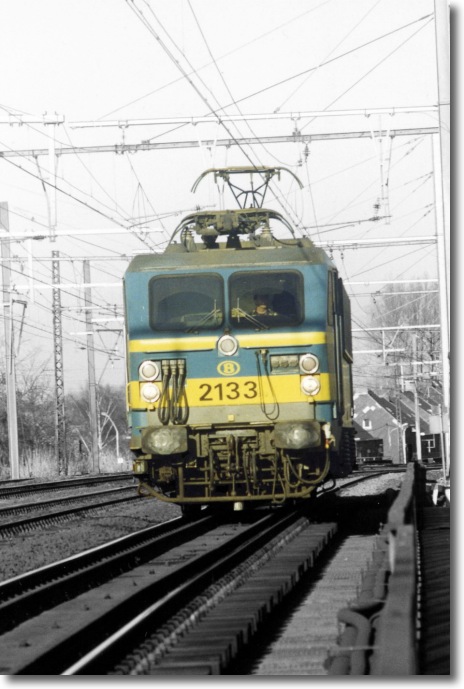
Before we continue lets look at what our image looks like now. It’s all black & white but hidden below it is the colour version just waiting to shine through in the regions we will specify.
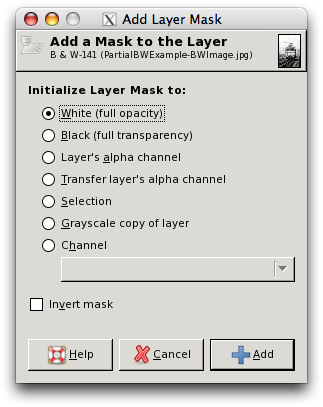
Once we’re happy with the black & white layer we need to convert it to a mask. Before doing this you should verify that you have your foreground colour set to black and your background colour to white. To convert the layer to a mask right-click on it in the Layers Pallet and choose Add Layer Mask ... in the contextual menu. A new dialogue will appear where you should choose the default settings.
Once you’ve done this all the areas that you colour black in the black & white layer will become transparent allowing the colour to shine through. You can paint these regions in in any way you like, however, I like to use a three-step technique. First I use the pencil (NOT the brush or it won’t work right) to draw a rough out-line around the bits I want to become coloured. Then I use the fill-tool to flood-fill those regions. Finally I use the brush tool to colour in the edges, changing to a smaller brush as needed. The reason you have to use the pencil first is that it has a rough edge. There is no semi-transparent region half-coloured in around it’s edges. This means that when you flood-fill you get a neat ‘join’. The brush does add a small semi-transparent area around where it’s drawn so it’s bad for marking out the area to fill but perfect for filling in the edges. It gives a nicer join between the black & white and the coloured regions than the pencil in my experience.
Once you’re done colouring in it’s time to tweak the background layer, if needed. If you’re happy with the image then save it now (you have to have the bottom layer selected to save). If you think the colour regions could do with being brightened, darkened, or colour boosted then you can do that now by selecting the background layer. Generally all that I do is boost the saturation of the colour layer a little by going to Colors -> Hue-Saturation ... and increasing the Saturation slider. In the case of this image that’s not needed so we’re done.
[…] Creating Partially-Coloured Black & White Images With the GIMP […]
Great guide Bart, I’ve been experimenting with this effect for quite a bit, with some great results.
Hi Karl,
Do you have any of your work online anywhere? If so any chance of a link?
Bart.
Hey Bart, I can email you a picture I’ve just done today. its a long story.
But It should be on the net soon, you can link to it then.
Hi Bart,
I jus downloaded gimp, and wanted to see if it could do this thing cos i knew photoshop could. thank you for ur tutorial on it, i got it working.
you have some amazing photos there, the blackk frame you put around the photos is brill, keep up the good work
Hi Pete,
Thanks for much for your kind comments, and I’m glad this post was useful for you.
Happy snapping!
Bart.
Hi Bart!
This is just a note to thank you for having provided the community a tutorial for this fantastic effect specifically conceived for the GIMP!!
Keep up with the good work!
Cheers!
Your instructions are so clear and easy to follow, I’m making great pictures with absolutely no GIMP experience! Thanks!