The Author – Bart Busschots
Creative Commons
Unless otherwise stated, the content on this site is licensed under Creative Commons Attribution, Noncommercial, No Derivative Works 3.0 License


Aug
22
SSH Agent – Simple Yet Secure SSH Keys On OS X
Filed Under Computers & Tech, Security, System Administration on August 22, 2007 at 6:21 pm
 If, like me, you spend a lot of time using SSH you’ll probably like the idea of being able to log in to servers without a password. If you really want this you can do it by setting up a SSH key pair with an unencrypted private key. This works, it lets you log in to your servers without a password. HOWEVER, it’s a simply disastrous idea from a security point of view. The only reason I don’t do this is because the idea of an unencrypted private key scares the bejeesus out of me. Hence, I still dutifully type my SSH password each time I connect to a server, and each time I check something in to source control. I’ve been keeping an eye out for a simple solution for a while but hadn’t been actively thinking about it for months. That is until I came across Dave Dribin’s blog post Putting the “S” Back Into SSH this morning. Dave rightly points out that there is a solution,
 ssh-agent, the problem is it’s a command-line tool and by all account not the simplest one to use. So, what’s obviously needed is a nice GUI for ssh-agent. Dave initially thought he’d found the solution in the program SSHKeychain. SSHKeychain is more of a proxy for ssh-agent than a GUI for it though, and Dave soon discovered that it has it’s fair share of problems. So, in the end, I didn’t decide to use SSHKeychain. However, the post inspired me to have another go at finding a solution. Also, the reference to ssh-agent sparked a vague memory in the back of my head of an OS X GUI for something to do with SSH that had the word ‘agent’ in its name.
[tags]SSH, SSH Keys, ssh-agent, OS X, Apple[/tags]
Introducing SSH Agent
I remember I had come across this mystery app when I was looking for an SSH bookmarking solution (I settled on JellyfiSSH). This app didn’t do what I wanted at the time so I discarded it. However, I definitely remember it having something to do with SSH and with an Agent. So, I threw “ssh-agent OS X” into google and soon found the app again. The App in question is SSH Agent and appears to be the perfect solution to my problem. Oh, and it’s released under a BSD-style license so it’s free too 🙂
SSH Agent does two things, it provides a simple GUI to add identities (read private keys) to ssh-agent, and it provides a simple GUI for managing your identities (read key-pairs). This is enough to make it trivially easy to set up secure password-less authentication to servers over SSH.
Some Important Background Info
Before I go on to describe how you can use SSH Agent to do this I think I need to give you in on some background information. SSH can authenticate users based on public/private key pairs. For this to work you need to have your private key installed in the .ssh folder in your home directory (~/.ssh/) and you need your public key added to the file authorized_keys2 in the .ssh folder in your home folder on the remote server (~/.ssh/authorized_keys2).
The important thing to note here is that ANYONE who has your private key can log in without a password as if they were you. This is why it is necessary to encrypt the private key with a pass-phrase. However, this means that you need to type that pass-phrase each time you load the key. The important thing to remember is that you need this pass-phrase each time you LOAD the key, not each time you USE it. In the normal run of events there is no distinction, the key gets loaded each time you try to SSH somewhere, hence you need your pass-phrase each time. So, you’ve just swapped one password for another. This is why the temptation to keep the private key unencrypted is very strong. However, this is where ssh-agent comes in. It’s a service that is part of the SSH suite and what it does is allow you to load a key into memory once and use it repeatedly. Hence, with ssh-agent we can connect to as many servers as we want as often as we want while only having to load the key once. Hence, with ssh-agent you only have to enter your pass-phrase once.
Using SSH Agent to Log into Servers with a Password
OK, so now lets look at how you can use the SSH Agent GUI to get the desired results. The first thing to note is that SSH Agent gives you GUI access to all key pairs (identities) in your ~/.ssh/ folder. Any key pairs (identities) you create using the SSH Agent GUI will be saved to that folder. You may notice that your .ssh directory does not show up in the Finder. However, you can browse this folder in the Finder by going to Go -> Go To Folder ... and then entering the location ~/.ssh/. I also need to note that each “Identity” in SSH Agent maps to two files in this folder, one is the private key, the other, the public key. If, for example, you created an identity and called it “test” two files would be created test and test.pub where test would be the private key and test.pub the matching public key. NEVER copy a file from this folder to a server if it does not end in .pub.
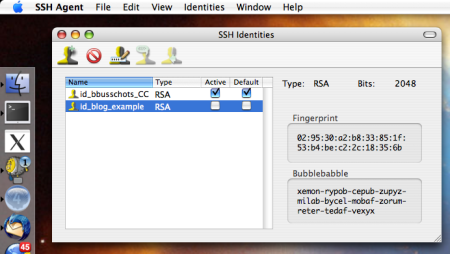
For this example I’m going to create a new identity called id_blog_example. Please note that I have not used this identity ANYWHERE. So, to get started go to Identities -> New Identity and give it a name. The default settings of RSA and 2048 bits should be fine so you can leave those as they are. REMEMBER TO SET A PASS-PHRASE. When you do this the new identity should show up in the SSH Agent GUI and the two relevant key files should be in your ~/.ssh/ folder. You should now see something like the screen shot below:
If this is the first time you’ve used SSH Agent you need to log out and log back in now before SSH Agent will work properly. I’m not really sure why but you do have to do this.
You can now see that your identity shows up in the list. To add the identity to the running ssh-agent (and hence allow you to use the key without entering your pass-phrase each time) you just click on the “Active” check-box next to it. You will be asked for the pass-phrase when you do this. Until you log out or un-check that check-box you can use that key without re-entering the pass-phrase. To log in to a server without entering a password you must have the public key for an activated identity in your authorized_keys2 file on the server. You can get the file to the server any way you like but the simplest way is to copy it up with your favourite (S)FTP client. Once it’s on the server you need to append it to the right file with the following command (this assumes your key is in the file id_blog_example.pub, you need to change the name to match what ever you called your identity):
cat id_blog_example.pub >> ~/.ssh/authorized_keys2
Basically that’s really it. However, I do want to mention a few nice touches. Firstly, you can set identities to be “default” identities and then have them automatically activate when the program launches. You can also quickly activate all your default identities from the contextual menu on SSH Agent’s Dock icon. You can also use the contextual menu on the Dock icon to deactivate all identities. Finally, the Dock icon shows the number of active identities (which is actually quite handy).
my god, OS X is catching up with the rest of the world. 😉
Well, welcome to the joys ssh-agent.
Well, OS X has always had ssh-agent for those brave enough to interact with it straight from the command-line. Now I get to play with it in a point-and-click sorta way. Loving it though, making my life much easier.
Just one question,
So yo didn’t used Jellyfissh at all? is there a way I can do it only with Jellyfissh?
SSH Agent is compatible with Snow Leopard?
Hi LF,
Sorry for the slow reply – not been having a good time of things and got very behind on correspondence.
Anyhow, I use Jellyfissh all the time, just not to manage passwords, because it doesn’t do that.
On SnowLeopard there is no need to use SSH Agent, it’s turned on by itself within the OS. Once you try to use a key with a password you’ll get a popup to enter the password, and there is an option to store the password in the OS X keychain. Once you do this you can use an SSH key with a password to log in to your servers without having to enter a password, and do so securely.
Hope that makes sense,
Bart.
Any updates planned for Sierra (MacOS 10.12) compatibility?
Hi Robert,
Given that OS X/macOS has included the Unix/Linux tool ssh-agent for many versions now, this app is totally obsolete. I would be shocked if the developers choose to update it now.
B.