The Author – Bart Busschots
Creative Commons
Unless otherwise stated, the content on this site is licensed under Creative Commons Attribution, Noncommercial, No Derivative Works 3.0 License


Jun
8
Photographing Satellites
Filed Under Science & Astronomy, Photography on June 8, 2013 at 1:52 pm
 Ireland is actually quite far north, so our summer nights never get fully dark. You watch the sun set, but the glow on the horizon doesn’t go away, it slowly moves from the west through the north to the east where the sun rises again. This takes away a lot of astronomical opportunities, but, when one door closes, another opens. Because the sun never gets far below the horizon during the summer in higher northern latitudes, the part of space where satellites orbit remains in sunlight the whole night long, which means summer is satellite observing time! (The same is true in the southern hemisphere for far southern latitudes during their summer.)
There are lots of ‘ordinary’ satellites which can be seen pass over each night – they look like stars that move slowly but purposefully across the sky – taking a few minutes to cross from one side of the sky to the other. These can be fun to watch, and you can photograph them with a bit of effort, but, the stars of the show are the International Space Station (ISS), which blazes across the sky shining brighter than any star, and the network of Iridium communication satellites which ‘flare’ regularly. Any satellite can ‘flare’, when the sun glints off a solar panel or communication dish, but those flares are not predictable or dependable. Iridium flares are different, because the Iridium Satellites have massive dishes pointing earthwards at all times, and as they pass over-head, the dish will come into alignment with the sun, and what starts off looking like a regular dim satellite will suddenly brighten for a few seconds and then dim again. The flare is effectively a cone that sweeps the earth, if you are in the very middle of the cone, the flare will be spectacularly bright, down to magnitude -8. For context, the magnitude scale is inverse, so the lower the number the brighter the object. The brightest stars are about magnitude 0, the brightest planets about magnitude -4, and the Moon about magnitude -11, so -8 is getting close to the brightness of the Moon!
What do you need?
To have a change of capturing either the ISS or a flare, you need a camera that can be manually focused, and expose for at least 30 seconds, and a tripod. Ideally you would like the camera to have a bulb mode allowing any length of exposure, and some kind of remote shutter release, but these are optional.
Any SLR or DSLR should be capable of meeting these requirements, as should a micro-four-thirds camera, and possibly even some high-end point-and-shoots, though their small sensor size is a serious disadvantage.
Preparation
The most important thing though is to be prepared. There is of course a non-zero chance that you’ll just get lucky, but you can’t count on it. You need to know exactly where in the sky something is going to happen, and when, if you want to ensure you capture the event, and get a pleasing composition.
Firstly, you need to choose an observing location that will allow pleasing compositions for as much of the sky as possible. A park with big lawns allowing trees to be used as part of the composition in each direction can work well, or, some kind of building or monument that you can move around, so that you can place it into a composition in any direction is also ideal. If you can’t get one site that will work in all directions, you’ll have to pick a direction and only try to capture the sub-set of events that happen in that part of the sky. Remember, although regular satellites can appear in any direction, Iridium flares and ISS passes will generally pass from east to west in the direction towards the equator, so in the northern hemisphere the three most productive directions are the west, south, and east, and in the southern hemisphere, the east, north, and west.
Once you’ve chosen one or more locations to try shoot from, you’ll need to get their coordinates, you can do this with a smartphone app (e.g. the compass app that’s pre-installed on every iPhone), or using a mapping service like Google Earth. You want either degrees in decimal form, or degrees, minutes and seconds. You really do need to be as accurate as you can – even just two miles off can make enough of a difference to ruin your composition, and if you’re even further off, you simply won’t see the predicted satellites at all!
I found this out the hard way. I had predictions for Maynooth, but on a whim I set out to try a new location two miles away, armed with the Maynooth predictions. I composed the shot, and waited. The Iridium flare showed up right on time, but NOT where I was expecting it in the sky, and instead of being in the upper-right quadrant to balance the composition nicely, the flare ‘crashed’ into the tower I was using to frame the scene!
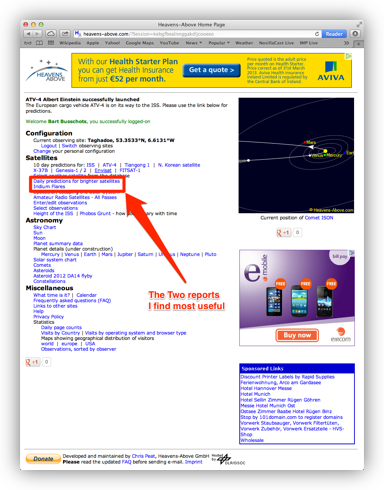
So, you’ve chosen your locations, you’ve found their coordinates, where can you get these predictions I keep mentioning? There are smartphone apps available, but nothing I have found yet compares to the fabulous free (but ad supported) website www.heavens-above.com. You can use Heavens Above as a guest, but you’ll have to enter your coordinates each and every time, so I strongly recommend you set up a free account, and add your list of sites (be sure to get the timezone right). Once you’ve added all your sites, you’ll be able to quickly and easily switch between them.
Heavens Above is not a pretty site, it’s very plain and very basic, but under its plain exterior lurks some serious power! The two reports I find most useful are the Daily Predictions for Brighter Satellites (set to a limiting magnitude of 3.0), and Iridium Flares.
You might also notice that there is a real-time clock in the upper right of the screen, just below the ad – this clock is present on every page, and it shows the time in the timezone that the predictions are shown in. If you’ve misconfigured your timezone, then the time on this clock will not match your local time, so you’ll know you need to go fix that.
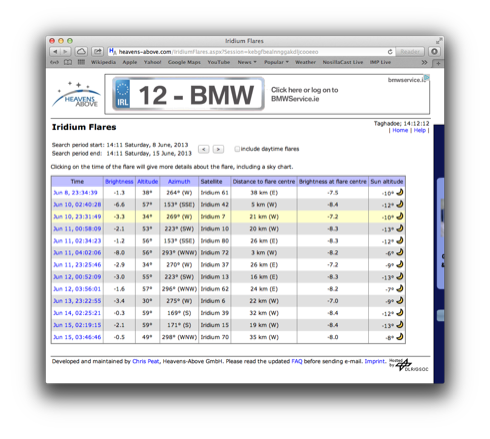
You’ll notice that when you hover the mouse over a row in the report, it is highlighted, and the cursor changes to a hand, this tells you the row is clickable, and when you click it, you get to the real reason that Heavens Above beats any app I’ve ever used, it will give you a map of the pass showing the exact path the satellite will take, with time-markings every minutes along the path. This will let you see exactly where and when the satellite will be, and it will allow you to set up perfect compositions. On iridium flare maps it will show you the point the satellite will flare with a little star icon.
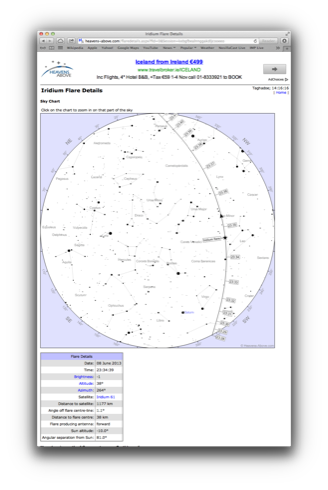
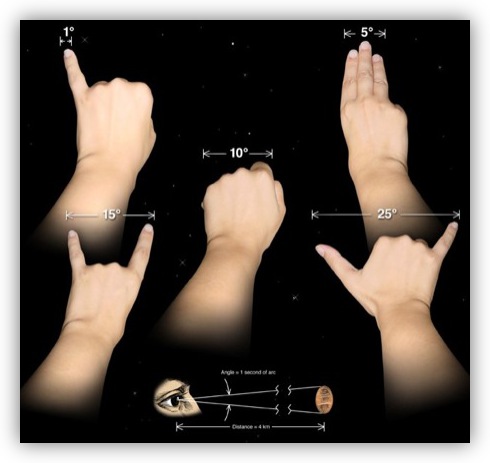
It is or course easiest to interpret these fantastic maps if you have at least a basic knowledge of the night sky and can recognise the constellations, but even if you don’t know the big dipper from the great bear (trick Q), don’t panic, the map is still useful. Around the edge you’ll find a scale showing the heading (or the Azimuth in Astronomical lingo) for that part of the sky, if you read off the heading you can use a compass (real or an app) to find the direction to look in. The height above the horizon is shown in the metadata both below the map, and in the list view (as the Altitude). That height will be in degrees, where 0 degrees is the horizon, and 90 degrees the point directly over head. You can use your hand held out at arms length to estimate altitudes using the guide shown below:
Taking the Photo
Once you know when and where the satellite you want to photograph will be appearing, the next question is how do you set up your camera? Firstly, there is a lot of trial and error involved in the setup process, so you need to be in position well in advance of the event – I like to be on-site 20 minutes in advance.
Before you leave the lit comfort of your house you should pre-configure your camera. My check-list before leaving the house is as follows:
- Widest lens attached (the wider the field of view the better)
- Image Quality set to RAW (if your camera allows)
- Camera in full manual mode (or as close to it as your camera allows)
- White balance set to daylight (5000k)
- ISO set to the highest noise-free value (ISO 400 on my Nikon D5100)
- Aperture set wide open
- Exposure set to 15 seconds (this is perfect for testing composition and focusing, will be set longer for the real exposures)
When I arrive at the site I pick my location, set up my tripod, put the camera in remote shutter release mode, and then start the often tedious but vitally important process of focusing. My technique is to start by putting the camera in single point auto-focus mode, and then trying to get it to automatically focus on either a point of light on the distant horizon, or a bright star or planet, and then flipping the camera back to manual focus for fine-tuning. The process of fine-tuning is quite time-consuming – I shoot a 15 sec exposure, zoom to 100% on a star, note the sharpness, nudge the focus a tiny amount in one direction, shoot, zoom in, see if it got better or worse, adjust, shoot, zoom, adjust, shoot, zoom … until I get the focus as sharp as I can. You’ll soon learn to recognise what perfect focus looks like at 100% with your equipment, so this will get easier with practice. The things is, because each test takes 15 seconds, you could easily need 5 minutes to get focused! Once you have focus, be damned careful not to accidentally to knock against the focusing ring on the lens!
The next step is to fine-tune the composition, again, try get it right, shoot a 15 second test shot, and then check that the right part of the sky is in the right position within your composition. I often use a marker on the horizon to help me figure out the correct direction to where the flare will be, because it can be hard to recognise constellations in the tiny screen on the back of the camera. I also use markers to estimate the correct height – say a little to the left of the tree and twice it’s height above. I find it very helpful to have either a tripod with a bubble level, or to use a little bubble level that attaches to the flash shoe to make sure my shot is level. Fine-tuning the composition will also take a few minutes, because again, each test shot takes 15 seconds.
With focus achieved and the composition fine-tuned, it’s time to fine-tune the exposure settings. We can see the satellites because the sun is not far below the horizon, so, the sky will not be fully dark, and it can easily be over-exposed to the point that it drowns out all the stars. How long of an exposure you need will be determined by the satellite pass you are trying to capture. Your average Iridium flare only takes 30 seconds or so, while an ISS pass may take 2 to 3 minutes to completely traverse your field of view. You can read the time taken to pass your field of view from the great Heavens Above maps, so my approach is to do a test exposure with my default settings for 30 seconds more than I think I’ll need, and then see if I can still see stars, if I can, then I’m ready, if not, it’s time to do one of the most counterintuitive things of all, to start darkening your exposure! I start by reducing the ISO, the less ISO the less noise, so cutting down your ISO will improve image quality (note – NEVER go below your camera’s native ISO, that makes even more noise than shooting above the native ISO, check your manual to find your native ISO). With the ISO reduced, I then do another test shot, if that is not good enough, I start increasing the aperture, three clicks (i.e. one stop) at a time. Note that each test here could be as long as 3 minutes, so this could easily take 10 minutes!
Hopefully you can get your focus, composition, and exposure tweaked with a few minutes to spare before your target satellite appears. You need to do your best to mentally project your field of view onto the sky, so you know exactly when to fire. With the ISS you’ll see it coming with lots of time to spare, but you’ll only see an Iridium flare with the naked eye just a few seconds before it flares, so you need to keep a good eye on the time and the sky for those! I like to use a a stopwatch (app) to time how long my exposure has been going – if the satellite travels slower than expected I’ll end the exposure when it gets to the longest time I’ve tested, regardless of whether the satellite has made it as far through the frame as I would have liked.
Post Processing
Hopefully you’ve now gotten your shot, and it’s time for post-processing. I generally don’t have to do much in the way of post on my satellite shots, but I do usually add a curves adjustment to darken the sky and brighten the stars, and if there is a lot of light-pollution I use the colour brick in Aperture to selectively darken only the specific colour of the light pollution. You simply drop an eye-dropper on the light pollution, and then dial the luminance slider down all the way, or as far as looks good.
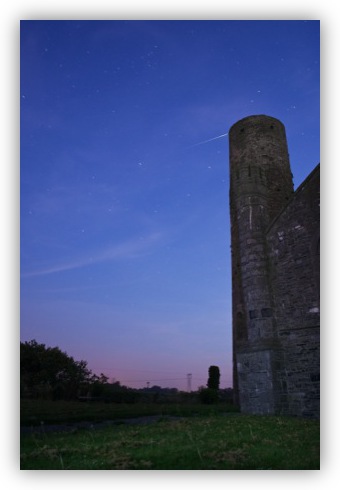
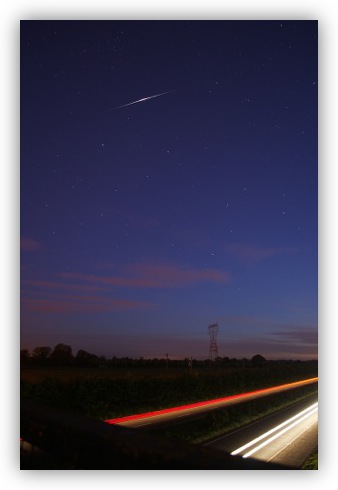
Here is a sample Iridium Flare shot, with just the basic post-processing described above:
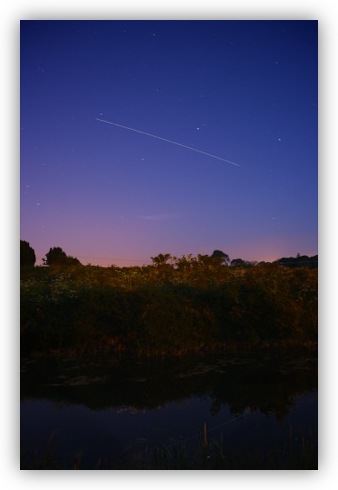
And here is an sample ISS pass with just basic post-processing:
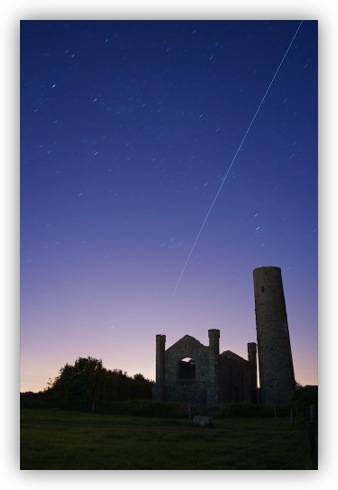
Sometimes, if the foreground is worth the effort, I will also tone-map the shot to bring out more detail in the obviously very underexposed foreground, and then use layer masks in Pixelmator to blend just the ground-part of the tonemapped image into the un-tonemapped image. It might also be necessary to alter the white-balance of just the ground part of the image during this process. Below is an example of an ISS shot where I used this technique to bring out some detail in the ruined church and round tower at Taghadoe.
Remember – this is a trial and error sort of thing – don’t get discouraged if things don’t go too well on your first try!